LabQuest Stream User Manual
Order Code: LQ-STREAM
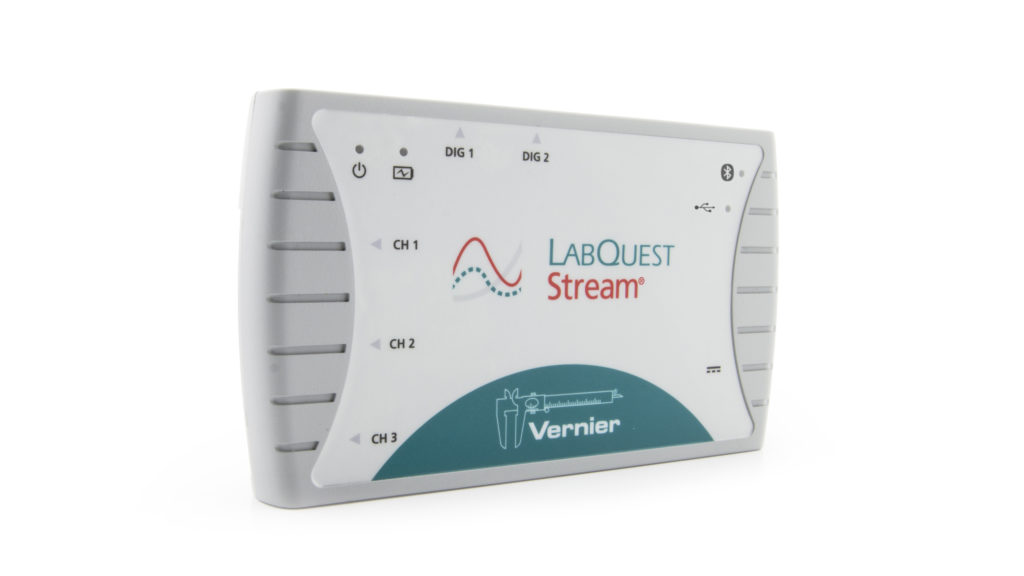
LabQuest Stream® is a multi-channel, data-collection interface that can be used to collect data from Vernier sensors on various platforms, such as iOS and Android™ devices, Windows® and macOS® computers, and Chromebook™ notebooks. LabQuest Stream supports both wired (USB) and Bluetooth® wireless technology connections. The type of connection you can use depends on the data-collection platform.
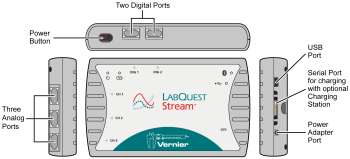
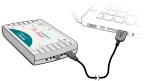
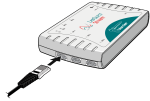
The LabQuest Stream interface contains three analog ports (CH 1–CH 3), two digital ports (DIG 1 and DIG 2), a mini-USB connection, a power adapter port, and a serial power port (for use with the optional Charging Station).
Note: Vernier products are designed for educational use. Our products are not designed, nor are they recommended, for any industrial, medical, or commercial process such as life support, patient diagnosis, control of a manufacturing process, or industrial testing of any kind.
What's Included
- LabQuest Stream interface
- Rechargeable battery (in unit)
- Power adapter
- Mini USB Cable
Before Using the Interface
- Remove the protective pull tab, which protects the battery, from the back of the unit.
- Connect the power adapter.
- Charge for at least 8 hours.
Compatible Platforms, Software, and Sensors
For All Supported Sensors For All Supported Sensors For All Supported SensorsComputers and Graphical Analysis (76 sensors)
Supported Sensors
Compatibility Notes
Computers and Logger Pro (81 sensors)
Supported Sensors
Compatibility Notes
Computers and Logger Lite (69 sensors)
Supported Sensors
Compatibility Notes
Chromebook and Graphical Analysis (76 sensors)
Supported Sensors
Compatibility Notes
iOS and Graphical Analysis (76 sensors)
Supported Sensors
Compatibility Notes
iOS and Graphical Analysis GW (63 sensors)
Supported Sensors
Compatibility Notes
Android and Graphical Analysis (76 sensors)
Supported Sensors
Compatibility Notes
Android and Graphical Analysis GW (50 sensors)
Supported Sensors
Compatibility Notes
NI LabVIEW (77 sensors)
Supported Sensors
Compatibility Notes
For more information about compatible devices and software, see www.vernier.com/lq-stream/#platforms
Getting Started
Follow these general procedures when using LabQuest Stream. For instructions on getting started with a specific sensor, www.vernier.com/start/lq-stream
Wired Data Collection (via USB)
Computers and Chromebooks
- Install software appropriate for the data-collection platform you are using.
- Turn on LabQuest Stream and connect a supported sensor. The Power LED,
 , will glow green and the Bluetooth LED,
  , will flash blue.
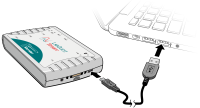
 - Connect the small end of the USB cable to the USB port on LabQuest Stream.
- Connect the other end of the cable to a USB port on your computer or Chromebook. The USB LED,
 will glow orange.
 - Start the software. The USB LED will change to green and the Bluetooth LED will be off. You are now ready to continue your experiment.
Wireless Data Collection (via Bluetooth Wireless Technology)
iOS and Android devices
- Install software appropriate for the data-collection platform you are using.
- Turn on LabQuest Stream and connect a supported sensor. The Power LED, , will glow green and the Bluetooth LED,
 , will flash blue.
 - Launch Graphical Analysis 4 and tap Sensor Data Collection from the New Experiment list.
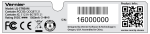
- Tap Connect a LabQuest Stream, then select your device from the list of discovered devices. The LabQuest Stream serial number, shown on the back label, is the device name.
- When connected, the Bluetooth LED will glow blue (no longer flashing). You are now ready to continue your experiment.
Computers Running Logger Pro
- Install Logger Pro software on your computer.
- Turn on LabQuest Stream and connect a supported sensor. The Power LED, , will glow green and the Bluetooth LED, , will flash blue.
- Pair LabQuest Stream with your computer. The LabQuest Stream serial number, shown on the back label, is the device name.
macOS: Open System Settings, navigate to the Bluetooth settings, and pair with LabQuest Stream.
Windows: Open the Settings dialog for Windows, navigate to the Bluetooth settings, and pair with LabQuest Stream.
- Open Logger Pro, then from the Experiment menu, choose Connect Interface > Wireless LabQuest Stream > Scan for Wireless LabQuest Stream.
- Select your device from the list of discovered devices. When connected, the Bluetooth LED will glow blue (no longer flashing). You are now ready to continue your experiment.
Computers and Chromebooks Running Graphical Analysis™ 4
Wireless data collection with computers and Chromebooks running Graphical Analysis 4 is not yet available. Future software updates to Graphical Analysis 4 will support wireless data collection on these platforms.
Providing Power
Power for LabQuest Stream is supplied by the rechargeable lithium-ion battery included with the unit. LabQuest Stream can also be powered without the battery by the following methods:
- Using the AC power adapter
- Using the USB port of a computer or Chromebook
- Using a USB power outlet or power adapter
Note: There may be configurations that limit how much power is available from the USB port on a computer or Chromebook. Such configurations may include having other devices that require USB power connected to the computer or Chromebook at the same time. In these situations, we recommend you use the battery or AC power adapter to provide power to LabQuest Stream.
Charging the LabQuest Stream battery
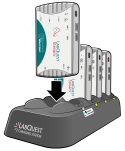
Use the supplied AC adapter, USB cable, or optional Charging Station (order code LQ2-CRG) to charge the battery. The battery cannot be overcharged and can be safely recharged after a partial discharge.

The Charging LED,  , flashes red when the battery level is low. The LED is orange when the battery is charging and green when the battery is fully charged.
For safety reasons, the charging circuitry on LabQuest Stream will turn off after about 10 hours, even if the battery is not fully charged. When this happens, the charging LED will glow red. To continue charging the battery, disconnect then immediately reconnect the power source.
The following are approximate time durations required to fully charge a dead battery:
- AC adapter: ~8 hours
- Charging Station: ~8 hours
- USB port: ~10 hours
Note: LabQuest Stream will not charge while connected via USB to a computer or Chromebook that is in a suspended state.
Turning the unit on
Press the power button located on the top of LabQuest Stream to turn the unit on. The Power LED,  , will be green when the unit is on. Note that the unit will automatically turn on when it is connected to the USB port on a computer or Chromebook.
Turning the unit off
Press and hold the power button for 3 seconds to turn the unit off. The Power LED, , will be off when the unit is off. LabQuest Stream will automatically turn off after 10 minutes when not connected to a Bluetooth or USB host.
Connecting Sensors
LabQuest Stream supports two types of sensors—analog and digital. Connect sensors to the appropriate port on LabQuest Stream.
Analog Sensors
Analog sensor examples include temperature probes, pH sensors, and force sensors. Up to three analog sensors can be connected to LabQuest Stream. The three ports for analog sensors (CH 1–CH 3) are located on the left side of the unit. These ports accept British Telecom-style plugs with a right-hand connector.
Digital Sensors
Digital sensor examples include motion detectors, photogates, and rotary motion sensors. Up to two digital sensors can be connected to LabQuest Stream. The two ports for digital sensors (DIG 1 and DIG 2) are located on the top side of the unit. These ports accept British Telecom-style plugs with a left-hand connector.

Note: Most sensors will automatically identify allowing the software to set up a default experiment. If you are using a sensor that does not auto-ID, you will need to manually identify the sensor in the software (as supported).
Videos
LED Behavior
Power LED
| State | Meaning |
|---|---|
|
Off |
Unit is off |
|
● |
Unit is on |
 Charging LED
| State | Meaning |
|---|---|
|
Off |
Sufficient battery charge for normal use or unit is not charging |
|
● |
Unit is charging |
|
● |
Charging is complete; battery is fully charged |
|
● (Flashing) |
Battery level is low |
|
● (Solid) |
Charging circuit timeout (~10 hr), battery fault, or no battery found |
 Bluetooth LED
| State | Meaning |
|---|---|
|
Off |
Blueooth connection not available |
|
● (Flashing) |
Available for Bluetooth connection |
|
● (Solid) |
Connected to host via Bluetooth; ready for data collection |
|
● |
Bluetooth system failed |
 USB LED
| State | Meaning |
|---|---|
|
Off |
Not connected to USB host or no power from USB host |
|
● |
USB connected; not communicating with software |
|
● |
Connected to host via USB; ready for data collection |
|
● |
USB host failed to enumerate or USB port underpowered |
Specifications
|
Resolution |
12 bit |
|
Battery |
High-capacity, lithium-ion rechargeable battery |
|
Battery life |
~24 hours |
|
Battery life |
~500 full charge cycles |
|
USB specification |
2.0 full speed |
|
Wireless specification |
Bluetooth® v4.1 |
|
Maximum wireless range |
30 m (unobstructed) |
|
Maximum sample rate (USB) |
|
|
Maximum sample rate (wireless) |
10,000 samples per second |
|
Minimum sample rate |
0.00125 samples per second |
|
Dimensions |
8.8 cm × 15.4 cm × 2.5 cm |
|
Weight |
220 g |
|
Safe-use temperatures (operating) |
0°C to 45°C (32°F to 113°F) |
|
Safe-use temperatures (storage) |
–30°C to 60°C (–22°F to 140°F) |
Care and Maintenance
Battery
LabQuest Stream uses a high-quality lithium-ion battery. This is the same chemistry used in premium laptop and cell phone batteries, and you can expect similar performance.
Use the supplied AC adapter, USB cable, or optional Charging Station (order code LQ2-CRG) to charge the battery. The battery takes 8 to 10 hours to fully charge. The battery cannot be overcharged, and it can be safely recharged after a partial discharge. It is safe to leave the battery charging indefinitely, and there is no need to fully discharge the battery before needing to charge it.
The discharge time for a fully charged battery will depend on the sensors used. In most cases, you can obtain 24 or more hours of use before recharging. We recommend charging LabQuest Stream overnight to start the next day with a full charge.
The long-term life of the battery will vary, but you can expect about 500 full charge/discharge cycles before the battery will need to be replaced. In this count, a charge from half charged to a full charge counts as half of a charge cycle. In typical school use, the battery can last three years or more. Exposure to temperatures over 35°C (95°F) will significantly reduce battery life.
As a battery reaches the end of its functional life, the discharge time for a fully charged battery will become shorter. Eventually the discharge time will be too short for your application, and you will want to replace the battery. Rechargeable batteries are considered a consumable, and as such, are warranted for one year. A replacement battery can be ordered from our website (order code LQ2‑BAT). Recycling information is available at www.call2recycle.org
Use only the supplied battery for this device. Do not puncture or expose the battery to excessive heat or flame.
Temperature considerations
Safe operating temperatures for LabQuest Stream are from 0°C to 45°C (32°F to 113°F). Storage temperatures are –30°C to 60°C (–22°F to 140°F). Exposures to low or high extreme temperatures will temporarily reduce the discharge time for a fully charged battery. Exposure to temperatures over 35°C (95°F) will significantly reduce long-term battery life.
Avoid rapid temperature changes as condensation may form inside the device. Do not leave it in a car, as temperatures can exceed the maximum storage range.
Water Resistance
LabQuest Stream is not water resistant and should never be immersed in water. If water gets in the device, immediately remove the USB cable and turn the unit off by holding down the power button for at least 3 seconds. Disconnect all sensors and cables and remove the battery. Allow the unit to dry thoroughly before restarting it. Do not attempt to dry it using an external heat source.
Storage
Do not store LabQuest Stream in a chemical closet or in areas of concentrated chemical gases.
Safe storage temperatures are –30°C to 60°C (–22°F to 140°F). Exposing the battery to temperatures above 35°C (95°F) will reduce its lifespan. If possible, store LabQuest Stream in an area that is not exposed to temperature extremes.
To store LabQuest Stream for extended periods of time, turn the unit off and remove the battery. Over several months, the battery will discharge but will not be damaged. After such storage, charge LabQuest Stream (a full charge can take 10 hours), and the unit will be ready for use.
How the Interface Works
The LabQuest Stream interface is more than just a physical adapter between two different connectors. It is hardware that allows Vernier sensors to interact with computers, Chromebooks, and mobile devices. LabQuest Stream contains dedicated electronics for precise sampling of sensor events. LabQuest Stream timestamps these events so measurements from multiple sensors can be analyzed simultaneously. To allow data to flow smoothly, LabQuest Stream manages the communication link between the sensors and the computing platform.
Troubleshooting
For troubleshooting tips and frequently asked questions regarding LabQuest Stream, see www.vernier.com/til/3656
Repair Information
If you have followed the troubleshooting steps and are still having trouble with your LabQuest Stream, contact Vernier Technical Support at support@vernier.com or call 888-837-6437. Support specialists will work with you to determine if the unit needs to be sent in for repair. At that time, a Return Merchandise Authorization (RMA) number will be issued and instructions will be communicated on how to return the unit for repair.
Accessories/Replacements
| Item | Order Code |
|---|---|
|
LQ2-CRG |
|
|
LQ-LAN |
|
|
LQ2-BAT |
|
|
LQ-PS |
|
|
CB-USB-MINI |
|
|
CB-USB-C-MINI |
Warranty
LabQuest Stream
Vernier warrants this product to be free from defects in materials and workmanship for a period of five years from the date of shipment to the customer.
This warranty does not cover damage to the products caused by abuse or improper use. This warranty covers educational institutions only.
LabQuest Stream Battery
Vernier warrants this product to be free from defects in materials and workmanship for a period of one year from the date of shipment to the customer.
This warranty does not cover damage to the products caused by abuse or improper use. This warranty covers educational institutions only.
Disposal
When disposing of this electronic product, do not treat it as household waste. Its disposal is subject to regulations that vary by country and region. This item should be given to an applicable collection point for the recycling of electrical and electronic equipment. By ensuring that this product is disposed of correctly, you help prevent potential negative consequences on human health or on the environment. The recycling of materials will help to conserve natural resources. For more detailed information about recycling this product, contact your local city office or your disposal service.
Battery recycling information is available at www.call2recycle.org
Do not puncture or expose the battery to excessive heat or flame.
 The symbol, shown here, indicates that this product must not be disposed of in a standard waste container.
Contact Support
Fill out our online support form or call us toll-free at 1-888-837-6437.