This information describes how to set up Go Direct Photogates (GDX-VPG) when using Graphical Analysis or Graphical Analysis Pro.
If you are collecting data with LabQuest App, see this article.
If you are collecting data with a wired Vernier (BTD) photogate, see this article.
Although the output of a photogate is quite simple (blocked or unblocked), timing of a Go Direct Photogate is determined by sensor firmware or the photogate timing mode in the data-collection software. There are different sensor channels and data collection modes for different types of experiments. The channels and mode you use depends on what quantity you want to measure.
Go Direct Photogate Default Setting
The default sensor channel is Object Velocity.
The default data collection mode is Time-based.
Performing a Vernier Experiment?
If you are doing an experiment from one of the Vernier lab books (e.g. Physics with Vernier), instructions for how to set up the Go Direct Photogates with either Graphical Analysis 4 or LabQuest 2 are in the student versions of the experiment.
Writing Your Own Lab?
If you are writing your own lab, you will need to configure the sensor channels and data collection mode depending on what you want to measure. Below is an outline for some common data-collection setups.
Go Direct Photogate Set Up using Graphical Analysis or Graphical Analysis Pro
- For instructions on connecting a Go Direct Photogate, see https://www.vernier.com/start/gdx-vpg
- Follow these instructions for changing the data collection mode.
- Tap Mode to view the Data Collection Settings dialog.
- Choose the appropriate mode from the drop-down menu.
- For Photogate Timing, select the desired measurement and measurement parameters to match your experiment.
- Select DONE.
| Desired Measurement | Sensor Channel(s) | Data Collection Mode and Settings | Details |
| Instantaneous Velocity | Object Velocity | Time Based | The time between the object breaking Gate 1 and Gate 2 is used along with the known (2.0 cm) distance between the gates to determine the magnitude of the object’s velocity.
When the object travels from Gate 1 to Gate 2, the velocity is positive. When the object travels from Gate 2 to Gate 1 the velocity is negative. |
| Average Speed (between two photogates) |
Gate 1 – Gate State (on both photogates) |
Photogate Timing Photogate Measurement: Speed through Gate Use gate separation (Pulse timing) Measure the distance between the gates and enter that as the “Distance between gates”. |
Set up two photogates so that the object will pass through both photogates.
Pay attention to which photogate you connect to first. This photogate will be the triggering gate. Timing will not start until this gate is blocked. Timing begins when the object breaks the beam of the first photogate and ends when it breaks the beam of the second photogate. The average speed of the object is determined by dividing the distance between the photogates by the measured time. Note: The speed calculated during pulse timing is the average speed of the object between the two photogates, not the final speed at the second photogate. |
| Acceleration | Object Acceleration (multiple flags) | Time Based | For this measurement, your object must have at least two “flags” that will break the beams of the Go Direct Photogate.
The velocity of each flag is measured as described for instantaneous velocity (see above). These two velocity measurements and their associated times are used to calculate the object’s acceleration (change in velocity/change in time) |
| Distance, Speed, and Acceleration | Gate 1 – Gate State (or any Gate State channel) If you are using the Ultra Pulley Attachment, you must use Gate 2 – Gate State |
Photogate Timing Measurement: Linear Motion Select the appropriate object: Vernier Picket Fence, Cart Picket Fence, Ultra Pulley (in groove or outside edge), or Bar Tape. If using some other device, select User defined and enter the appropriate spacing information. (Use the dark band separation as the spacing.) |
Attach a picket fence to the object and set up a photogate so that the object will pass through it. As the picket fence moves through the photogate each blocking event is given a distance, based on the known spacing of the picket fence. From that distance data, velocity and acceleration are calculated. |
| Period of a Pendulum | Gate 1 – Gate State (or any Gate State channel) |
Photogate Timing Measurement: Timer or Period Time measurements: Pendulum Period |
Place the photogate at the bottom of the pendulum swing. Pendulum timing measures the time from when the bob first passes until the third pass, i.e. when the bob swings back through the photogate in the original direction. |
| Projectile Motion | Varies | Varies | Photogate set up for projectile motion is discussed here (How do I set up Go Direct Photogate for data collection in a projectile motion experiment?) |
Further Information
-
- For additional data collection setup ideas, see the Go Direct Photogate Specifications and User Guide
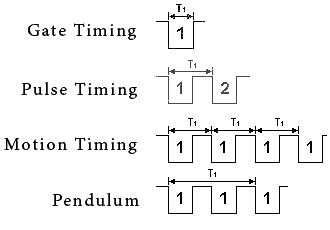
- The following diagram summarizes the various timing modes and how they differ in timing measurements. The diagram shows a horizontal line representing time. The vertical position represents the gate state. When the line is high, the gate is unblocked. When the line is low, the gate is blocked. Time T1 is the time that software records as the gate being blocked. In the case of Gate Timing, the diagram shows that the gate is initially unblocked, then blocked, and then unblocked again and the interface records only the time it is blocked.
- A comprehensive tutorial can be found at
http://www2.vernier.com/manuals/LabQuest_Introduction_to_the_Vernier_Photogate.pdf
RELATED TILS
Why does my photogate record a really high velocity at the beginning of a trial with a picket fence?
How can I use a Vernier Photogate to measure g?
Why is my picket fence blue and black instead of clear and black?
How can I use a photogate to count events?