This information pertains to Go Direct Photogates.
Go Direct® Photogate (GDX-VPG)
For information about using Vernier (BTD) Photogates, see
How can I use Vernier Photogates (VPG-BTD) to time the Science Olympiad Scrambler event?
The Science Olympiad Scrambler event suggests using laser photogates to time the scrambler devices. The devices must traverse an 8-meter course. You will need two photogates and two class 2 lasers. Science Olympiad prohibits the use of class 3 or higher lasers. Many commercial laser pointers will work.
Part 1: Using Go Direct Photogates with a laser
You will need:
2 –Go Direct® Photogate (GDX-VPG)
2 –Laser Pointer (LASER)
1 –LabQuest 3 (LABQ3) or a computing device running Graphical Analysis 4
Each photogate will have to be securely mounted at the correct height (see http://vnr.st/xe1d – shown with a BTD photogate to illustrate the idea) and will need its own laser pointer (see http://vnr.st/xff8).
Part 2: Collecting data using two photogates.
1. Connect the Go Direct Photogate sensors to your data collection device. See https://www.vernier.com/start/gdx-vpg
The gate you connect to first needs to be placed at the starting line.
Place the second photogate at the finish line.
2. Use the Laser Gate – Gate State sensor channel on both photogates.
3. Align the laser pointers to create the laser gates.
4. Set the Photogate Timing mode.
Graphical Analysis 4:
a. Click or tap Mode and change the Measurement to Timer or Period – Time between gates.
b. Click or tap DONE.
LabQuest App:
a. Tap the gray “Mode:” box on the right side of the LabQuest screen.
b. Change the Photogate Mode from “Motion” to “Pulse”.
c. Input the correct distance into the “Distance between gates” box.
d. Change the End data collection setting to after 4 events.
e. Tap OK.
5. Change the view to show the data table.
When you are ready to time a run, first tap the Collect button, then signal that the contestant can start their vehicle. Once the vehicle has passed through both photogates, the time of travel will be shown in the data table.
Part 3 – A second option for more accurate timing
You will need:
1 –Go Direct® Photogate (GDX-VPG)
1 –Photogate (VPG-BTD)
1 –Go Direct® Time of Flight Pad Cable (TOF-CB-GDX)
1 -Double-female RJ-12 connector
10 feet of 6-conductor US telephone wire [6P6C wire]
Make sure you purchase 6-wire phone cable; 4-wire phone cable will not work.
1. Connect one end of the telephone wire to the BTD photogate.
You will not use the photogate cable that came with the Vernier (BTD) photogate.
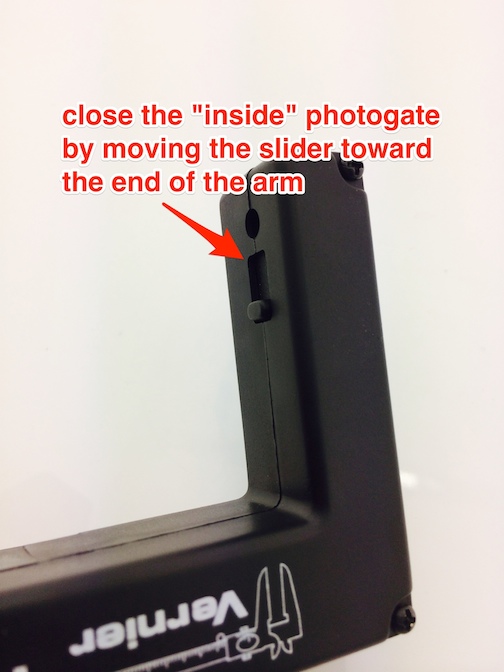
Make sure the shutter for the Vernier (BTD) Photogate is closed to create the laser gate.
2. Connect the double-female connector to the other end of the telephone wire.
3. Connect the Go Direct Time of Flight Pad cable to the Go Direct Photogate.
The ends for the Go Direct Time of Flight Pad cable are different and will only connect one way.
4. Connect the other end of the Go Direct Time of Flight Pad cable to double-female connector.
5. You can place either photogate at the Start or Finish line.
6. Connect the Go Direct Photogate sensor to your data collection device. See https://www.vernier.com/start/gdx-vpg
7. Use default Laser Gate/Remote Gate Timing sensor channel.
For this setup you will collect data using Time-based data collection.
8. Align the laser pointers to create the laser gates.
9. Change the view to show the data table.
When you are ready to time a run, first tap the Collect button, then signal that the contestant can start their vehicle. Once the vehicle has passed through both photogates, the time of travel will be shown in the data table.
See also:
How do I set up a Go Direct Photogate to collect data using LabQuest App?
How do I set up a Go Direct Photogate to collect data using Graphical Analysis or Graphical Analysis Pro?