We were intrigued by an article in the November 2009 issue of The Physics Teacher entitled “Inexpensive Strobe-Like Photographs” by Emil L. Medeiros, O dilon A.P. Tavares and Sergio B. Durate. The article describes a great way to create strobe-like photographs with simple video cameras, or with still digital cameras that have a movie mode. This prompted us to share three ideas with you.

First of all, Vernier is proud to sponsor the AAPT High School Physics Photo Contest. For this contest, students submit photos that illustrate physics concepts and a corresponding description of the physics associated with the photograph. The contest has two categories: “natural” photographs and “contrived” photographs. The photo to the right submitted by Chase Lampe, University High School, Tucson, Arizona was last year’s winner in the Natural category. His teacher was Pamela Tautz.
Participating in this contest is an excellent way for students to explore physics in their everyday lives. We hope that you will encourage your students to enter the contest.
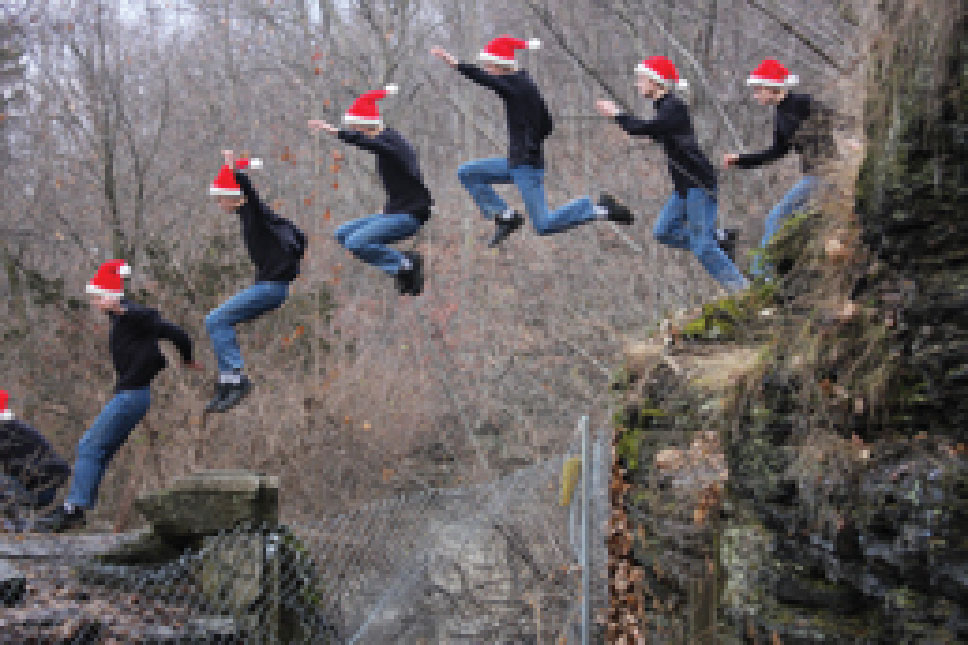
Two years ago, a couple of unique photographs were submitted to this contest. In these photographs, students overlaid multiple images into one photograph. The photos then had a strobe-like effect. The photograph entitled “Human Projectile” was submitted in 2008 by Joey Moro, Ithaca High School, Ithaca, New York. His teacher was Deborah Lynn. This type of photograph was again submitted in the 2009 contest and has resulted in the creation of a new contest category called “Photos with Multiple Images,” which brings us to our second point.
The authors of the article mentioned above describe how to create and analyze strobe-like photographs. They point out that traditional strobe photos are made by repeated exposures of a single frame of film to a bright flash of stroboscopic light. Their approach uses modern technology and digital editing software. They extract frames from a digital movie using video-editing software (AVS Video Converter), and then combine the frames in photo-editing software (Paint Shop Pro). We’d like to mention another option:
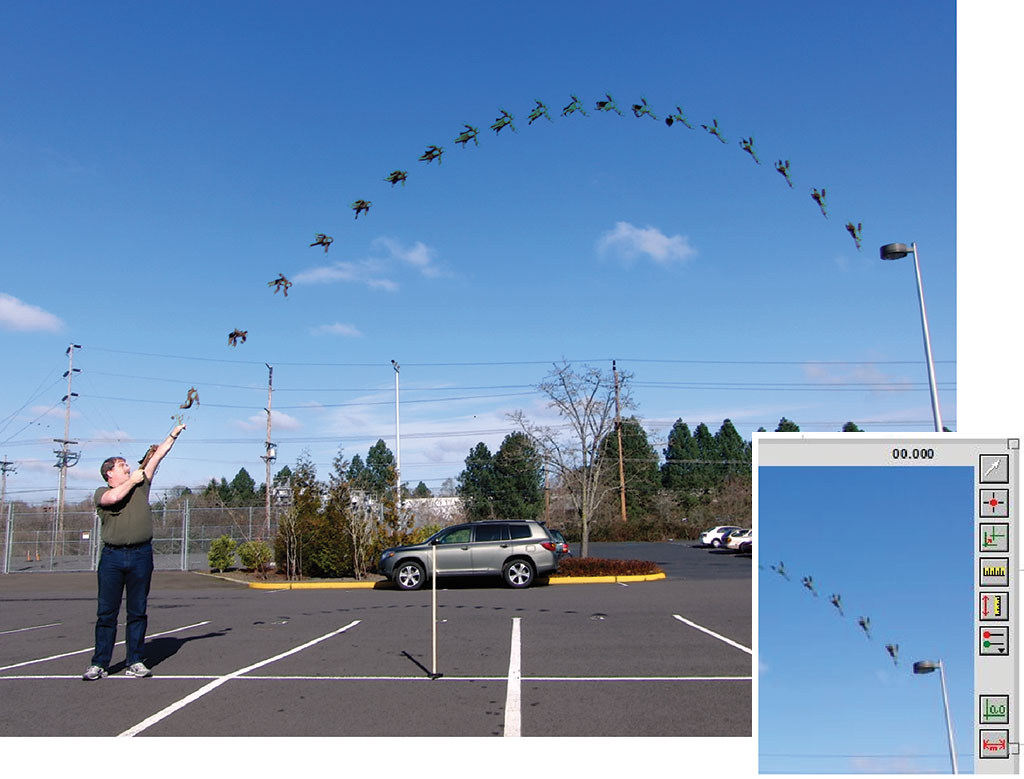
In the Fall 2009 Caliper, we discussed Casio high-speed digital cameras and how you could capture and analyze high-speed movies with them. These cameras are also capable of capturing still digital frames at high-speed bursts of up to 40 fps. After these photos are captured, they can be easily imported into the computer without the need for video-editing software. The photos can then be merged into a single photo using a free, photo-editing program called Paint.net (Windows only). We used a Casio camera and Paint.net to generate this photo of a toy monkey being launched.
Lastly, we’d like to remind you of a Logger Pro feature that is often overlooked. That feature is the ability to collect and analyze data from a still photograph. When you import a picture into Logger Pro, you have the option to import it with “photo analysis.” When you choose that option, the photo analysis tool palette will appear on the right side of the photo. You then use these tools to mark locations on the photograph. If you have an object of known length in the plane of the motion, you can set a scale and apply units of measure to the analysis. We placed a vertical meter stick in the same plane as our projectile. In our Logger Pro file, we were able to create a time column, since we knew that the burst rate of the camera shutter was 15 frames per second. We could then use our curve-fitting tools to investigate the velocity and acceleration of the toy monkey.
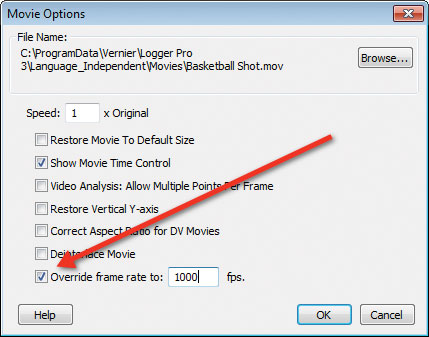
Wait, there’s one more piece of information to share! As mentioned above, in the Fall 2009 Caliper, we talked about processing videos from high-speed cameras. An issue to address was the fact that high-speed movies are recorded with a frame rate of 30 fps, instead of the actual frame rate, e.g. 420 fps. I n the Caliper, we described a way to use calculated columns to generate the real capture rate. Well, we’ve automated that process within Logger Pro, and that new feature is available in version 3.8.2. Now, you simply double-click the movie to bring up the Movie Options dialog box. There, you will find a box labeled “Override frame rate”. Check that box, and enter in the actual capture rate. Logger Pro then uses this information to calculate velocities and accelerations.