This information pertains to LabQuest 2 and LabQuest 3.
The original LabQuest does not support this functionality.
When trying to use the LabQuest Viewer software with a LabQuest 2 or LabQuest 3 connected via USB, a driver will be needed.
- To install the driver, first ensure your computer has internet access.
- Next, check that your LabQuest is set to use the Viewer over USB, and then connect your LabQuest to the computer. For more information, see How do I connect a LabQuest to LabQuest Viewer via USB?
- When LabQuest 2 is connected, Windows will start the “Found New Hardware” wizard, and may ask you if it should connect to Windows Update.
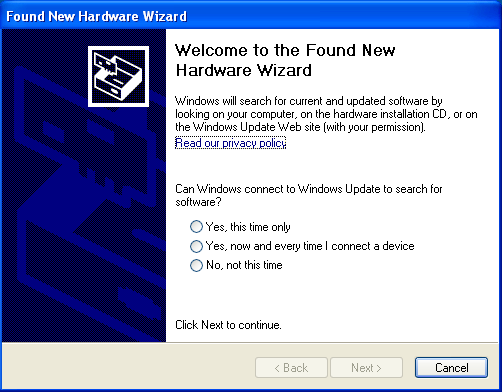
- Select one of the “Yes” options. (If you don’t see the dialog, someone already selected “Yes, now and every time I connect a device” on this computer).
- You will be prompted to install the software automatically or from a specific location. Choose “Install the software automatically (Recommended)”.

- Windows will search for a few minutes and then will install the drivers.
If this doesn’t work, see How do I manually install a driver for LabQuest Viewer software to enable communication with LabQuest 2 or LabQuest 3 via USB?
Note 1: If the driver install takes a particularly long time (including the time it takes you to read this document), the LabQuest may think that the network connection has failed. You may need to reboot your LabQuest to make the connection work again (for LabQuest 2 tap Home ▶System ▶Reboot; for LabQuest 3 tap Settings ▶Reboot). This is a one time issue that will only happen the first time you install the USB network drivers.
Note 2: If you do not see the Found New Hardware Wizard when you connect LabQuest to the computer (or if you saw it once, and now don’t see it again), go into the Device Manager and right click on the “RNDIS/Ethernet Gadget” device (it will show up with a Question Mark icon). Then, choose “Update Driver.” The full steps are similar to handling other drivers: Windows Pre-Logger Pro 3.11 original LabQuest and LabQuest Mini, and pre-3.12 LabPro drivers