5 Key Tools in Vernier Video Analysis—And How to Use Them
Sharing ideas and inspiration for engagement, inclusion, and excellence in STEM
5 Key Tools in Vernier Video Analysis—And How to Use Them
By Vernier Science Education
Vernier Video Analysis® helps students explore motion through real-world video, giving them a hands-on way to connect graphical representations of data with the movement they actually see. Whether you’re just getting started or looking for a refresher, this post walks you through five key tools in the app—along with tips on when and why to use each one.
Before You Start: Tips for Better Video Setup Getting accurate data starts with a solid video setup. This video shares a few best practices to follow before you begin if you or your students are recording videos to analyze.
Getting Started with Vernier Video Analysis Part 1: How to Set Up & Capture Your Own Video
Key Takeaways
Lighting: Record in a well-lit area, using consistent lighting to avoid glare or shadows.
Scale object: Place a scale object, like a meterstick, in the same plane as the motion.
Camera angle: Aim the rear-facing camera perpendicular to the plane of motion.
Frame rate: Capture video in HD at 30 FPS or higher.
Visuals: Choose a high-contrast object and a plain background. Add markers (like stickers) to track complex shapes.
Framing: Keep the entire motion path within the frame for the full video.
1. Manual Tracking vs. Autotracking
Vernier Video Analysis offers two tracking options:
Autotracking automatically marks an object frame by frame
Manual tracking allows the user to place the point in each frame
Use manual tracking to mark motion manually on each frame, especially when more precision is needed.
Manual tracking is the default mode. When you import a video, Add is selected and Track is off. You’ll see a crosshair cursor that lets you mark each point manually. This mode gives you more control and is often better for complex shapes, blurry or shadowy motion, or found videos that may not meet ideal conditions.
Try to mark the same point on the object consistently as you advance through each frame (e.g., the center of the basketball).
Use Autotracking to quickly mark frame-by-frame motion. This tool is most effective in clean, consistent videos that meet recommended setup guidelines.
To use Autotracking, click Add , then Track . You’ll now see a draggable crosshair cursor you can use to target your moving object. Autotracking works best when your video is clean and consistent—think high contrast, simple shapes, good lighting, and no visual clutter. It saves time and works especially well for straightforward motion, like a basketball toss.
Center the object in the crosshairs and adjust the slider so the inner circle is slightly larger than the object. Then click Start Autotracking to begin. To return to manual tracking, deselect Track.
Tip: You can mix methods: Use Autotracking where it works well, then switch to manual mode to fix tricky frames. You can also manually adjust any point after the fact by clicking Edit
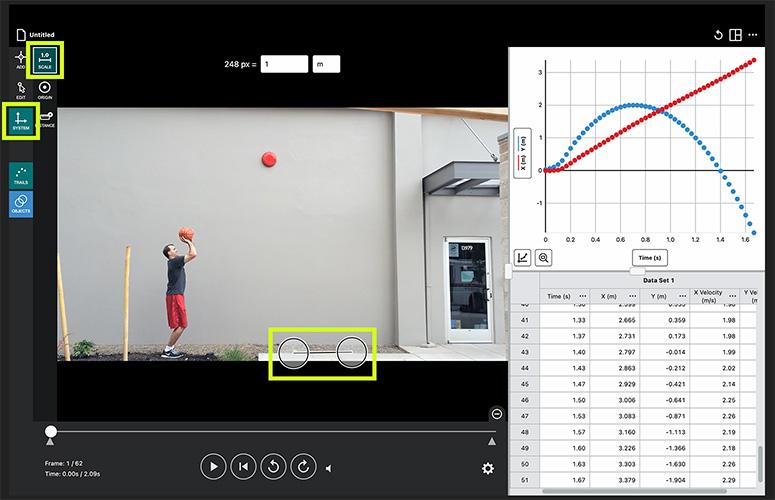
2. Scale Tool: Convert Pixels to Real-World Units
To use the Scale tool, click System , then Scale . Drag the two end points to align with your scale object and enter the known length (and units).
By default, the Vernier Video Analysis app uses pixels as units. Use the Scale tool to convert pixels to real-world units by marking a known distance in the video—like a meterstick placed flat in the same plane of motion. Once you define the scale, all data table values and graphs will automatically update to display the defined unit.
Tip: Always double-check that your scale object lies in the same plane as the motion you’re analyzing. Angled or out-of-plane reference items can distort results.
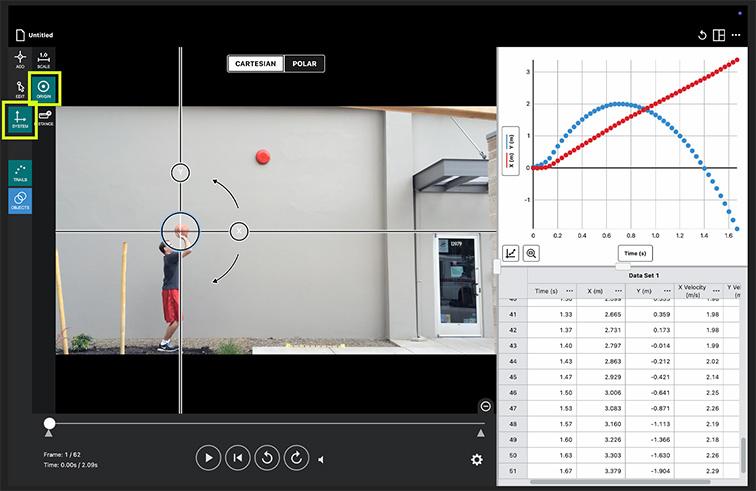
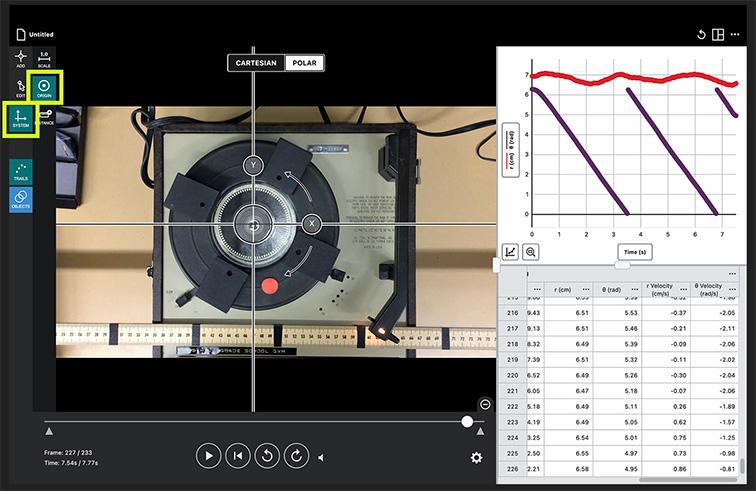
3. Origin Tool: Set Your Custom (0, 0)
To use the Origin tool, click System , then Origin . Drag the on-screen axes to your custom (0,0) origin point.
Setting the origin lets you define where motion begins. This is especially helpful if you want the graph to reflect a specific position or direction—for example, starting time and position at launch or defining upward motion as positive. You can also adjust the angle of the coordinate plane to better align with the video orientation.
When setting a custom origin, you can switch between “Cartesian” and “Polar” coordinates at the top of the screen.
You can also use the Origin tool to switch coordinate systems:
Cartesian (x, y) is standard for linear motion
Polar (r, θ) is useful for rotational or circular systems—like spinning masses or pendulums
Tip: If you’re comparing multiple motions, like projectiles launched from different points, setting a common origin helps streamline data comparison and interpretation.
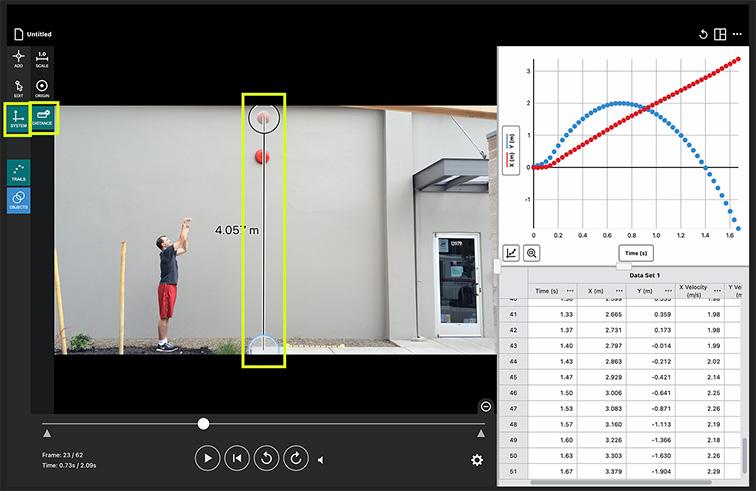
4. Distance Tool: Measure Any Two Points
To use the Distance tool, click System , then Distance . Drag the two end points to the distance you wish to measure using the previously set-up scale system.
The Distance tool is a quick way to measure any two points in a frame. It’s great for estimating total distance traveled, checking spacing between objects, and verifying scale accuracy.
Tip: Use this tool to confirm measurements after tracking—especially in experiments where you expect uniform motion or equal intervals between frames.
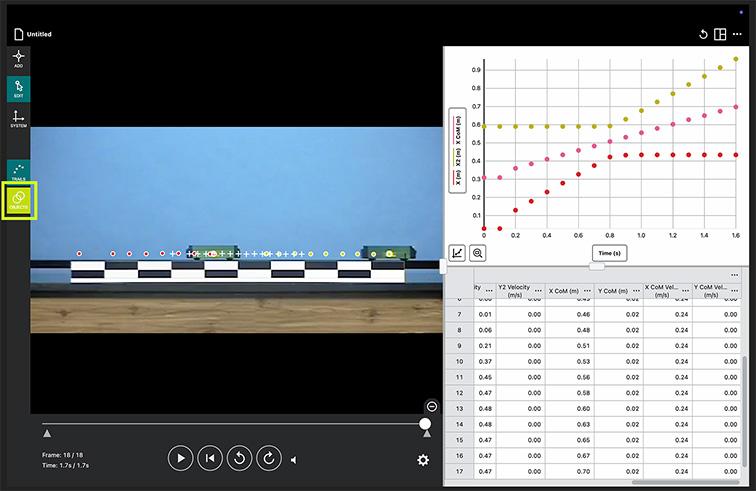
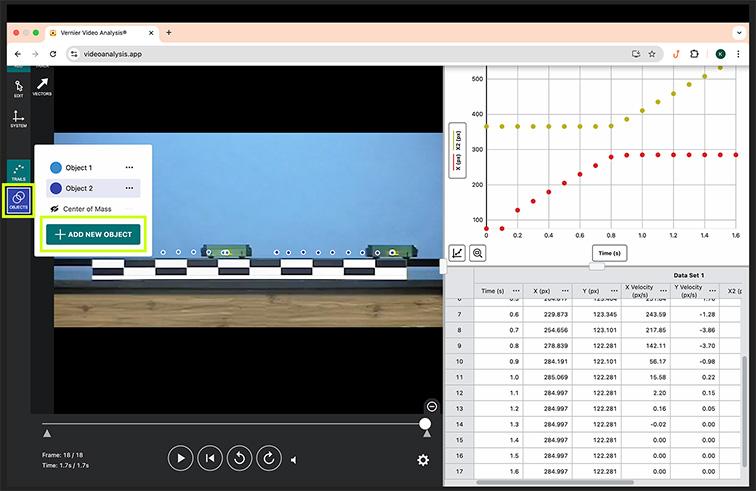
5. Multi-Object Tool: Investigate Relative Motion
You can track multiple objects within a single video—ideal for investigating collisions, comparative motion, or system dynamics.
To track multiple objects, click Objects , then .
Track each object one at a time. Data from each object appears on separate graphs and can be displayed together for side-by-side comparison. (In this example, the y-axis data is hidden to focus on motion in one dimension.)
This feature is especially useful for momentum conservation investigations, projectile comparisons, or any scenario involving relative motion.
Use Objects to calculate and graph the center of mass once the motion of at least two objects has been tracked.
You can also calculate the center of mass for selected objects, which helps students examine system behavior during interactions like collisions.
Tip: When recording your video, use visually distinct markers or labels on each object to make tracking easier and reduce confusion during analysis.
See How Other Educators Use Vernier Video Analysis
In this blog post, Vernier Trendsetter Eric Walters shares how his high school physics students investigate conservation of angular momentum by analyzing real-world spinning systems.
Questions about how to use Vernier Video Analysis in your classroom or lab? Reach out to physics@vernier.com, call 888-837-6437, or drop us a line in the live chat.

 automatically marks an object frame by frame
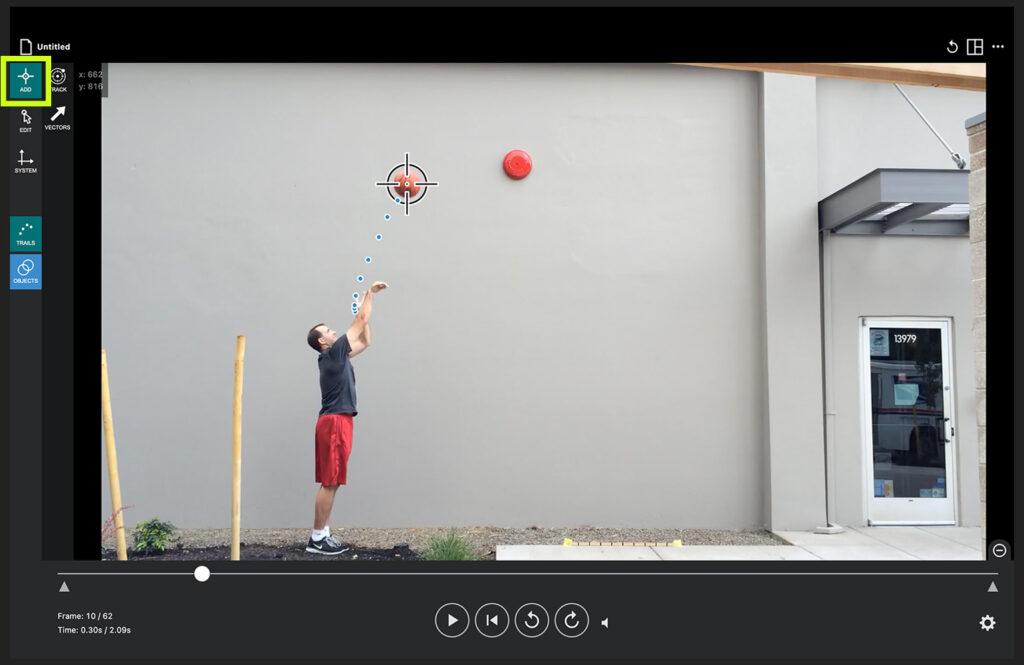
 .
.