Solar Thermal Exploration Kit User Manual
Order Code: KW-STXK
This Solar Thermal Exploration Kit is modeled after a domestic solar water-heating system. How you design the solar heating system will dramatically affect how quickly the water will heat and the maximum temperature the water will reach. The kit allows you to explore variables such as box color, light intensity, tube design, rate of water pumping, and amount of time it takes to heat the water.
Note: Vernier products are designed for educational use. Our products are not designed nor are they recommended for any industrial, medical, or commercial process such as life support, patient diagnosis, control of a manufacturing process, or industrial testing of any kind.
What's Included
- 25 ft clear tubing*
- Black plastic box
- Clear plastic lid for plastic box
- Containers (2)
- 2 V/400 mA Solar Panel
- KidWind Small Water Pump with tubing
- Wire leads with clips (1 black and 1 red)
*This part is a consumable and is excluded from the warranty.
Building the Solar Water Heater
This kit allows for a great deal of variability in design. Each design decision will affect the efficiency of the system.
These are the components of the solar water heater:
- Small Water Pump to circulate water
- Solar Panel (powers the water pump)
- Water storage container tub
- Tubing for water to circulate
- Box with clear lid to house the tubing
- To measure the temperature charge, consider using a temperature sensor, such as our Go Direct® Temperature (order code GDX-TMP).
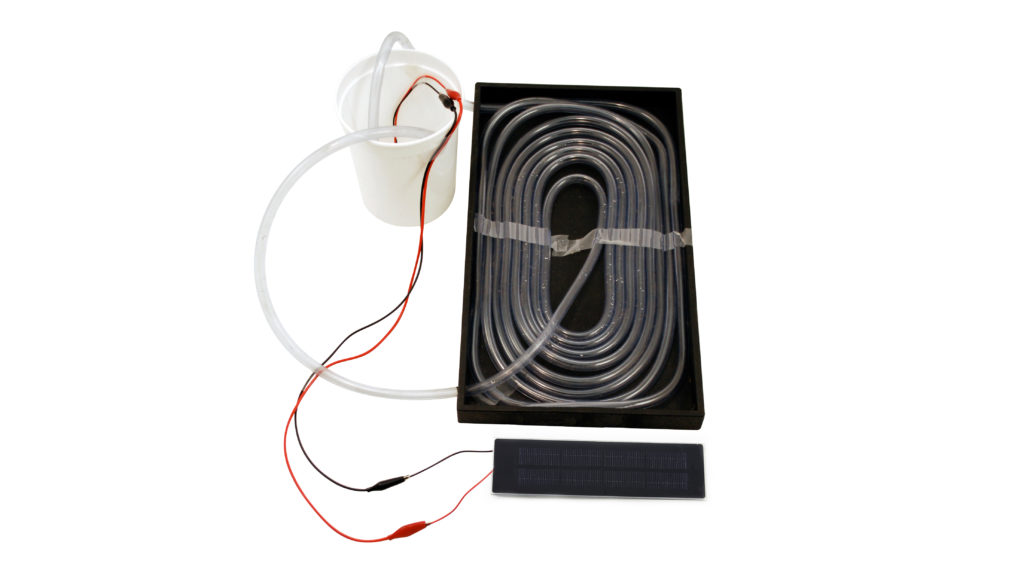
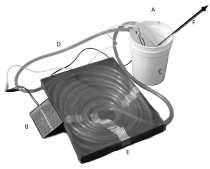
Arranging the Tubing in the Box
The black plastic box that comes with the kit has two holes drilled in the side. The holes allow the tubing to enter the box from the water pump and exit the box to the storage container.
Push one end of the tubing out of the drilled hole from the inside of the box. Make sure you push enough tubing out of the box to reach the water pump in the water container.
The way in which the tubing is arranged is one of the design variables you can explore. The more surface area you expose to the sun, the more efficient your system will be. Take your time to coil, wrap, or loop the tubing to try to maximize the amount of tubing being hit by the sunlight. You may need to use some tape to hold the tubing in place. Clear tape works well because it allows light to pass through.
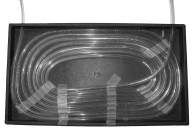
After you have arranged the tubing, push the free end of the tubing through the other hole in the box. The water will flow through this end of the tubing to the external storage container. Leave enough tubing to reach into to the container, but remember that having more tubing exposed outside of the solar collector may reduce efficiency. Consider insulating this outer tubing as you explore the efficiency of your system.
Cover the tubing in the box with the clear plastic lid. You can tape one edge onto the box to make a hinge, or tape all the edges for a tight seal.
Setting Up the Water Storage Container and Pump
Set up the water storage container and pump so the pump will pump water out of the storage container, through the solar collector, and back into the container. This way, the entire system is a contained, circulating loop.
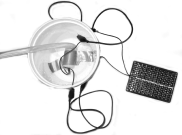
Connect one end of the tubing to the water pump and place it at the bottom of the storage container (you can tape it to the bottom), making sure that the two wires from the pump are facing up. These wires will be connected to your solar panel.
It can be a good idea to insulate the storage container. Since the bins are made of thin plastic, it is easy for heat to escape through the walls of the container. Experiment with different insulation materials such as tin foil, newspaper, or cloth.
Next, pour water into the container. Use room temperature water so that you can measure a temperature change as the system operates. The water pump should be fully submersed, but keep the wires sticking up out of the water so you can connect the solar panel to the pump.
Insert a thermometer or temperature sensor into the water in the storage container. When the reading is stable, record the initial water temperature.
Connecting the Solar Panel to the Water Pump
Use the wire leads to connect the solar panel to the pump. When you do this, connect the red wire from the solar panel to the red wire of the pump and the black wire from the solar panel to the black wire of the pump. You may need to strip the leads of the solar panel or the pump to expose enough metal.
If the solar panel is in sunlight, the pump will begin pumping as soon as the circuit is connected. Since the pumping will start right away, be sure that your tubing is all set up before you connect the pump. Double-check that the tubing coming from the solar collector goes back into the storage container.
If you want to stop the pumping, simply shade the solar panel. The panel will stop producing electricity if sunlight is not hitting it, and the pump will stop when the flow of electricity stops.
Warranty
Vernier warrants this product, excluding consumables, to be free from defects in materials and workmanship for a period of five years from the date of shipment to the customer. This warranty covers educational institutions only. Consumables are clearly marked in What's Included.
Contact Support
Fill out our online support form or call us toll-free at 1-888-837-6437.