If you think your LabQuest 3 units are not charging or not holding a charge, here are some troubleshooting steps to see if you have a problem, and if you do, which part is actually failing.
Getting Started
Before you start troubleshooting, here are some things you should check.
Make sure the AC outlet you are connecting to provides power when you are using it. While this seems unlikely that an outlet would not have power, it happens more often than you might think. Check for outlets tied to a light switch or timer, a power strip switch that gets turned off, or even a bad power strip outlet.
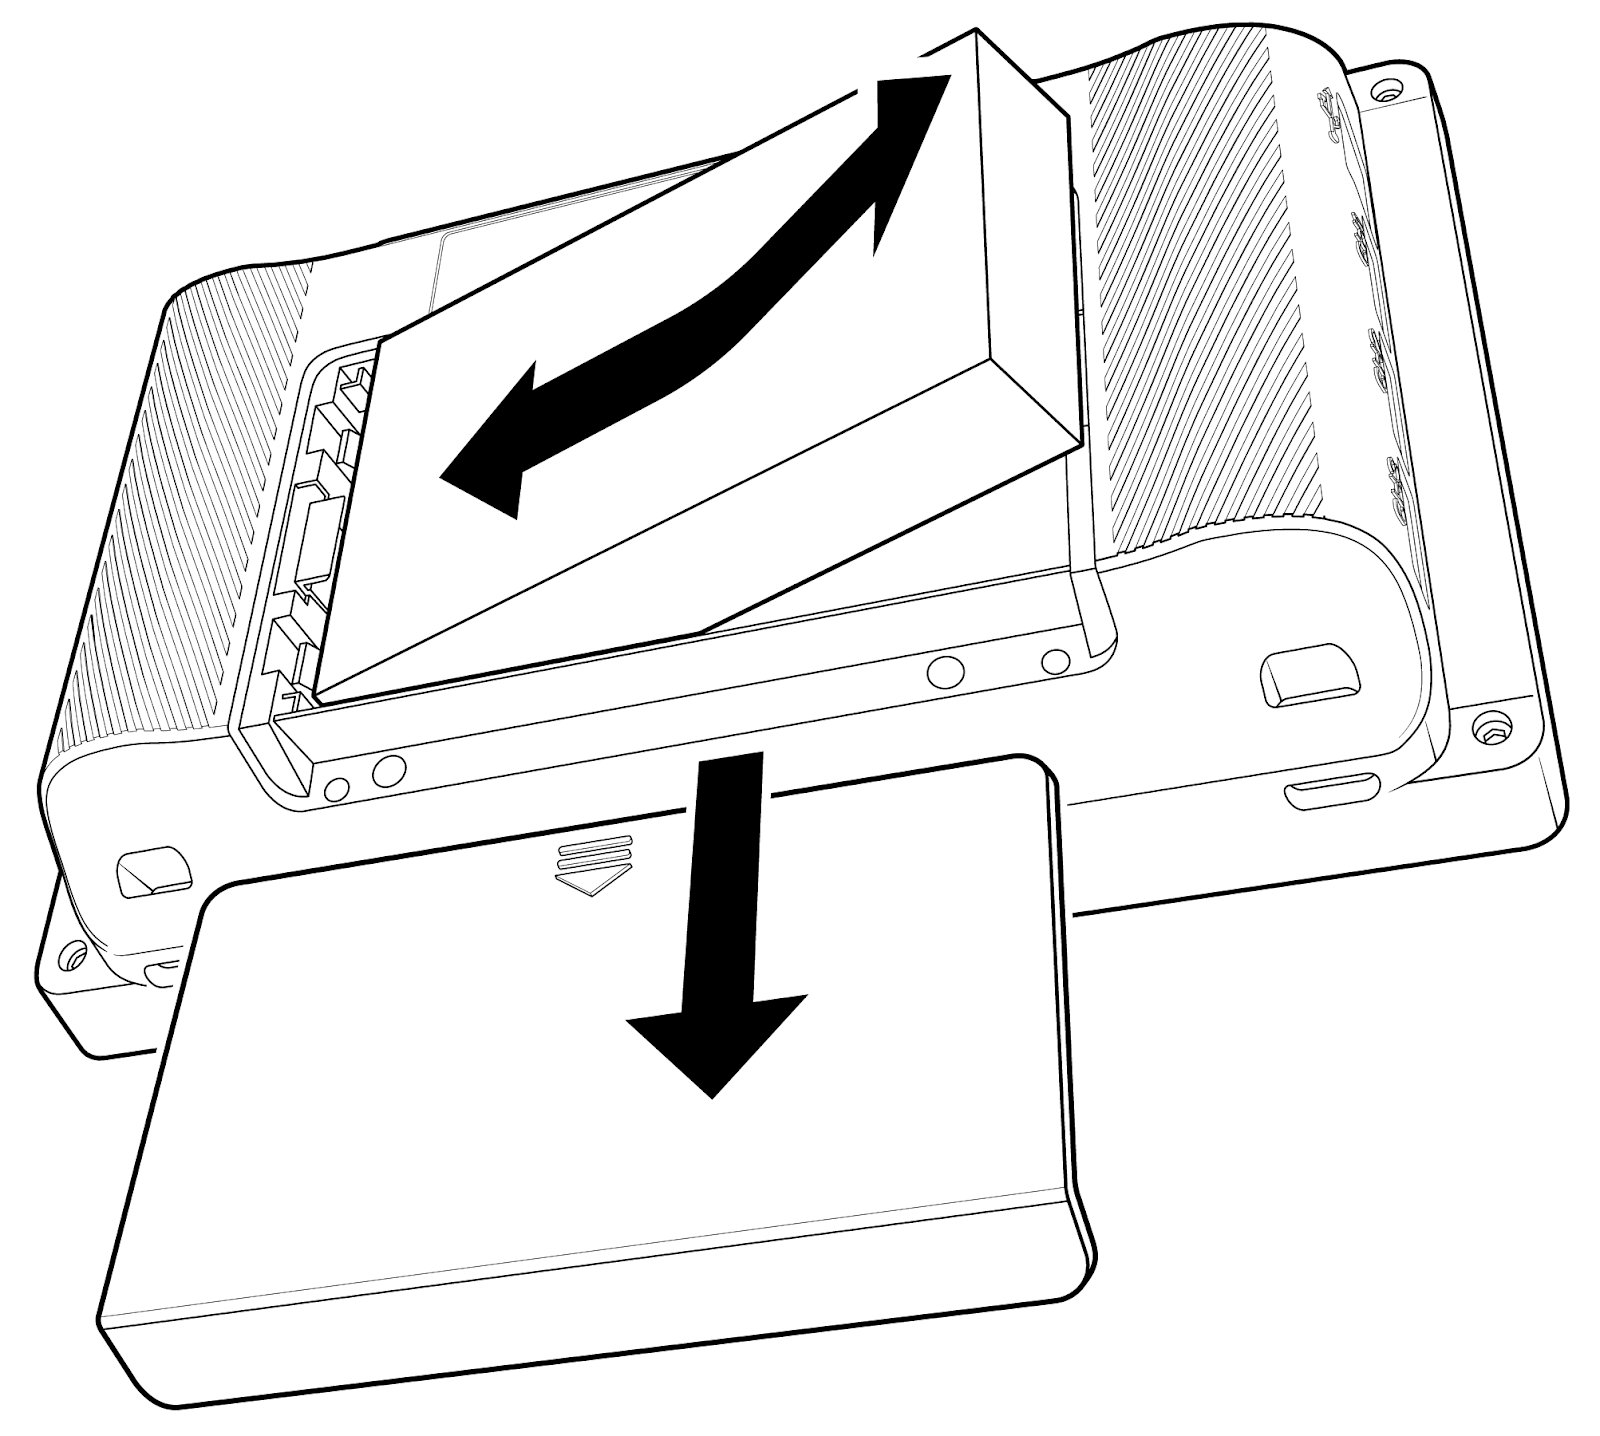
A protective tab is put in new units to prevent the battery from making contact with the connectors during shipping. You must remove the battery to remove this tab.
While the battery is out of the unit, verify that the contacts on the battery and LabQuest are clean.
A natural part of the aging process of these soft-sided batteries is that they will begin to swell over time. If your battery has started to swell, it needs to be replaced. While we would not expect this to happen for several years of use, a defective battery may show swelling sooner. With normal use, batteries are expected to last 3 to 5 years.
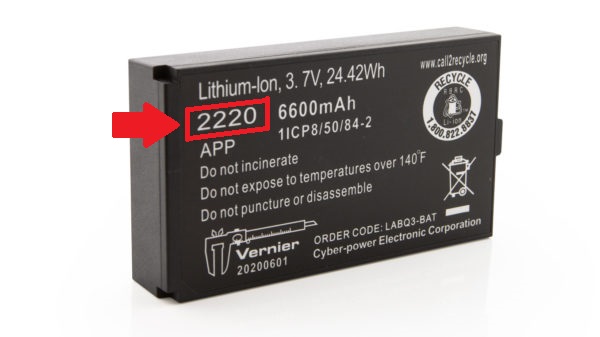
You can tell the battery manufacture date by looking at the 4-digit number on the upper left of the battery label. The number is listed as Week-Year (WWYY), so “2220” was manufactured in week #22 (May 25 – May 31) of the year 2020.
Our older original LabQuest and LabQuest 2 adapters will power a LabQuest 3, however, they do a poor job of charging the larger LabQuest 3 battery.
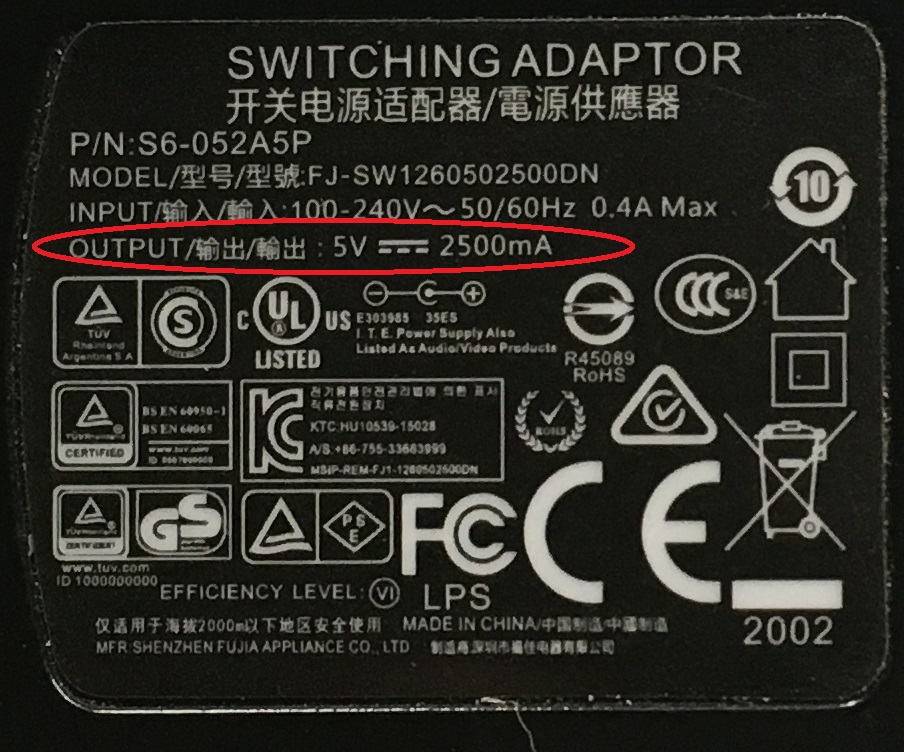
The output of a LabQuest 3 AC adapter should be 5V, 2500 mA (not 5V, 1500 mA).
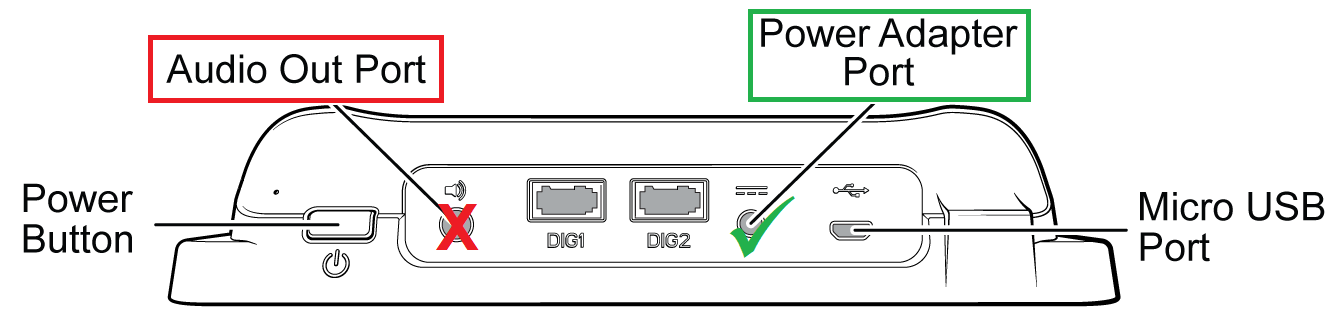
Make sure you are connecting the AC adapter to the power adapter port and not the Audio out port on the LabQuest 3. Unfortunately, the audio out port is the right size to fit the AC adapter and it is the one closest to the power button so it is easy to confuse the two ports.
Before troubleshooting, it is always a good idea to make sure your unit is running the latest software update. For instructions on updating a LabQuest 3, see
https://www.vernier.com/downloads/labquest-3-updates/
Once all of these things have been checked, you are ready to troubleshoot any remaining issues.
Troubleshooting
Note: when trying to troubleshoot issues with a specific LabQuest 3, it is extremely helpful if you have a set of equipment (LabQuest 3, battery, and AC adapter) that you feel is working as expected as you can more quickly isolate a defective component.
When a LabQuest fails to turn on with battery power, try the unit with AC only.
- Remove the battery from the unit, then connect a known-to-work AC adapter to the unit. (If the unit does not start on its own, press the power button once.)
- Assuming the outlet has power, the power adapter is working, and the adapter is connected to the correct port on the LabQuest 3, the LabQuest should fully launch. If the unit fails to come on, the unit will need repair.
- If the unit powers up normally, replace the battery and continue testing.
- To reduce the risk of software corruption, do not remove the AC adapter while the unit is running without a battery. Power off the LabQuest first.
Note: testing a known-to-work LabQuest 3 with AC only is a great way to test if the power supply is working enough to power a LabQuest 3. If it does not, most likely the AC adapter needs to be replaced.
Verify that the status bar is showing the charging battery icon.

- If you have verified the outlet is providing power and the AC adapter is connected to the correct power port, then LabQuest 3 not showing the charging icon,
, would indicate a problem.
- Note: it can take several seconds for the battery status icon to change once the AC adapter has been connected. Wait at least 15 seconds to ensure it is working.
Verify that the battery level (not already at 100%) increases while the LabQuest is connected to AC power.
- Connect a known-to-work AC adapter to LabQuest 3 and allow the unit to charge for 30 minutes.
- Assuming you are using a LabQuest 3 power adapter connected to the power adapter port, and the battery percentage is not already showing 100%, leaving the adapter connected for at least 30 minutes should show an increase in the battery-level percentage.
- If it does increase, then all things appear to be normal. Leave the battery charging overnight and continue to use the unit. Remember, the battery can take up to 12 hours to go from dead to fully charged.
- If you still suspect something is wrong, or your battery level remains the same or decreases, verify again you are using a LabQuest 3 power adapter, then continue with the next step.
It is likely that you have determined this by monitoring the unit’s battery level (%). However, the timing of when the battery dies does not depend on the battery level percentage, it depends on the measured voltage produced by the battery. It is possible for a unit to be at 0% battery level and still be running. That is a tell-tale sign that the battery monitoring software has not yet “learned” the battery.
Note: The battery level (%) is inherently unreliable after the battery monitoring software is reset. The value is reset whenever the LabQuest is updated or rebooted, when a new battery is detected, or when the battery has been removed for over a minute. While the value often starts off unhelpful, the value is significantly more reliable after a couple of full charge cycles.
To determine if the issue you are seeing is related to the battery monitoring software, run this battery test to see how long the battery will actually last.
- Remove the battery from the LabQuest and leave it out of the unit for at least one minute. This will ensure the LabQuest battery monitoring software is reset.
- Replace the battery, then turn on the unit.
- Use the Light and Power app (available in Settings) to set the power profile to Automatic.
- Connect a LabQuest 3 power supply. Verify the battery charging icon,
- The next morning, connect a temperature probe to your LabQuest 3. If you don’t have a temperature probe, a different wired (BTA, BTD, or USB) sensor can be used. Do not run this test using a sensor connected via a wireless connection.
- Set the data collection settings to collect Time Based data for 24 hours at a rate of 60 samples per hour.
- Disconnect AC power and start data collection.
- During collection the screen will dim and eventually go off, but data collection will continue. If you need to, tap the screen or press the power button to wake up the unit to see that things are progressing.
- Once you have determined that the battery has died (or after waiting the 24 hours), connect the unit to AC power and turn it on. When presented with an option to open an auto-recovery file, select to open that file.
- Go to the Graph view and examine the data to determine how long after data collection started the last data point was collected.
- You should expect the battery to last more than 6 hours. A new battery may last over 19 hours. The actual time will vary and does depend on the age of the battery and what sensor is being used.
If the unit collected data for at least 6 hours, it is working within specification and no further action is required. Keep the unit connected to AC power and let the unit charge. Remember, it can take up to 12 hours to fully charge a battery that is totally dead. After this test, the battery level reading should better reflect the life of your battery.
If the battery did not last 6 hours and is more than 3 years old, it is probably time to replace your battery. See www.vernier.com/lq3-bat for battery replacement information.
If the battery did not last 6 hours and is less than 3 years old, continue testing.
- Swap batteries with another known-to-work unit that has a near dead battery.
- Repeat the battery test with both units. Don’t forget to let the batteries charge overnight before running the test.
- What you are looking for is repeatability in the failure in one of two ways:
- The first unit you tested fails to fully charge two different batteries (indicating the unit is not charging the batteries), and the original battery is charged and tested within specification in the second LabQuest.
- The battery you initially tested fails to charge in two different units (indicating a bad battery), and the first LabQuest you tested charged (and tested within specification) a different battery.
It is possible that both batteries test within specification in this further test. If this happens, make note of the LabQuest serial numbers on these units and continue to use them normally. If you start seeing issues with LabQuest units not charging again, check to see if these are one of the units you had tested previously. It is possible that the problem may be intermittent.
There are power saving features built into LabQuest 3 to help conserve battery power. Things like dimming and powering off the screen when the device is inactive are used in LabQuest 3 just as they are used in smartphones and tablets.
If you are concerned that the power saving features are too aggressive, use the Light and Power settings to select a different power profile. For more information on the power settings in LabQuest 3, see https://www.vernier.com/til/8389/
Once you have determined that you have a defective part, contact Vernier for additional assistance.
Getting Additional Help
If you find you do have a problem with a LabQuest 3, LabQuest 3 power supply, or LabQuest 3 battery, here is some additional information on getting those repaired or replaced.


