This help article applies to the Plunger Cart (
1) From the button on top. This can be used when you have two carts touching and want to have them push apart, or to launch one cart from against a track end, for example.
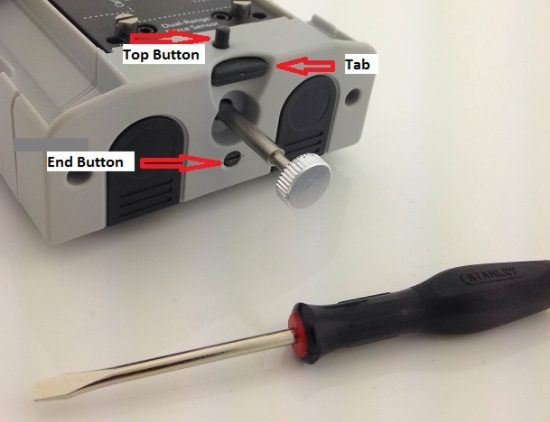
2) Alternatively, you can release the plunger using the button on the end (just below the plunger). This is useful when you want to explore super-elastic collisions between two carts. When the carts collide the button is pressed, releasing the plunger.
You can also configure the plunger to be extended at all times. The position of the end button (with the slot) is used to control this. You will need a small screwdriver to adjust this.
1) In order to trigger off of end button:
Push the end button in with a screw driver and rotate the screw all the way counter clockwise. The screw will extend out from the body of the cart. Push the plunger in and depress the tab above the plunger. It will hold until the end button is pushed in.
2) In order to have the plunger out and not latch:
Rotate the screw a quarter turn (so the slot is horizontal). The plunger will extend out from the body of the cart and the locking mechanism will not engage to hold the plunger in place.
3) In order to trigger off of the button on top of the cart:
Rotate the screw all the way clockwise. The screw will be flush with the body of the cart. Push the plunger in and depress the tab above the plunger. It will hold.
The green metal plunger cart that came with the older model Vernier Dynamics System only has the top button. You latch the plunger in place by depressing the plunger and pushing in the tab immediately above the plunger. The plunger will be released when the button on top is pressed.