The following information describes how to set up wired Vernier Photogates (VPG-BTD) when using Graphical Analysis or Graphical Analysis Pro.
If you are collecting data with LabQuest App, see: this article.
If you are collecting data with Go Direct Photogates, see this article.
Although the output of a photogate is quite simple (blocked or unblocked), timing is determined by the photogate timing mode in the data-collection software. There are different modes for different types of experiments. The mode you use depends on what quantity you want to measure.
Graphical Analysis and Graphical Analysis Pro approach photogate setup differently than Logger Pro 3 or LabQuest App. This document will relate the photogate timing measurements used in Graphical Analysis to the photogate timing modes used in our other software.
Vernier Photogate Default Setting
The default timing measurement depends on the number of photogates detected:
- When only one photogate is detected, the default measurement is Linear Motion.
- The default object is the Vernier Picket Fence.
- This mode provides distance, velocity, and acceleration measurements.
- This is equivalent to Motion Timing used in other software.
- When two photogates are detected, the default measurement is Speed through Gate.
- The default distance between gates is 0.02 m.
- This is equivalent to Pulse Timing used in other software.
Performing a Vernier Experiment?
If you are doing an experiment from one of the Vernier lab books (e.g. Physics with Vernier), instructions for how to set up the Photogates with our software are in the student versions of the experiment. When using Vernier (BTD) Photogates, look for instructions for Graphical Analysis 4 with LabQuest Sensors.
Writing Your Own Lab?
If you are writing your own lab, you will need to set the timing measurement and set the appropriate parameters to get meaningful data. Below is an outline for some common data-collection setups.
Photogate Set Up using Graphical Analysis or Graphical Analysis Pro
- Click or tap Mode (leftmost button on the bottom toolbar) to access the Data Collection Settings Dialog .
- Photogate Timing is automatically selected when a photogate is detected.
- Select the desired Measurement and modify the measurement settings to match your experiment.
- Click or tap the information button for help with the measurement settings.
- Select DONE.
| Measurement Type | Measurement Settings | Related Photogate Modes (other software) |
Details |
| Speed Through Gate | Use object/flag width For Flag Width, enter the length of the object that will block the photogate as it passes through the gate. If you roll a marble through the gate, you would need to know the diameter or chord length of the ball that blocks the beam. |
Gate timing | Set up the photogate so that the object moves through it. When the object passes through the photogate, it measures how long the beam is blocked (gate time). The object’s speed (as it passes through the photogate) is determined by dividing the length of the object by the gate time.
If the flag width entered differs from the actual length of the object that passes through the beam, the speed measurement will be off. Note: If you are using two gates, each gate will report an object speed. |
| Speed Through Gate | Use gate separation Distance between gates, enter the distance the object will travel as it goes between the two gates. |
Pulse timing [2-gate] | Set up two photogates so that the object will pass through both of them. Timing starts when the object breaks the beam of the first photogate and ends when it breaks the beam of the second photogate. The average speed of the object is determined by dividing the distance between the photogates by the measured [pulse] time. The speed reported is the average speed of the object as it moves between the two photogates, not the final speed at the second photogate.
If you connect the sensors to the interface before you connect the interface to Graphical Analysis 4, the sensor connected to DIG 1 will be the triggering gate. If you connect the sensors to the interface after the interface is connected to Graphical Analysis 4, the first gate you connect to the interface will be the triggering gate, which could be the photogate connected to DIG 2. Timing will not start until the triggering gate is blocked and will continue until the non-triggering photogate is blocked. Note: If you are only using one gate, the speed will be calculated using the pulse time between successive blocked events for that gate. |
| Linear Motion (distance, velocity, acceleration) | Select the Object you are using to pass through the gate. Options for objects made by Vernier are included in the dropdown. If you are using something else, select Other/User Defined and enter the spacing and number of flags to match your object.
To measure linear distance for a wheel, the circumference of the wheel divided by the number of spokes for spacing. You can choose End Data Collection option to end after all flags have passed through all gates, or to end collection manually using the STOP button. |
Motion Timing
Note: in our other software, you choose to end collection after some number of events. Ending collection after a set number of flags is equivalent. |
Attach a picket fence to the object and set up a photogate so that the attached fence will pass through the gate. As the fence moves through the photogate each blocked event is given a distance, based on the known spacing of the fence. Velocity and acceleration data are calculated from the distance data.
Note: If you are using two gates, each gate will report position, velocity, and acceleration separately. |
| Angular Motion (distance, velocity, acceleration) | Enter the number of spokes in the wheel.
The angular position can be represented in radians, revolutions, or degrees. |
Motion Timing – where the object distance is the portion of one rotation represented by each spoke. | As the wheel moves through the photogate each blocked event is given an angular distance, based on the number of spokes. Angular velocity and angular acceleration data are calculated from the distance data.
Note: If you are using two gates, each gate will report position, velocity, and acceleration separately. |
| Timer or Period | Time between gates | Pulse Timing (without speed measurement) | Set up two photogates so that the object will pass through both of them. Timing starts when the object breaks the beam of the first photogate and ends when it breaks the beam of the second photogate.
If you connect the sensors to the interface before you connect the interface to Graphical Analysis 4, the sensor connected to DIG 1 will be the triggering gate. If you connect the sensors to the interface after the interface is connected to Graphical Analysis 4, the first gate you connect to the interface will be the triggering gate, which could be the photogate connected to DIG 2. Timing will not start until the triggering gate is blocked and will continue until the non-triggering photogate is blocked. Note: If you are only using one gate, the time will be the pulse time between successive blocked events for that gate. |
| Timer or Period | Pendulum Period | Pendulum Timing | Place the photogate at the bottom of the pendulum swing. Photogate measures the time from the first bob pass to the third, i.e. when the bob swings back through the photogate in the original direction.
Note: If you are using two gates, each gate will measure the pendulum period separately. |
| Projectile Launcher | Varies | Varies | Photogate set up for projectile motion is discussed here How do I set up Vernier Photogates (VPG-BTD) for data collection in a projectile motion experiment? |
Further Information
- The photogate mode Gate and Pulse Timing found in our other software is not supported in Graphical Analysis or Graphical Analysis Pro. In our testing, we have found that this data collection mode is unreliable due to the differences in gate timing measurements between two different BTD photogates. When using Graphical Analysis, use Motion Timing mode or a Go Direct Photogate to measure an object’s acceleration.
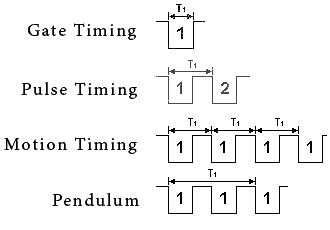
- The following diagram summarizes the various traditional timing modes and how they differ in timing measurements. The diagram shows a horizontal line representing time. The vertical position represents the gate state. When the line is high, the gate is unblocked. When the line is low, the gate is blocked. Time T1 is the time that software records as the gate being blocked. In the case of Gate Timing, the diagram shows that the gate is initially unblocked, then blocked, and then unblocked again and the interface records only the time it is blocked.
- A comprehensive tutorial can be found at http://www2.vernier.com/manuals/LabQuest_Introduction_to_the_Vernier_Photogate.pdf
RELATED LINKS
- How can I use Vernier Photogates (VPG-BTD) to time the Science Olympiad Scrambler event?
- Why does my photogate record a really high velocity at the beginning of a trial with a picket fence?
- How can I use a Vernier Photogate to measure g?
- Why is my picket fence blue and black instead of clear and black?