Sharing ideas and inspiration for engagement, inclusion, and excellence in STEM
When I was teaching AP Physics C, I assumed rotational motion would be easy for my students. These were strong math and science learners—most of them were already in calculus. So I used to introduce rotational motion by saying, “You already know this! It’s just linear motion, but with Greek letters.”
That didn’t work.
It turns out that while the math might look familiar, the meaning behind rotational quantities is very different. And if we skip over the conceptual shift students need to make, they tend to struggle, no matter how strong their math background is.
In this post, I’m sharing a few things I’ve learned (sometimes the hard way) about teaching torque and moment of inertia, along with a few of my go‑to investigations using the Go Direct® Centripetal Force System, Motor Accessory Kit, and the Moment of Inertia Accessory Kit.
Start with Concepts, Not Calculations
Before diving into equations, I’ve found it incredibly helpful to help students develop a real understanding of what angular displacement, velocity, and acceleration actually mean.
One of my favorite tools for this is ranking tasks. These low-math, high-thinking activities ask students to compare different physical setups—like rods with different pivot points—and rank them based on a quantity like torque or angular acceleration. Then they explain their reasoning. Ranking Task Exercises in Physics, a book developed by physics teachers, is a great resource.
I’d have students rank individually, then discuss with a partner, and finally share out as a class. These discussions always surfaced useful misconceptions and helped students form stronger mental models of rotational motion.
I’ve also used simple objects like turntables and bikes to connect rotation to the real world. I’m a bike commuter, and I always kept my bike in my classroom so I could use it to talk about things like rolling without slipping. It was a great way to make ideas like Δx = rΔθ feel a lot more concrete.
Try These Hands-On Investigations
Once students had a handle on the concepts, we’d dig into data collection. Here are three investigations that consistently helped my students make meaningful connections between torque, angular acceleration, and moment of inertia.
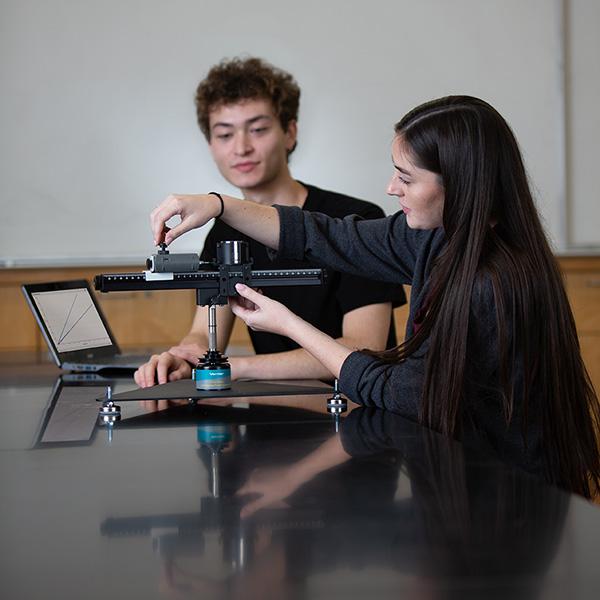
This experiment uses the Go Direct Centripetal Force System to explore how mass, radius, and angular velocity affect centripetal force. I usually run this as a spin-down lab—students give the system an initial spin and collect data as it gradually slows. That way, they capture a wide range of velocity values in a single run and can see how force changes continuously as speed decreases.
You can also run the experiment using the motor accessory to hold speed constant. For newer physics students, I actually recommend this motorized version—it’s slower, but cleaner. Students are able to clearly see how one variable affects another without wondering if air resistance or friction is skewing the results.
This investigation reinforces the idea that acceleration doesn’t always mean “speeding up”—it can also refer to changes in direction. Students measure the force exerted on a spinning mass and relate it to the square of its tangential velocity by graphing and linearizing their data. Then, they repeat the procedure at different radii to observe how force changes with distance from the axis of rotation. By interpreting the slope and applying Newton’s second law, they construct a model for centripetal force and derive an expression for centripetal acceleration.
- Rotational Dynamics
Experiment #13 from Advanced Physics with Vernier — Mechanics
Experiment #13 from Advanced Physics with Vernier — Mechanics
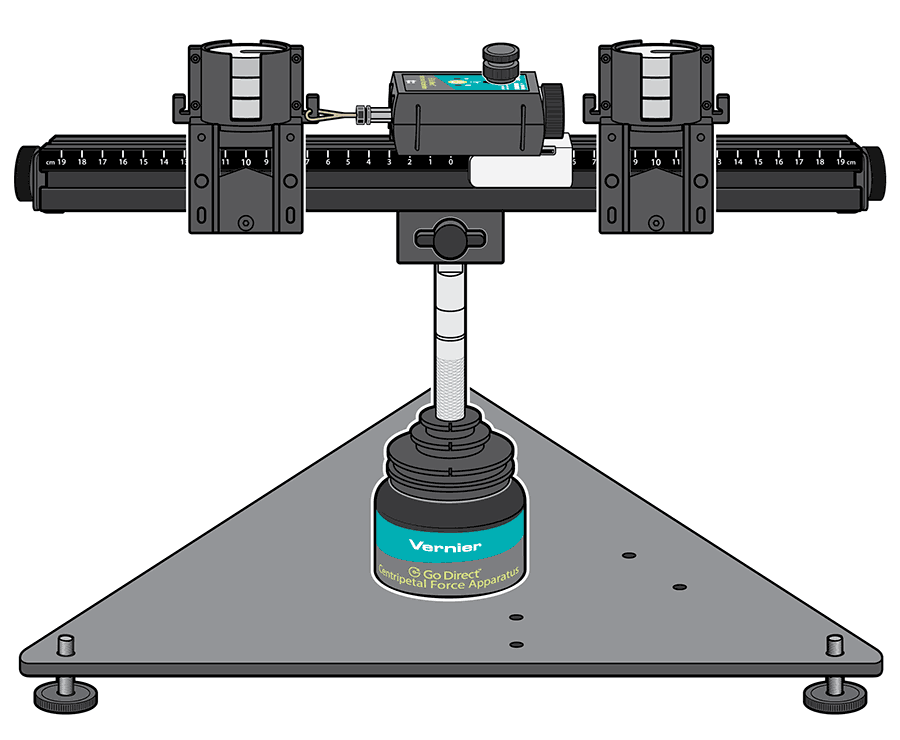
This experiment uses the Go Direct Centripetal Force System and the Moment of Inertia Accessory Kit to explore Newton’s second law for rotation: 𝜏=𝐼𝛼.
We start with a single rotating disk. Students wind a string around the largest pulley and attach a hanging mass. As the mass falls and the disk accelerates, they collect angular velocity data over time and calculate angular acceleration. Using the tension in the string and the radius of the pulley, they calculate torque, then graph torque vs. angular acceleration to determine the moment of inertia.
Next, students collect data with two disks, and then repeat the experiment using a beam and point masses. Despite less total mass, the beam setup slows down more because the mass is farther from the axis. That’s the moment when students start to grasp that it’s not just how much mass you have, but it’s where that mass is located.
I also have students compare their measured values to theoretical ones. The discrepancies always lead to great discussions about friction, system orientation, or model assumptions. It’s a natural way to bridge classroom theory with real‑world behavior.
- Moment of Inertia
Available for download on the Centripetal Force System Moment of Inertia Accessory Kit product page.
Available for download on the Centripetal Force System Moment of Inertia Accessory Kit product page.
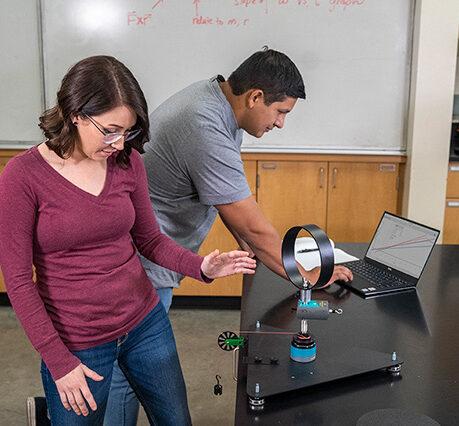
In this investigation, students use the Moment of Inertia Accessory Kit with the Go Direct Centripetal Force System to explore how the distribution of mass, not just the amount, affects rotational acceleration; it’s a great follow-up to the Rotational Dynamics activity above.
Students test a variety of rotating objects: a beam, a single disk, stacked disks, and combinations of disks and hoops in both horizontal and vertical orientations. For each configuration, they apply a constant torque using a hanging mass, collect angular velocity data, and calculate angular acceleration by fitting a line to the first portion of the velocity curve. From there, they use the torque and angular acceleration to compute the experimental moment of inertia and compare it with the theoretical value.
This experiment also helps clarify a common misconception: That more mass always means more rotational resistance. The results tell a different story. Students see that where the mass is located makes a big difference. Objects with mass farther from the axis accelerate more slowly, even if they’re lighter overall.
Looking for More Inspiration?
At the end of the day, teaching rotational motion isn’t about throwing a new set of equations at students; it’s about helping them build intuition first. When they can explain what torque and moment of inertia really mean, the math becomes a natural next step instead of a barrier. That shift made all the difference for my students, and it’s why I keep coming back to these investigations.
Want more resources to help teach about rotational dynamics with torque and moment of inertia? Check out some of our on-demand webinars to see the Vernier physics team walk you through using Vernier sensors in your physics class or lab.
- Rotational Readiness: Teaching Torque and Moment of Inertia
- Mastering Motion: Strategies for Teaching Rotational Kinematics and Dynamics
How do you use the Go Direct Centripetal Force System and accessories to inspire learning in your classroom or lab? Let us know and share with us on social! Questions? Reach out to physics@vernier.com, call 888‑837‑6437, or drop us a line in the live chat.
Share this Article
Related Articles


Sign up for our newsletter
Stay in the loop! Beyond Measure delivers monthly updates on the latest news, ideas, and STEM resources from Vernier.