Sharing ideas and inspiration for engagement, inclusion, and excellence in STEM
Last spring break, I came back to school ready to run my usual momentum lab, the classic egg drop, only to be met with an unexpected obstacle: egg prices. Breaking 80–100+ eggs over 5 class periods was going to be far too expensive.
So I decided to try something different. I set out to design a new laboratory activity to close out our momentum chapter that would convey the same engineering principles, without requiring hundreds of eggs. What started as a budget-friendly replacement turned into a richer, more mathematically robust activity that uses Vernier probeware for real-time quantitative analysis and keeps students highly engaged through friendly competition baked into the lesson. Even if egg prices do go back to normal, this is the lab I’m sticking with.
From Egg Drops to Crumple Zones
When I first read the NGSS Standard HS-PS2-3: Apply science and engineering ideas to design, evaluate, and refine a device that minimizes the force on a macroscopic object during a collision, I immediately thought: This standard is literally prescribing the egg drop.
But there’s more than one way to meet this NGSS standard. My inspiration for this new activity came from a YouTube video on how automotive safety has evolved from rigid steel frame cars (which offered minimal protection, even at low speeds) to modern vehicles designed with crumple zones.
These built-in safety features intentionally “crumple” during a collision, increasing the time over which velocity (and momentum) changes. By extending the collision time, they reduce the force exerted on passengers and improve the chances of walking away unharmed.
Phase 1: Anchoring Phenomenon—Why Crumple Zones Work
I start this lesson with that crash-test video, showing how car safety has evolved over the decades into these modern crumple-zone designs. I show the first three minutes, after giving an appropriate trigger warning for the crash-impact imagery.

Before moving on, I prompt a few discussion questions, such as
- What did you notice about collisions in older vs. newer cars?
- Why would engineers design a car to crumple?
- What does this mean for the passengers inside?
- How could we model this effect in our lab?
The Physics Behind It: Impulse-Momentum Theorem
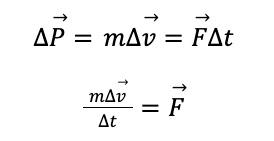
The guiding principle for this lab is the impulse-momentum theorem:
The longer the collision lasts (t), the smaller the peak force (F). For many introductory physics students, this feels counterintuitive and can be tricky to grasp. But seeing the quantitative data in real-time using Vernier Graphical Analysis® can really make this mechanics principle click, especially when students are seeing the data generated from their own projects.
Visualizing the Difference
Below is a force-time graph of a “good” crash (green) and a “bad” crash (orange). Both collisions bring the vehicle to rest, so the total change in momentum (represented by the area under each curve) is nearly the same.
The difference lies in how that momentum change happens.
- In the green crash, the collision is spread out over a longer time. This lowers the peak force, making for a gentler stop.
- In the orange crash, the collision happens much faster, producing a sharp force spike.
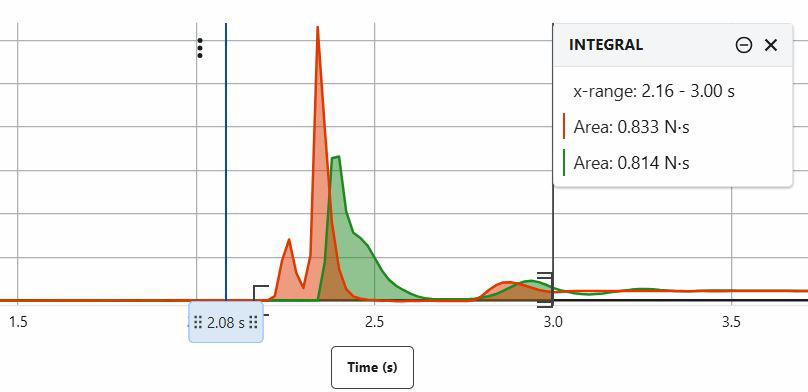
This data visualization makes the impulse-momentum theorem more accessible for students. They can see that it’s not just about stopping the cart, but it’s also about how long it takes to stop.
Phase 2: The Classroom Crumple‑Zone Challenge
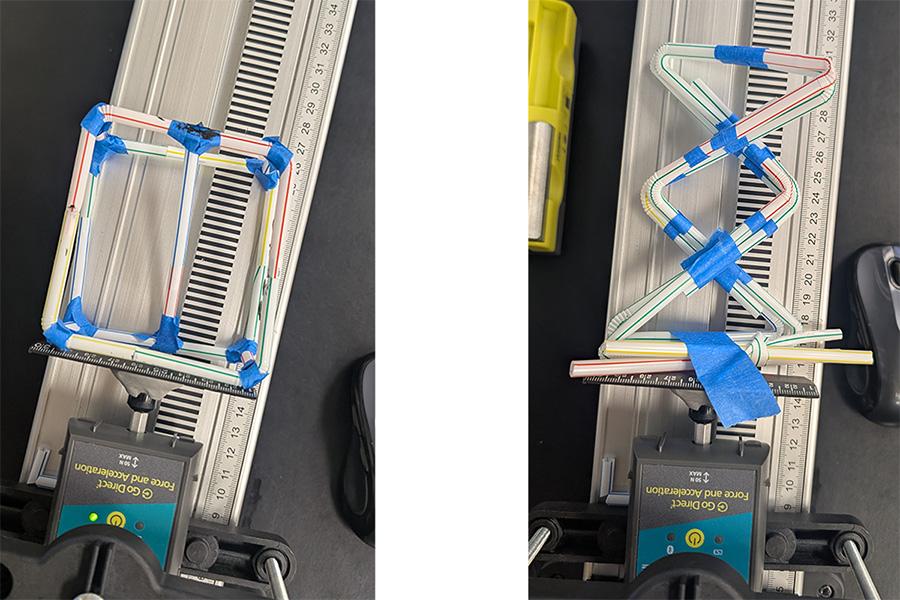
Step 1: Design and Build
Students work in pairs, each starting with the same set of materials. I provide straws, paper, and masking tape, but you could try this with other materials as well. Students have a set build time (30‑minutes) for their first crumple‑zone design.
Step 2: Test
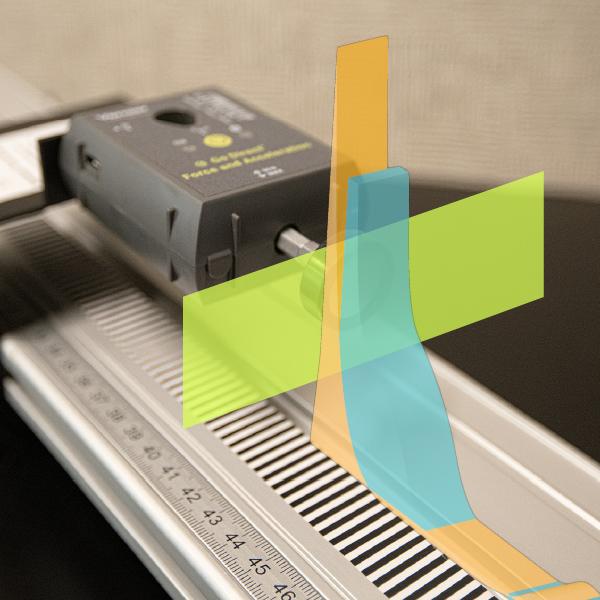
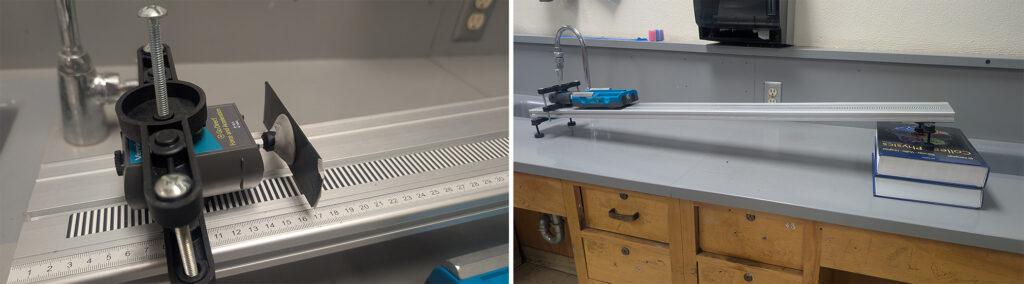
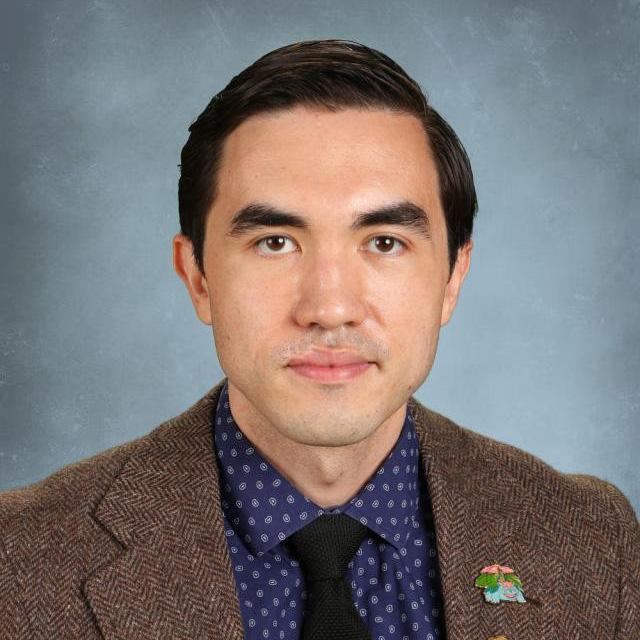
We test each group’s design on the “Crumple‑Zone Tester,” which consists of a Go Direct® Force and Acceleration Sensor mounted at the bottom of a dynamics track set at a fixed incline. Attached to the sensor is a flat ruler segment that serves as a mounting plate for securing each group’s crumple‑zone design. Testing takes about 15 minutes for the whole class.
For each trial, a Go Direct Sensor Cart with a fixed mass is released from the same starting height on the track, so that its momentum before impact is consistent. This consistency is essential for making comparisons and evaluating designs—it also makes a great quick review of conservation of energy with your students.
During testing, I run a live camera feed of the crash zone alongside Graphical Analysis so the whole class can see the force–time graph being generated in real time. This keeps everyone engaged and also turns every trial into a learning opportunity: Students have more opportunities to see what works, what doesn’t, and why.
Step 3: Analyze and Iterate
Once all first‑round tests are complete, the engineering fun really begins. I keep a running leaderboard on the whiteboard showing each group’s peak force. The lowest peak force each round wins a pick from my prize bin (a small but powerful motivator).
Students go back to the drawing board and redesign their crumple zone for a second round of testing. This is where iteration comes in—an important engineering principle that I don’t think we explore enough in fundamental physics education. They’ve seen what works from their own test and from watching their classmates’ trials, so their job is to make meaningful changes to improve‑performance.
Step 4: Reflect and Report
For grading, I focus on students’ ability to compare and contrast their two attempts. Each team submits a brief report that
- Includes force-time graphs from both attempts
- Explains their design choices in Round 1
- Describes how they modified their design for Round 2 and why
- Analyzes whether their changes improved results
- Reflects on what they learned about the physics and engineering process
Extensions
In my AP Physics 1 group, we do this same activity, but I add additional questions about elasticity. Crumple zones that cause the cart to bounce back actually increase the total area under the curve, and we can verify this elasticity by using the Go Direct Sensor cart and seeing if the velocity changes sign during the crash!
Another variation I’ve considered is introducing a materials menu and budget. For example, each team gets $100, with straws costing $5 each and tape charged by length. This forces students to make cost‑benefit trade‑offs. I have a suspicion that working with a more diverse set of materials and incorporating cost-benefit analysis would only enrich the post-lab discussion we have at the end of each round of testing.
Don’t Put All Your Data in One Basket
The real power of using the Go Direct Force and Acceleration Sensor in this lab isn’t just that it lets you visualize force data in real time—it’s that the results are continuous instead of discrete.
In the classic egg drop, the only outcomes students can record are
- Egg broken
- Egg cracked
- Egg undamaged
That’s great for a quick demo, but it leaves little room for detailed analysis or iteration.
With the force sensor in this activity, students can capture precise force measurements across a wide range of outcomes, giving them more robust data to compare and refine designs. This shift from “yes/no” results to quantitative performance metrics changes the entire nature of the lab and keeps students focused on engineering improvement.
So while the rising cost of eggs might have scrambled my original lab plans, it also hatched a better idea—one that cracked open richer learning opportunities for my students.
Eric Robinson is a co-chair of the science department at Herbert Hoover High School in Glendale, California. He has been teaching full-time since 2012. In addition to teaching, he is also a trainer for the American Modeling Teachers Association (AMTA) and a Vernier Trendsetter. Eric teaches physics to high school juniors and seniors as a district graduation requirement, using Modeling Instruction to best support a large population of dual‑language learners.
Want to hear more from Eric? He will be presenting this October at the California Association of Science Educators (CASE) conference, where you can catch his session, “Vertically Integrated Modeling Instruction for Multilingual Learners,” to learn more about implementing probeware in laboratory design.
Share this Article
Related Articles

Sign up for our newsletter
Stay in the loop! Beyond Measure delivers monthly updates on the latest news, ideas, and STEM resources from Vernier.