Menu
Shop
- Engineering
- Arduino
- Using Vernier Sensors with Arduino Guide
- Projects and Ideas
- Auto-ID for Analog (BTA) Sensors with Display
Auto-ID for Analog (BTA) Sensors with Display
The VernierLib Library includes an examples folder. In that folder, is the sketch VernierLibDemoWithDisplay.
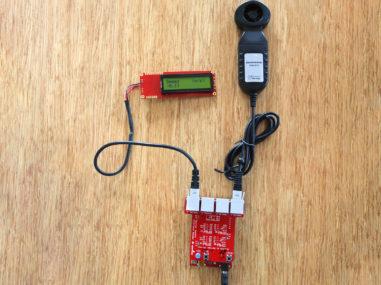
VernierLibDemoWithDisplay is a simple sketch that uses the VernierLib library to automatically identify by the Vernier BTA sensor connected to the BTA 1 connector on the Vernier Interface Shield and lets you show those readings on a display. It supports the Two-Line Display, sold by SparkFun as Serial Enabled 16×2 5 Volt LCD display.
The display should be connected as follows:
| DISPLAY | ARDUINO |
|---|---|
| RX | Arduino Pin 9 (or pin 6 of the BTD 2 connector) |
| GND | Arduino GND Pin (or pin 5 of the BTD 2 connector) |
| +5V | Arduino +5V Pin (or pin 4 of the BTD 2 connector) |
At startup, the program will list the Name, Units, and Calibration Page for the sensor. After a two second delay, the Short Name and the sensor reading, with units will be shown on the display.
/*
Read the information that is stored on a Vernier LabQuest sensor
and prints it to the Serial Monitor and LCD display, and then take
readings and print the sensor measurements to the Serial Monitor
and LCD display.

 - Connect the Vernier Arduino Interface Shield to a RedBoard, UNO R3 or R4.
 - Connect a Vernier LabQuest sensor to ANALOG 1
 - Connect a Vernier Digital Control Unit (DCU) to DIGITAL 2
 - Connect the LCD pins RX, GND, VDD to DCU lines D4, GND, XP, respectively.
 - Upload the code and then view the output on the LCD display or Serial Monitor

*/

#include <SoftwareSerial.h> //library used in printing to display
#include "VernierLib.h"
VernierLib Vernier;

const int buttonPin=12; //button on Vernier Interface Shield
int buttonState = 0;//variable for reading the pushbutton
char namestring[17];//character array for printing strings to display
char tempstring[16]; // character array used to create string for displaying numbers
SoftwareSerial mySerial(3,9); //for display, pin 9 = TX, pin 3 = RX (unused)

// Configure Serial Monitor and read sensor information
void setup(void)
{
  Serial.begin(9600);
  while (!Serial);
  delay(4000);   //Need time for the Serial Monitor to become available

  mySerial.begin(9600); // for sending characters to display
  delay(500); // wait for display to boot up
  mySerial.write(124); // adjust backlight brightness of display
  mySerial.write(150); //max=157, 150=73%, 130=40%,128=off

  Vernier.autoID();   // automatically identify the LabQuest sensor
  printSensorInfo();

  //send characters to 2-line display
  //Display Name, Units, and Page
  mySerial.write(254); // cursor to beginning of first line
  mySerial.write(128);
  mySerial.print("                "); // clear display for next loop
  mySerial.print("                ");
  mySerial.write(254); // cursor to beginning of first line (position 128)
  mySerial.write(128);
  mySerial.print(Vernier.sensorName()); // display name on first line
  mySerial.write(254); // cursor to beginning of second line
  mySerial.write(192);
  mySerial.print(Vernier.sensorUnits());  // display units on second line
  mySerial.write(254);// cursor to the end of second line
  mySerial.write(204);
  mySerial.print("p=");// display page at end of second line (-1 if resistor ID)
  mySerial.print(Vernier.page());
  delay(2000); // short delay
  mySerial.print("                "); // clear display for what is next
  mySerial.print("                ");
  //Special section to display equation type, slope, intercept, and c, if button is pressed:
  buttonState = digitalRead(buttonPin);
  // check if the pushbutton is pressed.
  // if it is, the buttonState is LOW:
  if (buttonState == LOW)
   {
     //Display SensorNumber, cal equation type, and a (intercept)
     mySerial.write(254); // cursor to beginning of first line
     mySerial.write(128);
     mySerial.print("#");
     mySerial.print(Vernier.sensorNumber()); // Sensor ID number
     mySerial.write(254);// cursor to middle of the first line
     mySerial.write(133); // cursor to position 6 of first line
     mySerial.print(" cal eq="); // // display cal eq type
     mySerial.print(Vernier.calEquationType()); //
     // display page at end of second line
     mySerial.write(254); // cursor to beginning of 2nd line
     mySerial.write(192);
     mySerial.print("a(int)=");
     mySerial.print(Vernier.intercept());
     delay (2000);
     //Display b(slope), and c (cfactor):
     mySerial.print("                "); // clear display for next loop
     mySerial.print("                ");
     mySerial.write(254); // cursor to beginning of first line
     mySerial.write(128);
     mySerial.print("b(sl)="); // one space
     mySerial.print(Vernier.slope()); //
     mySerial.write(254); // cursor to beginning of second line
     mySerial.write(192);
     mySerial.print("c=");
     mySerial.print(Vernier.cFactor()); //
     delay (2000);
     //Display shortName and AutoID voltage:
     mySerial.write(254); // cursor to beginning of first line (position 128)
     mySerial.write(128);
     mySerial.print("                "); // clear display for next loop
     mySerial.print("                ");
     mySerial.write(254); // cursor to beginning of first line (position 128)
     mySerial.write(128);
     mySerial.print(Vernier.shortName()); // display name on first line
     mySerial.write(254); // cursor to near the beginning of first line
     mySerial.write(192);
     mySerial.print("ID volts=");
     mySerial.print(Vernier.voltageID()); // print out the raw voltage from the sensor
     delay (2000);
   }// end of special display done if button is down
  //set up screen for displaying data:
  mySerial.write(254); // cursor to beginning of first line
  mySerial.write(128);
  mySerial.print("                "); // clear display for next loop
  mySerial.print("                ");
  mySerial.write(254); // cursor to beginning of first line (position 128)
  mySerial.write(128);
  mySerial.print(Vernier.sensorName()); // display name on first line
  mySerial.write(254); // cursor to middle of the second line
  mySerial.write(200);
  mySerial.print(Vernier.sensorUnits());  // display units on second line
}

// Take sensor readings
void loop()
{
  float sensorReading =Vernier.readSensor();
  Serial.print(sensorReading);
  Serial.print(" ");
  Serial.println(Vernier.sensorUnits());

  mySerial.write(254); // command character
  mySerial.write(192); // move to line 2, position 0,
  mySerial.print(sensorReading);
  mySerial.write(254); // command character
  mySerial.write(200); // move to line 2, position 7
  mySerial.print(Vernier.sensorUnits()); // print out sensor units
  delay(1000);// a second
  mySerial.write(254); // cursor to beginning of first line
  mySerial.write(192);
  mySerial.print("                "); // clear 2nd line of display for next loop
}

// function to get the sensor's stored information
void printSensorInfo()
 {
   // print out information about the sensor found:
   Serial.println("Sensor Information");
   Serial.print("Sensor ID number: ");
   Serial.print("\t");
   Serial.println(Vernier.sensorNumber());
   Serial.print("Sensor Name: ");
   Serial.print("\t");
   Serial.println(Vernier.sensorName());
   Serial.print("Short Name: ");
   Serial.print("\t");
   Serial.println(Vernier.shortName());
   Serial.print("Units: ");
   Serial.print("\t");
   Serial.println(Vernier.sensorUnits());
   Serial.print("ID voltage level: ");
   Serial.print("\t");
   Serial.println(Vernier.voltageID());
   Serial.print("Page: ");
   Serial.print("\t");
   Serial.println(Vernier.page());
   Serial.print("slope: ");
   Serial.print("\t");
   Serial.println(Vernier.slope());
   Serial.print("intercept: ");
   Serial.print("\t");
   Serial.println(Vernier.intercept());
   Serial.print("cFactor:");
   Serial.print("\t");
   Serial.println(Vernier.cFactor());
   Serial.print("calEquationType: ");
   Serial.print("\t");
   Serial.println(Vernier.calEquationType());
 }