Go Direct® Ethanol Vapor User Manual
Order Code: GDX-ETOH

Go Direct Ethanol Vapor measures the concentration of ethanol in the air above an aqueous sample. This sensor can be used in a wide variety of experiments in biological, agricultural, food, and environmental studies.
- Determine the rate of ethanol production during fermentation.
- Measure the discrete amount of ethanol in a given sample.
- Investigate which sugars yeast can ferment.
- Identify specific organisms that can utilize ethanol fermentation as a metabolic pathway.
Note: Vernier products are designed for educational use. Our products are not designed nor are they recommended for any industrial, medical, or commercial process such as life support, patient diagnosis, control of a manufacturing process, or industrial testing of any kind.
What's Included
- Go Direct Ethanol Vapor
- Micro USB Cable
- 250 mL Nalgene Bottle
- Ethanol Cap Assemblies
- Plumber's Tape
- #6 Stopper
Compatible Software
Choose a platform below to see its compatibility requirements.LabQuest
Interface LabQuest App LabQuest 3 Full support LabQuest 2 Full support 1 LabQuest Incompatible Compatibility Notes
Computers
Software Interface Graphical Analysis Graphical Analysis (Web App) No interface required Full support Full support LabQuest 3 Full support 1 Incompatible LabQuest 2 Full support 1 2 Incompatible Compatibility Notes
Chromebook
Software Interface Graphical Analysis (Web App) No interface required Full support iOS
Software Interface Graphical Analysis Graphical Analysis GW No interface required Full support Incompatible LabQuest 3 Full support 1 2 Full support 1 LabQuest 2 Full support 1 2 3 Full support 1 3 Compatibility Notes
Android
Software Interface Graphical Analysis Graphical Analysis GW No interface required Full support Incompatible LabQuest 3 Full support 1 2 Full support 1 LabQuest 2 Full support 1 2 3 Full support 1 3 Compatibility Notes
Python
Software Interface Python No interface required Full support Javascript
Software Interface Javascript No interface required Full support 1 Compatibility Notes
LabVIEW
Software Interface NI LabVIEW No interface required Full support
Quick Start: Vernier Graphical Analysis® and Bluetooth®
- Charge your sensor for at least 2 hours before first use.
- Turn on your sensor. The LED will blink red.
- Launch Graphical Analysis, then click Sensor Data Collection.
- Select your sensor from the list. The sensor ID is located on the sensor label near the bar code. Note: If you don’t see a list of available sensors, click WIRELESS. After selecting your sensor, click Pair.
- Click DONE. You are now ready to collect data.
Using other Vernier data-collection apps or want to connect via USB?
Visit www.vernier.com/start-go-direct
Note: This sensor also works with LabQuest 2 and LabQuest 3; it does not work with the original LabQuest.
Charging the Sensor
Connect Go Direct Ethanol Vapor to the included Micro USB Cable and any USB device for two hours.
You can also charge up to eight Go Direct Ethanol Vapor Sensors using our Go Direct Charge Station, sold separately (order code: GDX-CRG). An LED on each Go Direct Ethanol Vapor indicates charging status.
| Charging |
Blue LED on steady while sensor is connected to the Micro USB Cable or Charging Station. |
| Fully charged |
Blue LED is off when charging is complete. |
Powering the Sensor
| Turning on the sensor |
Press button once. Red LED indicator flashes when unit is on. |
| Putting the sensor in sleep mode |
Press and hold button for more than three seconds to put into sleep mode. Red LED indicator stops flashing when sleeping. |
Connecting the Sensor
See the following link for up-to-date connection information:
www.vernier.com/start/gdx-etoh
| Connected and charging | Blue and Green LED solid when sensor is connected to Graphical Analysis via USB and unit is charging. (Green LED is obscured by the blue one.) |
| Connected | Green LED solid when sensor is connected to Graphical Analysis via USB and the unit is fully charged. Green LED flashing when sensor is connected to Graphical Analysis via Bluetooth wireless technology. |
| Charging via USB, connected via Bluetooth wireless technology |
Blue LED is solid and green LED is flashing, but the green flashing LED looks white because it is overwhelmed by the blue. |
Identifying the Sensor
When two or more sensors are connected, the sensors can be identified by tapping or clicking Identify in Sensor Information.
Calibrating the Sensor
It may not be necessary to perform a calibration when using Go Direct Ethanol Vapor. If your experiment or application is evaluating the rate of ethanol production, such as determining fermentation rates with yeast, or the relative change in ethanol concentration, then the stored calibration works well.
For quantitative analysis of ethanol samples, it is best to use a two-point calibration to improve accuracy. The two points you choose for your calibration will depend on the expected amount of ethanol in your sample. For best results at low concentrations (0.1–1%), calibrate using 1% and 0.1% ethanol. For best results at high concentrations (1.0–3.0%), calibrate using 3.0% and 1% ethanol. If you are measuring an intermediate range you can also calibrate using 0.2% and 2.0% ethanol.
To calibrate the sensor in Graphical Analysis, complete the following steps.
- Click or tap the sensor meter to view sensor options.
- Select Calibrate and follow the applicable prompts on the Calibrate Sensor screen.
Once you have calibrated your Go Direct Ethanol Vapor, the calibration is automatically stored to the sensor and will be used each time you connect to your device. You can always choose to restore factory defaults if you feel the custom calibration is invalid.
To restore factory defaults in Graphical Analysis, complete the following steps.
- Click or tap the live readouts meter and choose Calibrate.
- Click or tap Reset Calibration.
A window will appear warning you that you are about to reset the calibration. Choose Reset Calibration.
Making Ethanol Standards for Calibration
To make solutions for the ethanol calibration, you will need to dilute fresh, stock ethanol to the appropriate concentration. Denatured ethanol or non-denatured, grain ethanol may be used. Ethanol that is 70% is more stable than 95%. For the most accurate results, use a volumetric flask to make the standards. Use the following equation to guide you:
C1V1 = C2V2
• C1 is the concentration of the stock solution (typically 70% or 95%).
• V1 is the amount of stock solution to be added (you will solve for this).
• C2 is the desired concentration in %.
• V2 the total final volume.
• V2 – V1 = amount of distilled water to add to the stock solution.
It may be necessary to do a serial dilution in order to get the precision you need for your standards. The following table shows an example of a serial dilution to make 0.1% ethanol starting with 70% ethanol.
|
Original concentration of ethanol |
Amount of ethanol to add (mL) |
Final volume (ethanol and water) (mL) |
Final concentration |
|
70% |
14.3 |
100.0 |
10% |
|
10% |
10.0 |
100.0 |
1% |
|
1% |
10.0 |
100.0 |
0.1% |
Specifications
|
Range (%) |
0 to 3% |
|
Accuracy (factory calibration) |
±1.5% at 3% |
|
Accuracy (custom calibration) 1–3% |
±0.5% at 3% |
|
Accuracy (custom calibration) 0.1–1% |
±0.3% at 1% |
|
Response time |
90% of full scale in 60 seconds |
|
Type |
Metal Oxide |
|
Wireless specification |
Bluetooth 4.2 |
|
Maximum wireless range |
30 m |
|
Battery |
650 mA Li-Poly |
|
Battery life (single full charge) |
~24 hours |
|
Battery life (long term) |
~500 full charge cycles (several years depending on usage) |
Care and Maintenance
Battery Information
Go Direct Ethanol Vapor contains a small lithium-ion battery. The system is designed to consume very little power and not put heavy demands on the battery. Although the battery is warranted for one year, the expected battery life should be several years. Replacement batteries are available from Vernier
(order code: GDX-BAT-650).
Storage and Maintenance
To store Go Direct Ethanol Vapor for extended periods of time, put the device in sleep mode by holding the button down for at least three seconds. The red LED will stop flashing to show that the unit is in sleep mode. Over several months, the battery will discharge but will not be damaged. After such storage, charge the device for a few hours, and the unit will be ready to go.
Exposing the battery to temperatures over 35°C (95°F) will reduce its lifespan. If possible, store the device in an area that is not exposed to temperature extremes.
Note: It is recommended that you wash the Nalgene bottle by hand. Most dishwashers will melt plastic bottles.
Water Resistance
Important: Go Direct Ethanol Vapor is neither waterproof, nor is it water resistant and should never be immersed in any liquid.
If any liquid gets into the device, immediately power the unit down (press and hold the power button for more than three seconds). Disconnect the sensor and charging cable, and remove the battery. Allow the device to dry thoroughly before attempting to use the device again. Do not attempt to dry using an external heat source.
Note: Damage due to exposure to liquids is not covered under warranty.
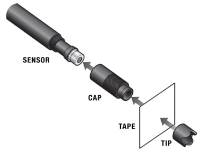
Making a Cap Assembly
Go Direct Ethanol Vapor comes with caps that have a membrane installed. You do not need to make a cap assembly using teflon tape, but if you choose to do so, follow the steps below.
- Remove the tip of the cap from the sensor. Discard the tissue paper covering the cap (first use only).
- Cut a 1.5 centimeter piece of plumber’s tape (included).
- Cover the cap entirely with the tape and inspect the tape for wrinkles or gaps.
- Place the tip over the tape and verify that it is secure before proceeding.
- Connect the probe following the steps in the Getting Started section of this user manual.
Note: Remove the tape from the cap at the end of the experiment. For best results, use a new piece of tape each day the sensor is used.
How the Sensor Works
Go Direct Ethanol Vapor uses a metal oxide semiconductor to detect ethanol concentrations in the air. Ethanol vapor reacts with the metal oxide and is consumed in a reaction that reduces the resistance of the sensing element. A circuit converts the change in resistance into an appropriate ethanol concentration. The sensing element is very sensitive to ethanol vapor and also responds to a wide range of volatile organic compounds. It also responds to water vapor and carbon dioxide gas but to a lesser degree.
Troubleshooting
- Very important: Do not place the sensor into any liquid. The sensor is designed to measure ethanol vapor above an aqueous sample.
- For best results, allow the sensor to warm up for 5 minutes before taking measurements.
- Built-in temperature, pressure, and humidity compensation are not provided. For best results, calibrate before use and use at room temperature.
- The recommended sampling rate is 1 sample per second or slower for this sensor. This allows the sensor to average a set of measurements before reporting a value. Gas must diffuse to the sensing element to detect any changes in concentration. Because diffusion of gases is a slow process, there can be a delay in response time.
- When using a fermentation chamber, use a clamp or an electrode support to adjust the position of the sensor tip by moving the shaft up or down as necessary.
- The 250 mL Nalgene Bottle and #6 stopper that are included can be used as a fermentation chamber. Wrap the stopper around the sensor shaft, rather than sliding it on or off. Place the probe with the stopper into the bottle, and then gently twist the stopper. Verify that the sensor tip is not immersed in fluid. For best results, place the chamber on a stir plate and use a magnetic stir bar to keep the sample moving.
- To collect data in a controlled environment and also use our one of our CO2 gas sensors, we recommend purchasing the BioChamber 2000 (2 L capacity). This BioChamber has a second, grommeted opening so that you can insert two probes at once.
For more troubleshooting and FAQs, see www.vernier.com/til/4303
Repair Information
If you have followed the troubleshooting steps and are still having trouble with your Go Direct Ethanol Vapor, contact Vernier Technical Support at support@vernier.com or call 888-837-6437. Support specialists will work with you to determine if the unit needs to be sent in for repair. At that time, a Return Merchandise Authorization (RMA) number will be issued and instructions will be communicated on how to return the unit for repair.
Accessories/Replacements
| Item | Order Code |
|---|---|
|
CB-USB-MICRO |
|
|
CB-USB-C-MICRO |
|
| Go Direct 650 mAh Replacement Battery |
GDX-BAT-650 |
| Ethanol Cap Assemblies (package of 3) |
ETH-CAPS |
| #6 Stopper |
ETH-STOP |
| Plumber's Tape |
ETH-TAPE |
| 250 mL Nalgene Bottle w/Lid |
CO2-BTL |
| BioChamber 2000 |
BC-2000 |
|
ESUP |
|
|
STIR |
Warranty
Warranty information for this product can be found on the Support tab at www.vernier.com/gdx-etoh/#support
General warranty information can be found at www.vernier.com/warranty
Consumable items, such as Plumber's Tape, are excluded from the warranty.
Disposal
When disposing of this electronic product, do not treat it as household waste. Its disposal is subject to regulations that vary by country and region. This item should be given to an applicable collection point for the recycling of electrical and electronic equipment. By ensuring that this product is disposed of correctly, you help prevent potential negative consequences on human health or on the environment. The recycling of materials will help to conserve natural resources. For more detailed information about recycling this product, contact your local city office or your disposal service.
Battery recycling information is available at www.call2recycle.org
Do not puncture or expose the battery to excessive heat or flame.
 The symbol, shown here, indicates that this product must not be disposed of in a standard waste container.
Contact Support
Fill out our online support form or call us toll-free at 1-888-837-6437.