Go Direct® Melt Station User Manual
Order Code: GDX-MLT
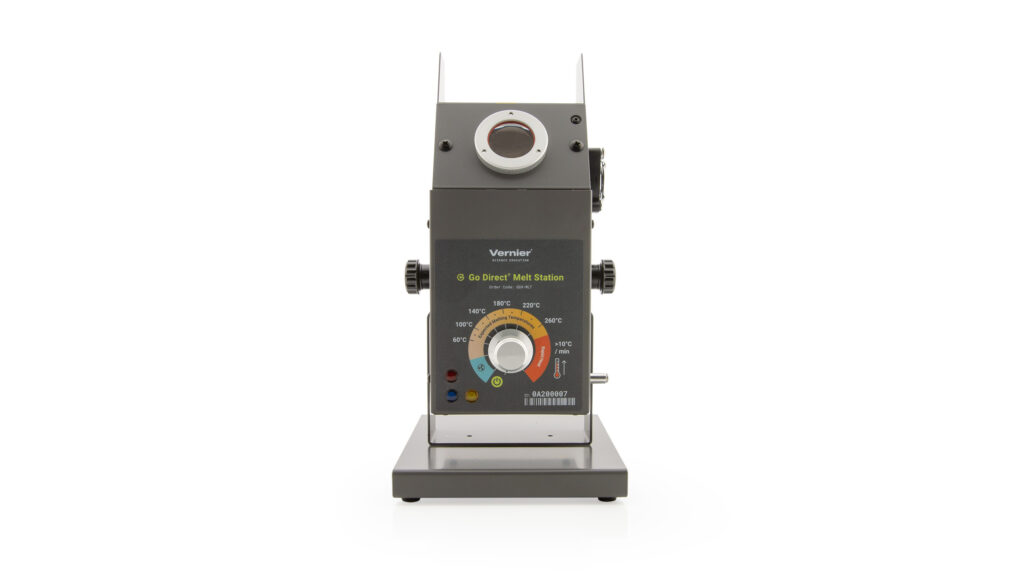
The Go Direct Melt Station is a sensor used to measure the melting temperature of solid substances.
Note: Vernier products are designed for educational use. Our products are not designed nor are they recommended for any industrial, medical, or commercial process such as life support, patient diagnosis, control of a manufacturing process, or industrial testing of any kind.
What's Included
- Go Direct Melt Station
- 100 standard capillary tubes
- AC power supply
- Micro USB Cable
Compatible Software
Choose a platform below to see its compatibility requirements.LabQuest
Interface LabQuest App LabQuest 3 Full support LabQuest 2 Full support 1 LabQuest Incompatible Compatibility Notes
Computers
Software Interface Graphical Analysis Graphical Analysis (Web App) No interface required Full support 1 Full support 1 LabQuest 3 Full support 1 2 Incompatible LabQuest 2 Full support 1 2 3 Incompatible Compatibility Notes
Chromebook
Software Interface Graphical Analysis (Web App) No interface required Full support 1 Compatibility Notes
iOS
Software Interface Graphical Analysis Graphical Analysis GW No interface required Full support 1 Full support 2 LabQuest 3 Full support 1 3 4 Full support 1 3 4 LabQuest 2 Full support 1 3 4 5 Full support 1 3 4 5 Compatibility Notes
Android
Software Interface Graphical Analysis Graphical Analysis GW No interface required Full support 1 Incompatible LabQuest 3 Full support 1 2 3 Full support 2 LabQuest 2 Full support 1 2 3 4 Full support 2 4 Compatibility Notes
Python
Software Interface Python No interface required Full support Javascript
Software Interface Javascript No interface required Full support 1 Compatibility Notes
LabVIEW
Software Interface NI LabVIEW No interface required Full support
Quick Start: Vernier Graphical Analysis® and Bluetooth®
- Turn on your sensor by plugging in the AC power and turn the temperature knob to the cooling fan. The LED will blink red.
- Launch Graphical Analysis, then click Sensor Data Collection.
- Select your sensor from the list. The sensor ID is located on the sensor label near the bar code. Note: If you don’t see a list of available sensors, click WIRELESS. After selecting your sensor, click Pair.
- Click DONE. You are now ready to collect data.
Using other Vernier data-collection apps or connecting via USB?
Visit www.vernier.com/start-go-direct
Note: This sensor also works with LabQuest 2 and LabQuest 3; it does not work with the original LabQuest.
Connecting the Sensor
See the following link for up-to-date connection information:
Using the Product
Prepare the sample and device
-
Set Up the Sensor
Connect the sensor as described in the Quick Start section of this manual.
-
Load the Sample
Place a small amount of solid into a capillary tube.
-
Insert the Tube
Carefully insert the tube into one of the three slots in the aluminum heating block.
-
Adjust Viewing Angle
Tilt the Melt Station up or down, as needed, to clearly view the sample through the lens.
Run the Experiment
- Begin Data Collection
- In your software, click or tap Collect.
- Turn the Melt Station's control knob to Rapid Heat.
- The red LED will turn on, indicating heating at a rate of >10°C/min.
- Monitor Temperature
- Watch the temperature vs. time graph.
- When the temperature is within ~10°C of the sample's expected melting point, adjust the control knob to that temperature to slow the heating rate to ~1.5°C/min.
Record the Melting Range
In Graphical Analysis Pro
- Observe the sample carefully.
- When the sample begins to melt, click or tap MARK to record the temperature.
- Click MARK again when the solid is completely melted.
- Click the text box to label each MARK point.
Note: The MARK feature is not available in the free version of Graphical Analysis. Use text annotations instead if desired.
In LabQuest App
- Observe the sample.
- When the sample begins to melt, tap Keep to record the temperature.
- Tap Keep again when the solid is completely melted.
- Tap the box to the right of the graph label box to add text.
Wrap Up
- Stop Data Collection
- Click or tap Stop in Graphical Analysis.
- In LabQuest App, tap the File Cabinet to save the run.
- Cool Down
Turn the knob to Fan/Cooling. The blue LED will turn on.
- Repeat as Needed
Prepare a new sample. Once the heating block has melted (check the temperature on the meter), you can load a new sample and begin the next trial.
Care and Maintenance
Cleaning Outside Surfaces
Clean the outside metal surfaces of the Melt Station with a cloth dampened with a mild detergent solution. Do not use organic solvents to clean the Melt Station.
Removing Broken Capillary Tubes
Follow the steps below to remove a broken capillary tube from the Melt Station. Caution: Do not handle a broken capillary tube with your fingers. Wear safety glasses or safety goggles.
- Turn off the Melt Station and allow it to cool to room temperature. Unplug the power cord from the device.
- Place the Melt Station unit on its back side so the capillary tube slots are as close to horizontal as possible. This will make it easier to safely remove the glass shards.
- Remove the two threaded screws holding the lens panel in place. Set the screws and the viewing lens aside.
- Use a 3/32 inch hex key to remove the two screws holding the metal spring fingers in place. Set the screws and spring fingers aside. Use the same hex key to loosen the screw holding the glass window in place. Slide the glass window up to remove it, and set it aside. Caution: The edges of the glass may be sharp.
- Use an appropriate tool to carefully remove the broken capillary tube from its slot and deposit it in a glass waste container. If the capillary tube is loose in the slot, you can very carefully tip the Melt Station over to slide the tube into a waste container.
- Replace the glass window, metal fingers, and viewing lens. Carefully tighten the screws to be snug rather than extremely tight. Remember that you may want to remove these pieces again in the future.
Safety
The Melt Station is designed for use in an academic laboratory. Its intended purpose is to determine the melting temperature of a solid substance in the temperature range between ambient and 260°C. The safety guidelines listed below must be followed strictly during the operation of this device. Failure to comply with these guidelines violates the standards of safety set forth in this document and the standards expected as good laboratory practice.
- Always wear safety goggles or safety glasses when using the Melt Station.
- Do not use the Melt Station for any purpose other than its intended use, which is to measure the melting point of a solid substance.
- Use the Melt Station under the supervision of a qualified chemistry instructor.
- Place the Melt Station on a clean, level surface.
- Make sure the Melt Station is a safe distance from solvents, containers of liquid or gaseous substances, and sources of water.
- Do not use the Melt Station with flammable liquids or gases.
- Do not allow the device to become wet. If it does, disconnect power to the device immediately and allow it to thoroughly dry.
- Do not leave the device unattended while heating; monitor temperature at all times.
- Turn off the Melt Station immediately after all testing is completed.
- Do not alter or remove the protective metal walls that surround the heating block of the Melt Station.
- The Melt Station is designed to operate in an upright position.
- Do not touch the heating block while it is hot.
- Check the temperature of the heating block before inserting a capillary tube of solid sample.
- The heating block can remain hot for a short period of time after use, even when off.
- Use the Melt Station in a well-ventilated room.
- The Melt Station is not designed for liquids or wet environments.
- The Melt Station is not designed or intended for use with samples that could explode or ignite by heat, friction, or spark.
- While some routine maintenance can be performed on the Melt Station, these tasks should be performed only by qualified personnel.
- Do not use the Melt Station if any malfunction is suspected.
- Do not modify or install additional parts to the Melt Station.
- Unplug the Melt Station before storing.
Safety Automatic Shut Off
An important safety feature of the Melt Station is the Automatic Shut Off. After you turn the control knob to heating, an internal timer starts. After 50–60 minutes have elapsed, the Melt Station will automatically turn off the heating element and the yellow LED will come on. To reset the Melt Station, simply turn the control knob to the cooling position or the Off position.
Specifications
|
Dimensions |
Base–13 cm × 15 cm × 1.5 cm Body–9 cm × 9 cm × 24 cm |
|
Weight |
1.0 kg (2.2 lbs.) Melt Station + AC adapter weight: 1.2 kg (2.6 lbs.) |
|
Range |
Ambient to 260°C |
|
Resolution |
0.10°C |
|
Accuracy |
±0.31 + 0.0006T, where T is the temperature in Celsius |
|
Typical |
±0.4°C (<200°C); ± 0.5 deg C (>200°C) |
|
Safety shut down |
The heating block is automatically powered down after approximately 60 minutes of heating. |
|
Capillary tubes |
1.4–1.8 mm outside diameter, 100 mm length |
|
Capillary tube slots |
3 |
|
Viewing lens |
27 mm diameter (functional), 30 mm (actual) |
|
Lighting of capillary slots |
3 white LEDs |
|
Lighting of control dial |
Red LED
(indicates heating mode), |
|
Temperature sensor |
Class A, Platinum Resistance Temperature Detector (RTD) |
|
Calibration |
Factory calibrated |
|
Power |
24VDC to unit, universal AC adapter 100–240 VAC 50–60 Hz input |
|
Power consumption |
40W max., < 0.5A @ 110V |
How the Sensor Works
The Melt Station contains an aluminum heating block. There are three slots for capillary tubes in the heating block. A capillary tube containing a solid substance is placed in the heating block and the block is heated by an embedded element. An RTD-based temperature sensor, also embedded in the heating block, measures the temperature of the heating block and therefore the capillary tube of substance. The temperature sensor connects to Vernier data-collection software. The substance to be melted is viewed through a 6X lens.
The temperature control on the Melt Station is divided into three regions.
- The first area, next to the Off position, is for cooling the heating block after you have completed a melting temperature run. When you turn the control knob to the cooling position, the fan and the blue LED will come on.
- The second area is divided into specific temperature settings. These temperatures correspond to the expected melting temperature of the substance. You will choose one of these settings when the Melt Station has warmed to within about 10°C of the expected melting temperature of your solid sample. The warming rate will slow to ~1.5°C/min at each of these settings.
- The third area is Rapid Heat. In Rapid Heat, the Melt Station will warm at a rate of >10°C/min.
Calibration
The temperature sensor embedded in the aluminum heating block of the Melt Station will never need to be calibrated. The sensor is carefully calibrated before it ships, and this unique calibration is stored on a smart chip in the sensor. Note: There is no method to perform a calibration of this sensor in any of our software programs.
Troubleshooting
For troubleshooting and FAQs, see www.vernier.com/til/3852
Repair Information
If you have followed the troubleshooting steps and are still having trouble with your Go Direct Melt Station, contact Vernier Technical Support at support@vernier.com or call 888-837-6437. Support specialists will work with you to determine if the unit needs to be sent in for repair. At that time, a Return Merchandise Authorization (RMA) number will be issued and instructions will be communicated on how to return the unit for repair.
Accessories/Replacements
| Accessory | |
|---|---|
| Item | Order Code |
| Mini USB Cable |
CB-USB-C-MINI |
|
MLT-TUBE |
|
| Replacement Part | |
| Item | Order Code |
| Micro USB Cable |
CB-USB-MICRO |
|
MLT-PS |
|
Warranty
Warranty information for this product can be found on the Support tab at www.vernier.com/gdx-mlt/#support
General warranty information can be found at www.vernier.com/warranty
Disposal
When disposing of this electronic product, do not treat it as household waste. Its disposal is subject to regulations that vary by country and region. This item should be given to an applicable collection point for the recycling of electrical and electronic equipment. By ensuring that this product is disposed of correctly, you help prevent potential negative consequences on human health or on the environment. The recycling of materials will help to conserve natural resources. For more detailed information about recycling this product, contact your local city office or your disposal service.
 The symbol, shown here, indicates that this product must not be disposed of in a standard waste container.
Contact Support
Fill out our online support form or call us toll-free at 1-888-837-6437.