Go Direct® Blood Pressure Sensor User Manual
Order Code: GDX-BP

Go Direct Blood Pressure is a non-invasive sensor that measures human blood pressure. It measures systolic, diastolic, and mean arterial pressure via the oscillometric method. Go Direct Blood Pressure can also report pulse rate and display both individual pressure pulses and peak-to-peak pulse amplitudes. The sensor indicator light provides immediate user feedback, letting students know when blood pressure parameters have been reported. With both USB and wireless capabilities, students can monitor blood pressure anywhere using almost any device.
Go Direct Blood Pressure can be used in a variety of experiments, such as
- Measuring and comparing blood pressure and heart rate
- Measuring how exercise changes blood pressure
- Observing how the "fight or flight" response changes blood pressure
Note: Vernier products are designed for educational use. Our products are not designed nor are they recommended for any industrial, medical, or commercial process such as life support, patient diagnosis, control of a manufacturing process, or industrial testing of any kind.
What's Included
- Go Direct Blood Pressure
- Standard adult size adjustable cuff (27 cm to 39 cm)
- Bulb pump (with release valve)
- Micro USB Cable
Compatible Software
Choose a platform below to see its compatibility requirements.LabQuest
Interface LabQuest App LabQuest 3 Full support LabQuest 2 Full support 1 LabQuest Incompatible Compatibility Notes
Computers
Software Interface Graphical Analysis Graphical Analysis (Web App) No interface required Full support Full support LabQuest 3 Full support 1 Incompatible LabQuest 2 Full support 1 2 Incompatible Compatibility Notes
Chromebook
Software Interface Graphical Analysis (Web App) No interface required Full support iOS
Software Interface Graphical Analysis Graphical Analysis GW No interface required Full support Incompatible LabQuest 3 Full support 1 2 Full support 2 LabQuest 2 Full support 1 2 3 Full support 2 3 Compatibility Notes
Android
Software Interface Graphical Analysis Graphical Analysis GW No interface required Full support Incompatible LabQuest 3 Full support 1 2 Full support 2 LabQuest 2 Full support 1 2 3 Full support 2 3 Compatibility Notes
Python
Software Interface Python No interface required Full support Javascript
Software Interface Javascript No interface required Full support LabVIEW
Software Interface NI LabVIEW No interface required Full support
Quick Start: Vernier Graphical Analysis® and Bluetooth®
- Charge your sensor for at least 2 hours before first use.
- Turn on your sensor. The LED will blink red.
- Launch Graphical Analysis, then click Sensor Data Collection.
- Select your sensor from the list. The sensor ID is located on the sensor label near the bar code. Note: If you don’t see a list of available sensors, click WIRELESS. After selecting your sensor, click Pair.
- This is a multi-channel sensor. Click SENSOR CHANNELS and select the channel(s) you want to use.
- Click DONE. You are now ready to collect data.
Using other Vernier data-collection apps or want to connect via USB?
Visit www.vernier.com/start-go-direct
Note: This sensor also works with LabQuest 2 and LabQuest 3; it does not work with the original LabQuest.
Charging the Sensor
Connect Go Direct Blood Pressure to the included USB Charging Cable and any USB device for two hours.
You can also charge up to eight Go Direct Blood Pressure Sensors using our Go Direct Charge Station, sold separately (order code: GDX-CRG). An LED on each Go Direct Blood Pressure indicates charging status.
| Charging |
Orange LED next to the battery icon is solid while the sensor is charging. |
| Fully charged |
Green LED next to the battery icon is solid when the sensor is fully charged. |
Powering the Sensor
| Turning on the sensor |
Press button once. Red LED indicator next to the Bluetooth icon flashes when the unit is on. |
| Putting the sensor in sleep mode |
Press and hold button for more than three seconds to put into sleep mode. Red LED indicator next to Bluetooth icon stops flashing when sleeping. |
Connecting the Sensor
See the following link for up-to-date connection information:
Connecting via Bluetooth
| Ready to connect | Red LED next to the Bluetooth icon flashes when sensor is awake and ready to connect. |
| Connected | Green LED next to the Bluetooth icon flashes when sensor is connected via Bluetooth. |
Connecting via USB
| Connected and charging | Orange LED next to the battery icon is solid when the sensor is connected to Graphical Analysis via USB and the unit is charging. LED next to Bluetooth icon is off. |
| Connected, fully charged | Green LED next to the battery icon is solid when the sensor is connected to Graphical Analysis via USB and fully charged. LED next to Bluetooth icon is off. |
| Charging via USB, connected via Bluetooth |
Orange LED next to the battery icon is solid when the sensor is charging. Green LED next to the Bluetooth icon flashes. |
Identifying the Sensor
When two or more sensors are connected, the sensors can be identified by tapping or clicking Identify in Sensor Information.
Using the Product
Connect the sensor following the steps in the Quick Start section of the user manual.
When performing blood pressure measurements, it is best to work with a partner. Follow these general procedures when using Go Direct Blood Pressure:
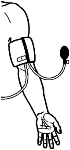
- Attach the rubber hose from the cuff to the connector on the sensor.
- Wrap the cuff firmly around the subject's arm, approximately 2 cm above the elbow as shown below. The two rubber hoses from the cuff should be positioned over the bicep muscle (near the brachial artery) and not under the arm. Important: The arm should rest at the level of the heart, and remain relaxed throughout data collection. A desk or table can be used to support the arm. The subject must remain still during data collection—no movement of the arm or hand should occur during measurements.
- Find the sensor indicator light. It is located in the top right corner of the sensor label next to the check mark.
- Begin data collection. Quickly and repeatedly squeeze the bulb to inflate the cuff. Continue inflating the cuff to a pressure between 150 and 170 mmHg. The sensor indicator light will flash red as the cuff is inflated. When the light flashes green, an appropriate pressure has been reached. Note: A meter in the data-collection software will also display the live pressure readings from the sensor.
- When the light flashes green, set the bulb pump down on the table. The built-in pressure release valve will slowly deflate the cuff. The sensor indicator light will flash green as the pressure decreases.
- When the pressure drops to 50 mmHg, you may press down on the pressure release valve to release any air remaining in the cuff.
- When the sensor indicator light turns solid green, blood pressure parameters have been reported. Stop data collection. Results will be displayed in the meters at the bottom of the graph. Results can also be found in the data table and will be reported on the meter screen.
Note: If the sensor indicator light turns solid red, blood pressure parameters were not reported by the sensor. Repeat data collection.
Note: If the cuff pressure does not reach 50 mmHg after 90 seconds, adjust the exhaust rate of the pressure release valve according to the directions listed under “Adjusting the Pressure Release Valve.”
Channels
Go Direct Blood Pressure has seven measurement channels:
- Cuff Pressure
- Mean Arterial Pressure
- Systolic Pressure
- Diastolic Pressure
- Pulse Rate
- Oscillations
- Envelope
Cuff Pressure
This channel measures the pressure applied to the cuff. This channel is active by default when the sensor is connected.
Mean Arterial Pressure
This channel reports the estimated mean arterial blood pressure using the oscillometric method. The value is reported at the end of the run after the pressure has fallen below 50 mmHg. This channel is active by default when the sensor is connected.
Systolic Pressure
This channel reports the estimated systolic blood pressure using the oscillometric method. The value is reported at the end of the run after the pressure has fallen below 50 mmHg. This channel is active by default when the sensor is connected.
Diastolic Pressure
This channel reports the estimated diastolic blood pressure using the oscillometric method. The value is reported at the end of the run after the pressure has fallen below 50 mmHg. This channel is active by default when the sensor is connected.
Pulse Rate
This channel reports the pulse rate of the subject in beats per minute (bpm). The sample window for the calculation is the last 30 seconds of data collection. The value is reported at the end of the run after the pressure has fallen below 50 mmHg. This channel is active by default when the sensor is connected.
Oscillations
This channel displays the pulses found during cuff deflation. This channel is not active by default when connected to the sensor.
Envelope
This channel graphs the peak-to-peak amplitudes of all pulses detected during cuff deflation. The resulting graph is the "envelope" used to calculate blood pressure parameters using the oscillometric method. This channel is not active by default when connected to the sensor.
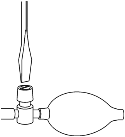
Adjusting the Pressure Release Valve
The pressure release valve is set to release at a rate of 3.0 mmHg/s on an arm that is 32 cm in circumference. For arms much larger or much smaller it may be necessary to adjust the valve so that the exhaust rate stays in the range of 2.0 to 4.0 mmHg/s. With the bulb in hand and the hose leading away from you, place a screwdriver into the metal slot on the top of the release valve. To increase the rate of exhaust, turn the screwdriver clockwise. To decrease the rate of exhaust, turn the screwdriver counter-clockwise. The larger a subject’s arm the slower the release valve will exhaust.
Using Go Direct Blood Pressure at High Altitudes (above 6,000 ft)
To record proper measurements at altitudes above 6,000 ft (0.8 atm or 609 mmHg) the pressure release valve will need to be readjusted. The pressure release valve is set to release at a rate of 3.0 mmHg/s at sea level, where atmospheric pressure is 1 atm or 760 mmHg. At higher altitudes, the pressure release valve will exhaust at a slower rate. To use Go Direct Blood Pressure at altitudes above 6,000 ft, open the pressure exhaust valve by turning it a half turn clockwise. See the instructions above. Verify that the exhaust rate is now in the range of 2.0–4.0 mmHg/s after making the adjustment.
Calibrating the Sensor
The sensor is factory calibrated and cannot be calibrated by the user.
Specifications
|
Type |
Differential pressure |
|
Range |
0 to 300 mmHg |
|
Resolution |
0.001 mmHg |
|
Accuracy |
± 0.75 mmHg |
|
Response time |
5 ms |
|
Maximum pressure without damage |
3100 mmHg |
|
Systolic pressure coefficient |
57% of MAP |
|
Diastolic pressure coefficient |
74% of MAP |
|
Pulse rate calculation |
Sample window: Last 30 s of data collection |
|
Maximum sampling rate |
200 samples/s |
|
USB specification |
2.0 |
|
Wireless specification |
Bluetooth 4.2 |
|
Maximum wireless range |
30 m |
|
Battery |
300 mA Li-Poly |
|
Battery life (single full charge) |
~24 hours |
|
Battery life (long term) |
~500 full charge cycles (several years depending on usage) |
Care and Maintenance
Battery Information
Go Direct Blood Pressure contains a small lithium-ion battery. The system is designed to consume very little power and not put heavy demands on the battery. Although the battery is warranted for one year, the expected battery life should be several years. Replacement batteries are available from Vernier (order code: GDX-BAT-300).
Storage and Maintenance
To store the Go Direct Blood Pressure for extended periods of time, put the device in sleep mode by holding the button down for at least three seconds. The red LED will stop flashing to show that the unit is in sleep mode. Over several months, the battery will discharge but will not be damaged. After such storage, charge the device for a few hours, and the unit will be ready to go.
Exposing the battery to temperatures over 35°C (95°F) will reduce its lifespan. If possible, store the device in an area that is not exposed to temperature extremes.
Water Resistance
Important: Go Direct Blood Pressure is not water resistant and should never be immersed in water.
If water gets into the device, immediately power the unit down (press and hold the power button for more than three seconds). Disconnect the sensor and charging cable, and remove the battery. Allow the device to dry thoroughly before attempting to use the device again. Do not attempt to dry using an external heat source.
How the Sensor Works
The sensor determines the blood pressure of the subject using the oscillometric method, a non-invasive means of measuring blood pressure. This method is based on the principle that blood pumped through the arteries by the heart causes the arterial walls to flex. When a cuff (placed around the upper arm to occlude the brachial artery) is inflated and then slowly deflates at a constant rate, an arterial pressure pulse forms. These pressure pulses pass from the arteries, through the arm, and into the pressure cuff itself.
When the artery is fully compressed by the cuff, blood flow stops, along with the pulsations. As the pressure in the cuff slowly decreases, the arterial blood pressure increases to the point that blood is forced through the artery in short pulses. As the pressure in the cuff decreases, more blood flows through the occluded artery and the pulses become larger until maximum amplitude is reached. Further decreases in cuff pressure minimize the occlusion of the artery and the pulses decrease in size until the occlusion is removed.
The peak-to-peak amplitudes of all of the pulses during cuff deflation form a bell-shaped curve of pulse amplitudes that is referred to as an "envelope". Within this envelope, the amplitude of each pulse increases through systolic blood pressure until the mean arterial pressure (MAP) is reached. The cuff pressure corresponding to the point with the maximum pulse amplitude approximates the mean arterial pressure of the subject. Systolic blood pressure is calculated by finding a point along the envelope prior to MAP that corresponds to a known percentage of the maximum amplitude. Diastolic blood pressure is calculated using a different percentage of maximum amplitude for the portion of the envelope following MAP. For more information on this method see www.vernier.com/til/2027
Troubleshooting
Go Direct Blood Pressure will not report blood pressure parameters until the sensor indicator light turns solid green. Do not stop data collection prematurely. Allow the sensor to complete the process of calculating blood pressure parameters.
Blood pressure readings will differ from person to person and even between measurements on the same individual. Do not expect to receive the same measurements on each trial since there are many factors that cause a person’s blood pressure to increase or decrease. Use the following tips to take accurate measurements.
Helpful Tips
- The subject’s arm and hand must remain still during measurements.
- The arm should rest at the level of the heart and remain relaxed during measurements. A desk or table can be used to support the arm.
- Proper placement of the pressure cuff will increase the accuracy of your blood pressure measurements. The rubber hoses from the cuff should exit over the bicep muscle (near brachial artery) and 2 cm above the crease in the elbow.
- Accurate blood pressure readings depend on the use of a cuff of appropriate size for the arm. For younger students, a smaller cuff (18 cm to 27 cm) is available (order code CUFF-SM). A large cuff (39 cm to 50 cm) is also available (order code CUFF-LG).
- Do not to touch or move the exhaust valve during measurements.
- Remove any clothing that may cover or constrict the portion of the arm being measured.
- For most individuals it is not necessary to inflate the pressure cuff higher than 170 mmHg. Over inflation of the cuff may cause pain and/or injury.
- If the pressure release valve is exhausting slower than 2.0 mmHg/s or faster than 4.0 mmHg/s, then adjust the exhaust rate of the pressure valve.
For more information see www.vernier.com/til/4454
Repair Information
If you have followed the troubleshooting steps and are still having trouble with your Go Direct Blood Pressure, contact Vernier Technical Support at support@vernier.com or call 888-837-6437. Support specialists will work with you to determine if the unit needs to be sent in for repair. At that time, a Return Merchandise Authorization (RMA) number will be issued and instructions will be communicated on how to return the unit for repair.
Accessories/Replacements
| Item | Order Code |
|---|---|
|
CB-USB-MICRO |
|
|
CB-USB-C-MICRO |
|
| Go Direct 300 mAh Replacement Battery |
GDX-BAT-300 |
|
CUFF-STD |
|
|
CUFF-LG |
|
|
CUFF-SM |
Warranty
Warranty information for this product can be found on the Support tab at www.vernier.com/gdx-bp/#support
General warranty information can be found at www.vernier.com/warranty
Disposal
When disposing of this electronic product, do not treat it as household waste. Its disposal is subject to regulations that vary by country and region. This item should be given to an applicable collection point for the recycling of electrical and electronic equipment. By ensuring that this product is disposed of correctly, you help prevent potential negative consequences on human health or on the environment. The recycling of materials will help to conserve natural resources. For more detailed information about recycling this product, contact your local city office or your disposal service.
Battery recycling information is available at www.call2recycle.org
Do not puncture or expose the battery to excessive heat or flame.
 The symbol, shown here, indicates that this product must not be disposed of in a standard waste container.
Contact Support
Fill out our online support form or call us toll-free at 1-888-837-6437.