Go Direct® Chloride Ion-Selective Electrode User Manual
Order Code: GDX-CL

Go Direct Chloride Ion-Selective Electrode (ISE) is used to measure the concentration of chloride (Cl−) ions in aqueous samples. It is designed to be used with the Vernier Go Direct ISE Amplifier (order code GDX-ISEA). Chloride ions are found in freshwater samples as a result of water flowing over salt-containing minerals. These salts might include either sodium chloride (NaCl) or potassium chloride (KCl). The EPA maximum contamination level for chloride concentration in drinking water is 250 mg/L. The chloride ion concentration in seawater is approximately 19,400 mg/L—well below the upper limit of the Chloride ISE of 35,000 mg/L.
Note: Vernier products are designed for educational use. Our products are not designed nor are they recommended for any industrial, medical, or commercial process such as life support, patient diagnosis, control of a manufacturing process, or industrial testing of any kind.
What's Included
- Go Direct Chloride Ion-Selective Electrode (Go Direct ISE Amplifier connected to a Go Direct Chloride Ion-Selective Electrode BNC)
- 30 mL bottle of High Standard solution with SDS (1000 mg/L or 1000 ppm Cl–)
- 30 mL bottle of Low Standard solution with SDS (10 mg/L or 10 ppm Cl–)
- Short-Term ISE Soaking Bottle
- Polishing strip
- Micro USB Cable
Compatible Software
Choose a platform below to see its compatibility requirements.LabQuest
Interface LabQuest App LabQuest 3 Full support LabQuest 2 Full support 1 LabQuest Incompatible Compatibility Notes
Computers
Software Interface Graphical Analysis Graphical Analysis (Web App) No interface required Full support Full support LabQuest 3 Full support 1 Incompatible LabQuest 2 Full support 1 2 Incompatible Compatibility Notes
Chromebook
Software Interface Graphical Analysis (Web App) No interface required Full support iOS
Software Interface Graphical Analysis Graphical Analysis GW No interface required Full support Full support LabQuest 3 Full support 1 2 Full support 1 2 LabQuest 2 Full support 1 2 3 Full support 1 2 3 Compatibility Notes
Android
Software Interface Graphical Analysis Graphical Analysis GW No interface required Full support Incompatible LabQuest 3 Full support 1 2 Full support 1 LabQuest 2 Full support 1 2 3 Full support 1 3 Compatibility Notes
Python
Software Interface Python No interface required Full support Javascript
Software Interface Javascript No interface required Full support 1 Compatibility Notes
LabVIEW
Software Interface NI LabVIEW No interface required Full support
Quick Start: Vernier Graphical Analysis® and Bluetooth®
- Charge your sensor for at least 2 hours before first use.
- Prepare the electrode by soaking it in the High Standard solution for 30 minutes. Refer to the Using the Product section for more information.
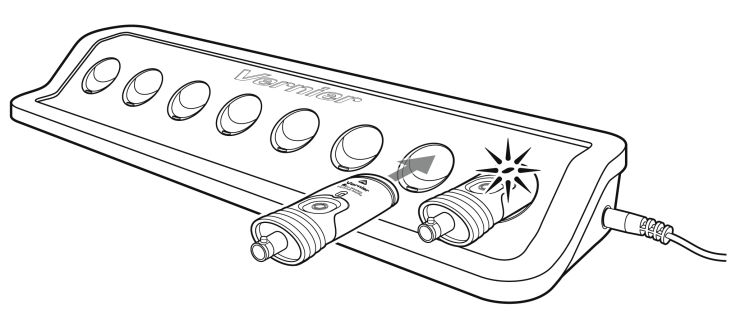
- Turn on your sensor. The LED will blink red.
- Launch Graphical Analysis, then click Sensor Data Collection.
- Select your sensor from the list. The sensor ID is located on the sensor label near the bar code. Note: If you don’t see a list of available sensors, click WIRELESS. After selecting your sensor, click Pair.
- Click DONE. You are now ready to collect data.
- For best results, perform a two-point calibration using the High and Low Standard solutions.
Using other Vernier data-collection apps or connecting via USB?
Visit www.vernier.com/start-go-direct
Note: This sensor also works with LabQuest 2 and LabQuest 3; it does not work with the original LabQuest.
Please see the following link for platform-specific connection information:
Charging the Sensor
Connect the Go Direct Chloride Ion-Selective Electrode to the included Micro USB Cable and any USB device for two hours. Connecting the Go Direct Chloride BNC Electrode to the amplifier during charging is optional.
You can also charge up to eight Go Direct Chloride Ion-Selective Electrodes using our Go Direct Charge Station, sold separately (order code: GDX-CRG). An LED on each Go Direct Chloride Ion-Selective Electrode indicates charging status.
| Charging |
Blue LED on steady while sensor is connected to the Micro USB Cable or Charge Station. |
| Fully charged |
Blue LED is off when charging is complete. |
Powering the Sensor
| Turning on the sensor |
Press button once. Red LED indicator flashes when unit is on. |
| Putting the sensor in sleep mode |
Press and hold button for more than three seconds to put into sleep mode. Red LED indicator stops flashing when sleeping. |
Connecting the Sensor
See the following link for up-to-date connection information:
| Connected and charging | Blue and Green LED solid when sensor is connected to Graphical Analysis via USB and unit is charging. (Green LED is obscured by the blue one.) |
| Connected, fully charged | Green LED solid when sensor is connected to Graphical Analysis via USB and the unit is fully charged. |
| Charging via USB, connected via Bluetooth |
Blue LED is solid and green LED is flashing, but the green flashing LED looks white because it is overwhelmed by the blue. |
Identifying the Sensor
When two or more sensors are connected, the sensors can be identified by tapping or clicking Identify in Sensor Information.
Using the Product
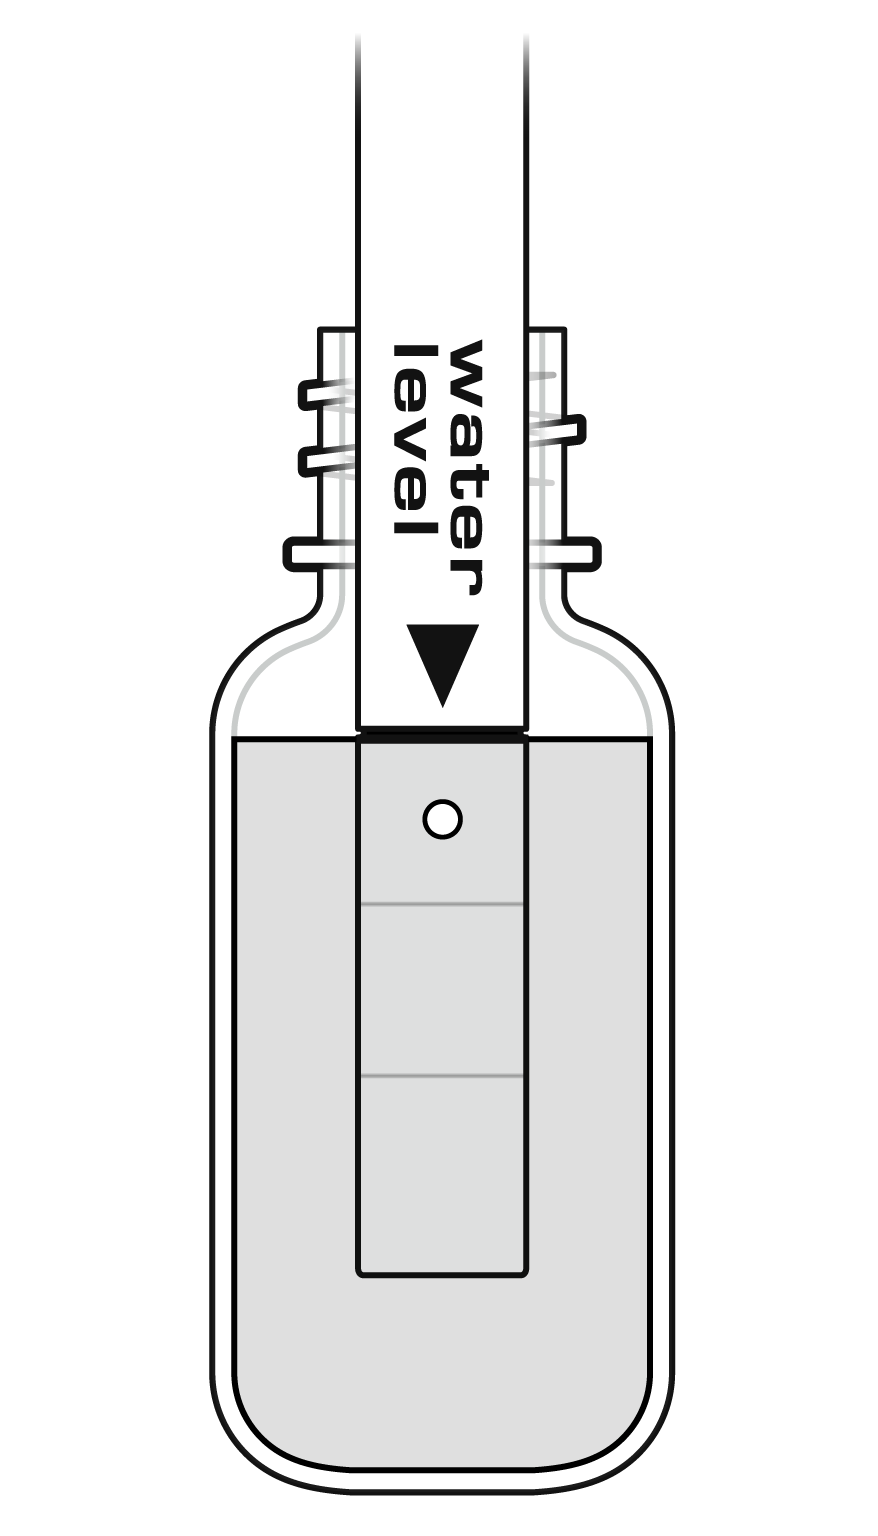
- Remove the storage bottle from the electrode by unscrewing the lid and removing the bottle and lid.
- Thoroughly rinse the lower section of the probe using distilled or deionized water.
- Soak the tip of the electrode for 30 minutes in the High Standard solution.
- The ISE should not rest on the bottom of the container.
- The small white reference contacts near the tip of the electrode should be immersed.
- Make sure no air bubbles are trapped below the ISE.
- Connect the sensor following the steps in the Quick Start section.
- For best results, perform a two-point calibration using the High and Low Standard solutions. For calibration instructions, see www.vernier.com/til/4011
- When you are finished making measurements, rinse the electrode with distilled water.
- Slide the cap onto the electrode body, and then screw the cap onto the storage bottle so the tip of the electrode is not touching the sponge.
Important: Do not fully submerge the sensor. The BNC connection is not waterproof.
Important: Do not leave the ISE soaking for more than 24 hours.
Note: If the ISE needs to be transported to the field during the soaking process, use the Short-Term ISE Soaking Bottle. Remove the cap from the bottle and fill it 3/4 full with High Standard. Slide the bottle’s cap onto the ISE, insert it into the bottle, and tighten it. For long-term storage, greater than 24 hours, make sure the sensor is stored in its storage bottle with the sponge slightly damp.
Channels
Go Direct Chloride Ion-Selective Electrode has six sensor channels. The channel names are
- Potential (mV)
- Chloride (mg/L)
- Ammonium (mg/L)
- Calcium (mg/L)
- Nitrate (mg/L)
- Potassium (mg/L)
Note: The Chloride channel is the default channel for this sensor. All channels are mutually exclusive except Potential (i.e., You can display one concentration channel and Potential at the same time, but you cannot display two concentration channels at the same time). In order to collect data from the other concentration channels, you must also attach the applicable corresponding BNC electrode to the amplifier.
Calibrating the Sensor
A calibration is stored on each sensor before it is shipped. As the membrane ages, this factory calibration may become inadequate. For best results, we recommend performing a two-point calibration.
Note: If you plan to use the electrode outside the range of the standards provided, you will need to prepare your own standards and use those for soaking and calibration. Standards should be two decades apart (e.g., 5 mg/L and 500 mg/L).
For additional calibration information, see www.vernier.com/til/4011
Specifications
|
Range (mV) |
±1000 mV |
|
Range (concentration) |
1 to 35,000 mg/L (or ppm) |
|
Accuracy after calibration |
±10% of full scale (calibrated 10 to 1000 mg/L) |
|
Interfering ions |
CN–, Br–, I–, OH–, S2–, NH3 |
|
pH range |
2–12 (no pH compensation) |
|
Temperature range |
0–80°C (no temperature compensation) |
|
Electrode slope |
–56 ±3 mV/decade at 25°C |
|
Electrode resistance |
1 to 5 MΩ |
|
Minimum sample size |
Must be submerged 2.8 cm (1.1 in) |
|
Potential readings, typical |
114 mV in 1000 mg/L, 230 mV in 10 mg/L |
|
USB specification |
2.0 |
|
Wireless specification |
Bluetooth v4.2 |
|
Maximum wireless range |
30 m |
|
Battery |
300 mA Li-Poly |
|
Battery life (single full charge) |
~24 hours |
|
Battery life (long term) |
~500 full charge cycles (several years depending on usage) |
Care and Maintenance
Proper care and storage are important for optimal longevity of your Chloride ISE.
- Long-term storage of the ISE (longer than 24 hours): Moisten the sponge in the bottom of the long-term storage bottle with distilled water. When you finish using the ISE, rinse it off with distilled water and blot it dry with a paper towel. Loosen the lid of the long-term storage bottle and insert the ISE. Note: The tip of the ISE should NOT touch the sponge. Also, make sure the white reference mark is inside the bottle. Tighten the lid. This will keep the electrode in a humid environment, which prevents the reference junctions from completely drying out.
- Put the device in sleep mode by holding the button down for at least three seconds. The red LED will stop flashing to show that the unit is in sleep mode. Over several months, the battery will discharge but will not be damaged. After such storage, charge the device for a few hours, and the unit will be ready to go.
- Short-term wet storage (less than 24 hours): Fill the Short-Term ISE Soaking Bottle 3/4 full with High Standard. Loosen the cap, insert the electrode into the bottle, and tighten it.
Maintaining and Replacing the ISE Standard Calibration Solutions
Having accurate standard solutions is essential for performing good calibrations. The two standard solutions that were included with your ISE can last a long time if you take care not to contaminate them. At some point, you will need to replenish your supply of standard solutions. Vernier sells 500 mL bottles of Chloride Low Standard, 10 mg/L (order code CL-LST) and Chloride High Standard, 1000 mg/L (order code CL-HST).
To prepare your own standard solutions, use the information in the following table. Note: Use glassware designed for accurate volume measurements, such as volumetric flasks or graduated cylinders. All glassware must be very clean.
| Standard Solution | Concentration (mg/L or ppm) | Preparation Method using High-Quality Distilled Water |
|---|---|---|
| Chloride (Cl–) ISE High Standard | 1000 mg/L as Cl |
|
| Calcium (Cl–) ISE Low Standard | 10 mg/L as Cl | Dilute the High Standard by a factor of 100 (from 1000 mg/L to 10 mg/L).* |
*Perform two serial dilutions as described below.
- Combine 100 mL of the High Standard with 900 mL of distilled water. Mix well.
- Combine 100 mL of the solution made in the previous step with 900 mL of distilled water. Mix well.
Battery Information
The Go Direct Chloride Ion-Selective Electrode contains a small lithium-ion battery in the handle. The system is designed to consume very little power and not put heavy demands on the battery. Although the battery is warranted for one year, the expected battery life should be several years. Replacement batteries are available from Vernier (order code: GDX-BAT-300).
Water Resistance
The Go Direct Chloride Ion-Selective Electrode is not water resistant and should never be immersed in water above the BNC junction.
If water gets into the device, immediately power the unit down (press and hold the power button for more than three seconds). Disconnect the sensor and charging cable, and remove the battery. Allow the device to dry thoroughly before attempting to use the device again. Do not attempt to dry using an external heat source.
How the Sensor Works
Combination Ion-Selective Electrodes consist of an ion-specific (sensing) half-cell and a reference half-cell. The ion-specific half-cell produces a potential that is measured against the reference half-cell depending on the activity of the target ion in the measured sample. The ion activity and the potential reading change as the target ion concentration of the sample changes. The relationship between the potential measured with the ISE and the ion activity, and thereby the ion concentration in the sample, is described by the Nernst equation:

- E = measured potential (mV) between the ion-selective and the reference electrode
- Eo = standard potential (mV) between the ion-selective and reference electrodes
- R = universal gas constant (R = 8.314 J mol-1 K-1)
- T = temperature in K (Kelvin), with T (K) = 273.15 + t °C where t is the temperature of the measured solution in °C.
- F = Faraday constant (96485 C mol-1)
- n = valence of the ion
- C = concentration of ion to be measured
- C0 = detection limit
Since R and F are constant, they will not change. The electrical charge of the ion (valence) to be measured is also known. Therefore, this equation can be simplified as
E = Eo – S• log(C + C0)
where  is the ideal slope of the ISE.
The following table describes ideal behavior:
| Ion Examples | n (valence of ion) | S (at 25 °C), mV/decade |
|---|---|---|
| Calcium (Ca2+) | +2 | +29.58 |
| Potassium (K+), Ammonium (NH4+) |
+1 | +59.16 |
| Nitrate (NO3-), Chloride (Cl-) | –1 | –59.16 |
Assuming C0 is near zero, the equation can be rewritten as:
C = 10˄[(E – Eo) / S]
allowing for the calculation of the ion concentration.
It is very important to note that this table reflects ideal behavior. Ion-selective electrodes have slopes that are typically lower than ideal. It is generally accepted that an ISE slope from 88–101% of ideal is allowable. The slope (S) is an indicator of ISE performance. If the slope changes significantly over time, it may indicate that it is necessary to replace the ISE sensor tip.
Potential vs. Concentration
To measure the mV readings from an aqueous sample, calibration is not required. To convert mV readings to concentration (mg/L or ppm), the software uses a modified version of the Nernst Equation:
C = 10˄[(E – Eo) / Sm]
- C = concentration of ion to be measured (mg/L or ppm)
- E = measured potential of sample (mV)
- Eo = measured potential (mV) at a C = 1 mg/L Cl– concentration
- Sm = measured electrode slope in mV/decade
The value of Sm, the measured electrode slope, is determined by measuring the potential of two standard solutions, and solving the equation below:
Sm = – [(Low Standard – High Standard) / # of decades*]
*A decade is defined as the factor of the difference between the two standard solutions. For example, the difference between a 1mg/L standard and a 100 mg/L standard is 2 decades (a factor of 100 difference, or 1 × 10²).
Example Calculation, converting mV to mg/L
For this example, the measured quantities are shown in the chart below:
| Solution | Measured Potential |
|---|---|
|
1 mg/L Cl– standard |
288 mV |
|
10 mg/L Cl– standard |
230 mV |
|
1000 mg/L Cl–standard |
114 mV |
|
unknown sample |
188 mV |

C = 10^[(188 mV – 288 mV)/ –58 mV/decade] = 53 mg/L Cl–
Troubleshooting
Sampling Freshwater Samples for Chloride Concentration
For best results, calibrate the Chloride ISE using the 10 mg/L and 1000 mg/L standards.
Measuring Chloride Concentration of Saltwater or Brackish Water
When measuring chloride concentration in seawater or brackish water, calibrate the Chloride ISE using the 1000 mg/L standard included with your Chloride ISE for one calibration point (or 1.806 parts per thousand, or ppt). For the second calibration point, prepare a standard that is 20,000 mg/L Cl– by adding 32.96 g of solid NaCl to enough distilled water to prepare 1 L of solution:

If you are calibrating in ppt, call this solution 36.13 ppt.
Determining Salinity of Saltwater or Brackish Water
Salinity is the total of all salts dissolved in water, expressed either as mg/L (equal to parts per million, ppm) or in parts per thousand (ppt). Seawater contains a fairly constant quantity of chloride ions. From your measurement of chloride ion concentration (in the previous section), salinity can be calculated using the following formula:
Salinity (mg/L or ppm) = 1.8066 × [Cl– concentration, mg/L]
Using this formula, the salinity of saltwater is calculated to be:
Salinity (mg/L or ppm) = 1.8066 × (19400 mg/L) = 35,000 mg/L
The level of salinity of seawater in parts per thousand, or ppt, would be:
Salinity (ppt) = 35000 / 1000 = 35 ppt
Using Ionic Strength Adjuster Solutions to Improve Accuracy
For optimal results at low concentrations of chloride ions, a standard method for taking measurements with the Chloride Ion-Selective Electrode (ISE) is to add ionic strength adjuster (ISA) solutions to each of your standard solutions and samples.
Adding an ISA ensures that the total ion activity in each solution being measured is nearly equal, regardless of the specific ion concentration. This is especially important when measuring very low concentrations of specific ions. The ISA contains no ions common to the Chloride ISE itself. Note: The additions of ISA to samples or standards described below do not need to have a high level of accuracy—combining the ISA solution and sample solution counting drops using a disposable Beral pipet works fine.
Use an ISA with the Chloride ISE by adding 5.0 M NaNO3 ISA solution (42.50 g NaNO3 / 100 mL solution) to the Cl– standard or to the solution being measured, in a ratio of 1 part of ISA (by volume) to 50 parts of the total solution (e.g., 1 mL of ISA to 50 mL of total solution, or 2 drops of ISA to 5 mL of total solution).
When the response of the Chloride ISE begins to slow, the membrane may need polishing. Cut a small piece (about 1 inch square) from a polishing strip. Wet the end of the electrode and the dull side of the polishing strip thoroughly with distilled water. Using only moderate pressure, polish the end of the electrode by gently rubbing it in a circular motion. This will remove the inactive layer of the membrane which impedes measurement. Rinse thoroughly with distilled water and recalibrate in the usual manner.
See general tips for using Ion Selective Electrodes at www.vernier.com/til/665
Repair Information
If you have followed the troubleshooting steps and are still having trouble with your Go Direct Chloride Ion-Selective Electrode, contact Vernier Technical Support at support@vernier.com or call 888-837-6437. Support specialists will work with you to determine if the unit needs to be sent in for repair. At that time, a Return Merchandise Authorization (RMA) number will be issued and instructions will be communicated on how to return the unit for repair.
Accessories/Replacements
| Item | Order Code |
|---|---|
|
BTL-ES |
|
|
CL-HST |
|
|
CL-LST |
|
|
GDX-CL-BNC |
|
|
GDX-ISEA |
|
|
CB-USB-MICRO |
|
|
CB-USB-C-MICRO |
|
|
GDX-BAT-300 |
Warranty
Warranty information for this product can be found on the Support tab at www.vernier.com/gdx-cl/#support
General warranty information can be found at www.vernier.com/warranty
Disposal
When disposing of this electronic product, do not treat it as household waste. Its disposal is subject to regulations that vary by country and region. This item should be given to an applicable collection point for the recycling of electrical and electronic equipment. By ensuring that this product is disposed of correctly, you help prevent potential negative consequences on human health or on the environment. The recycling of materials will help to conserve natural resources. For more detailed information about recycling this product, contact your local city office or your disposal service.
Battery recycling information is available at www.call2recycle.org
Do not puncture or expose the battery to excessive heat or flame.
 The symbol, shown here, indicates that this product must not be disposed of in a standard waste container.
Contact Support
Fill out our online support form or call us toll-free at 1-888-837-6437.