Go Direct® Drop Counter User Manual
Order Code: GDX-DC
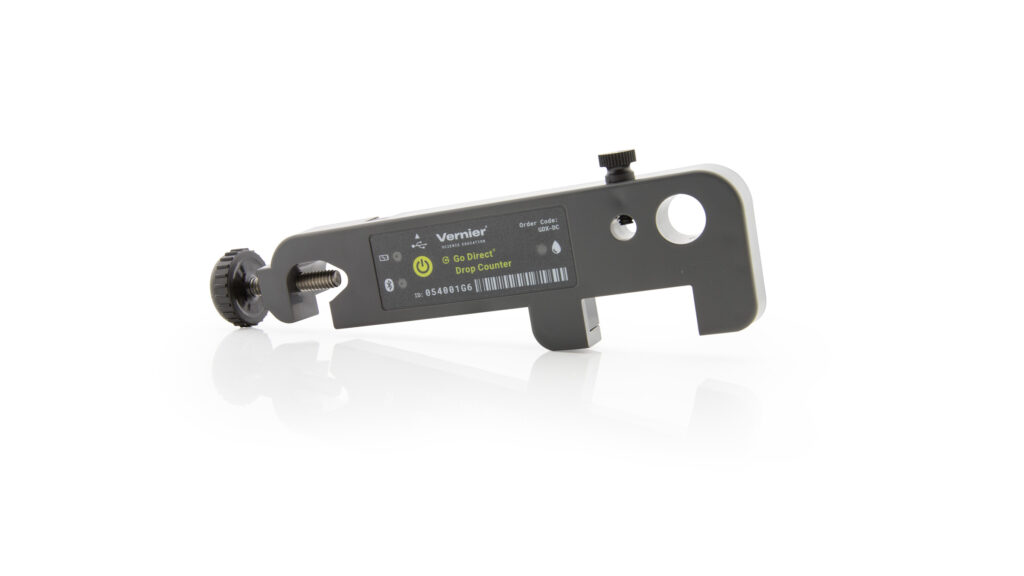
Go Direct Drop Counter is used to perform accurate, automatic titrations. This digital sensor can be used in conjunction with a pH Sensor, ORP Sensor, Conductivity Probe, or other sensor to accurately record the volume of titrant added during a titration.
Go Direct Drop Counter has many features that makes it easy to use:
- Adjustable clamp, fits most laboratory ring stands and lattices
- Wide drop-detecting area
- Large sensor slot, fits most conventional stick-style sensors
- Smaller, adjustable slot for temperature sensors
- Red LED, near the detecting area, flashes to indicate a drop has been recorded
Note: Vernier products are designed for educational use. Our products are not designed nor are they recommended for any industrial, medical, or commercial process such as life support, patient diagnosis, control of a manufacturing process, or industrial testing of any kind.
What's Included
- Go Direct Drop Counter
- Plastic reagent reservoir
- Plastic valve with a double stopcock fitting
- Vernier Microstirrer (a magnetic stirrer that fits on the tip of your sensor)
- Micro USB Cable
Compatible Software
Choose a platform below to see its compatibility requirements.LabQuest
Interface LabQuest App LabQuest 3 Full support LabQuest 2 Full support 1 LabQuest Incompatible Compatibility Notes
Computers
Software Interface Graphical Analysis Graphical Analysis (Web App) No interface required Full support 1 Full support 1 LabQuest 3 Full support 2 Incompatible LabQuest 2 Full support 2 3 Incompatible Compatibility Notes
Chromebook
Software Interface Graphical Analysis (Web App) No interface required Full support 1 Compatibility Notes
iOS
Software Interface Graphical Analysis Graphical Analysis GW No interface required Full support 1 Full support 1 LabQuest 3 Full support 2 3 Full support 2 3 LabQuest 2 Full support 2 3 4 Full support 2 3 4 Compatibility Notes
Android
Software Interface Graphical Analysis Graphical Analysis GW No interface required Full support 1 Incompatible 1 LabQuest 3 Full support 2 3 Full support 2 LabQuest 2 Full support 2 3 4 Full support 2 4 Compatibility Notes
Python
Software Interface Python No interface required Full support Javascript
Software Interface Javascript No interface required Full support 1 Compatibility Notes
LabVIEW
Software Interface NI LabVIEW No interface required Full support
Getting Started
Quick Start: Vernier Graphical Analysis® and Bluetooth®
- Charge your sensor for at least 2 hours before first use.
- Turn on your sensor. The LED will blink red.
- Launch Graphical Analysis, then click Sensor Data Collection.
- Select your sensor from the list. The sensor ID is located on the sensor label near the bar code. Note: If you don’t see a list of available sensors, click WIRELESS. After selecting your sensor, click Pair.
- Click DONE. You are now ready to collect data.
Using other Vernier data-collection apps or want to connect via USB?
Visit www.vernier.com/start-go-direct
Note: This sensor also works with LabQuest 2 and LabQuest 3; it does not work with the original LabQuest.
Charging the Sensor
Connect Go Direct Drop Counter to the included USB Charging Cable and any USB device for two hours. Connecting Go Direct Drop Counter to the electrode amplifier during charging is optional.
| Charging |
Orange LED next to the battery icon is solid while the sensor is charging. |
| Fully charged |
Green LED next to the battery icon is solid when the sensor is fully charged. |
Powering the Sensor
| Turning on the sensor |
Press button once. Red LED indicator flashes when unit is on. |
| Putting the sensor in sleep mode |
Press and hold button for more than three seconds to put into sleep mode. Red LED indicator stops flashing when sleeping. |
Connecting the Sensor
See the following link for up-to-date connection information:
Connecting via Bluetooth
| Ready to connect | Red LED next to the Bluetooth icon flashes when sensor is awake and ready to connect. |
| Connected | Green LED next to the Bluetooth icon flashes when sensor is connected via Bluetooth. |
Connecting via USB
| Connected and charging | Orange LED next to the battery icon is solid when the sensor is connected to Graphical Analysis via USB and the unit is charging. LED next to Bluetooth icon is off. |
| Connected, fully charged | Green LED next to the battery icon is solid when the sensor is connected to Graphical Analysis via USB and fully charged. LED next to Bluetooth icon is off. |
| Charging via USB, connected via Bluetooth |
Orange LED next to the battery icon is solid when the sensor is charging. Green LED next to the Bluetooth icon flashes. |
Using the Product
- Assemble the equipment. (Note: The Vernier Stir Station, Go Direct pH Sensor, beaker, and utility clamp are not included with the Vernier Drop Counter.)
- Place a 100 mL beaker on the center of the Stir Station.
- Remove the storage bottle from the sensor (if applicable). Insert the sensor body through the larger round hole on the Drop Counter.
- Slip the Microstirrer onto the bottom of the sensor. Slide the Drop Counter down the ring stand to a level such that the Microstirrer is very close to the bottom of the beaker. Tighten the turn screw of the Drop Counter to hold it firmly in place.
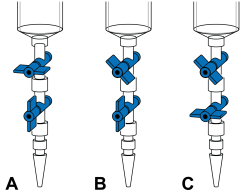
- Connect the spout and two 2-way valves to the plastic reagent reservoir. Note: There are two 2-way valves below the reagent reservoir. In this setup, use the bottom valve as an on-off valve (either completely open or completely shut). Use the top valve as an adjustment valve to adjust to a slow, consistent rate.
- Using the utility clamp, secure the reagent reservoir to the stir station rod. The spout should be aligned just above the three-sided rectangular opening.
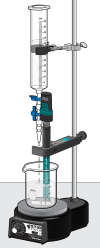
- Make sure that both 2-way valves are in the closed position (horizontal). Add about 20 mL of titrant to the plastic reagent reservoir. For this example, we will use 0.1 M NaOH solution.
- Before collecting data or calibrating the drops, adjust the flow rate of the two valves of the reagent reservoir. Temporarily, place another beaker below the spout of the reagent reservoir. First, completely open the bottom 2-way valve; then slowly open the top valve until a very slow drop rate is achieved—a rate of one drop every two seconds, or slower. Close the bottom valve.
- Add the solution to be titrated to the 100 mL beaker. For this example, use about 5 mL of 0.1 M HCl solution. Add enough distilled water so the solution level covers the bulb of the pH Sensor (about 35 to 40 mL). If you are going to use a small magnetic stirring bar, less distilled water will be required (about 1 to 20 mL). Turn on the magnetic stirrer. Important: Minimizing volumes of solution titrated and maximizing stirring efficiency will significantly improve your titration results.
- Connect the sensor following the steps in the Getting Started section of this user manual. Note: The Drop Counter will only collect data if another sensor is connected.
- No data will be collected until the first drop falls through the rectangular opening of the Drop Counter. Carefully center the spout of the reagent reservoir to allow the drops to pass through the Drop Counter. Completely open the lower 2-way valve (the upper valve should still be set to a slow drop rate). You will now see pH vs. volume data being plotted on a graph. When you are satisfied that the titration has proceeded past the equivalence point, shut off the lower 2-way valve of the reagent reservoir and stop the data collection.
Videos
Calibrating the Sensor
There are three different ways to handle the reporting of volume:
- Use the stored calibration.
- Manually enter a drops/mL ratio value. If you have done a previous calibration with a particular apparatus, you can enter the drops/mL ratio.
- Perform an Automatic drops/mL calibration. You can calibrate the reagent reservoir or a buret. To perform your own drops-per-mL calibration, follow these steps:
- Place a 10 mL graduated cylinder below the slot of the Drop Counter.
- Fill the reagent reservoir about 3/4 full with the titrant solution.
- Choose to calibrate the Drop Counter in your data-collection program.
- Open the bottom 2-way (on-off) valve to begin releasing drops through the Drop Counter.
- Release drops until there is 9–10 mL of liquid in the graduated cylinder.
- Close the bottom valve to stop the drops.
- Type the exact volume, to the nearest 0.1 mL, of liquid in the graduated cylinder in the Volume (mL) box of the Calibrate drops dialog box.
- Choose to stop the calibration routine of your program.
- The number of drops/mL will be displayed.
- You can now continue with the titration.
Care and Maintenance
Battery Information
Go Direct Drop Counter contains a small lithium-ion battery. The system is designed to consume very little power and not put heavy demands on the battery. Although the battery is warranted for one year, the expected batter life should be several years. Replacement batteries are available from Vernier (order code: GDX‑BAT‑300).
Storage and Maintenance
To store Go Direct Drop Counter for extended periods of time, put the device in sleep mode by holding the button down for at least three seconds. The red LED will stop flashing to show that the unit is in sleep mode. Over several months, the battery will discharge but will not be damaged. After such storage, charge the device for a few hours, and the unit will be ready to go.
Exposing the battery to temperatures over 35°C (95°F) will reduce its lifespan. If possible, store the device in an area that is not exposed to temperature extremes.
Water Resistance
Go Direct Drop Counter is not water resistant and should never be immersed in water.
If water gets into the device, immediately power the unit down (press and hold the power button for more than three seconds). Disconnect the sensor and charging cable, and remove the battery. Allow the device to dry thoroughly before attempting to use the device again. Do not attempt to dry using an external heat source.
How the Sensor Works
The sensor has an infrared LED emitter on one end of the area through which the drop falls (1.3 × 3.7 cm) and a detector on the other end. When the infrared beam (centered at 890 nm) between the source and detector is blocked by a drop of titrant, a digital signal is sent to the data-collection software. The drops are then converted to volume units (e.g., milliliters) in the data-collection program. A red LED indicator light flashes each time a drop of liquid passes through the Drop Counter.
Use Go Direct Drop Counter with other Vernier sensors such as our Ion‑Selective Electrodes, Conductivity Probe, or other Vernier pH Sensors. The Vernier Drop Counter can accommodate many third-party electrodes when used in conjunction with the Electrode Amplifier.
Troubleshooting
- Set a slow drop rate. For the best, most accurate data, we recommend setting the rate at 2 seconds/drop or slower. A slow rate provides enough time for each drop of titrant to be thoroughly mixed in the solution and the pH sensor (or other sensor) to respond.
- Minimize the volume of solution to be titrated. We recommend 5–10 mL of test solution. Larger volumes will take longer to mix and may require a very slow drop rate for best results.
- Use the Vernier Microstirrer. It helps deliver solution directly to the pH bulb, minimizing the response time. Also, you can run a magnetic stirrer at a very high speed and the Microstirrer will not form a visible vortex, which prevents splashing.
- Add only as much distilled water to the titrated solution as is necessary to cover the bulb of the pH Sensor (or other sensor).
- Use the plastic reagent reservoir that is supplied with the Drop Counter. The reagent reservoir provides a wider diameter and less change in the hydrostatic pressure per unit volume of titrant above the 2-way valve.
- Use the pair of 2-way valves; one for drop rate adjustment and the other as an on-off valve. This eliminates the need to do a fine adjust during the initial readings and also allows for a consistent rate to be set.
- Manually release drops at a slower rate to allow for more thorough mixing when near the equivalence point.
For additional troubleshooting and FAQs, see www.vernier.com/til/3855
Repair Information
If you have watched the related product video(s), followed the troubleshooting steps, and are still having trouble with your Go Direct Drop Counter, contact Vernier Technical Support at support@vernier.com or call 888-837-6437. Support specialists will work with you to determine if the unit needs to be sent in for repair. At that time, a Return Merchandise Authorization (RMA) number will be issued and instructions will be communicated on how to return the unit for repair.
Accessories/Replacements
| Item | Order Code |
|---|---|
|
VDC-RR |
|
|
MSTIR |
|
|
PS-STEM |
|
|
PS-2WAY |
|
|
CB-USB-MICRO |
|
|
CB-USB-C-MICRO |
|
|
GDX-BAT-300 |
Warranty
Warranty information for this product can be found on the Support tab at www.vernier.com/gdx-dc/#support
General warranty information can be found at www.vernier.com/warranty
This warranty does not cover consumables, such as the reagent reservoir and valves.
Disposal
When disposing of this electronic product, do not treat it as household waste. Its disposal is subject to regulations that vary by country and region. This item should be given to an applicable collection point for the recycling of electrical and electronic equipment. By ensuring that this product is disposed of correctly, you help prevent potential negative consequences on human health or on the environment. The recycling of materials will help to conserve natural resources. For more detailed information about recycling this product, contact your local city office or your disposal service.
Battery recycling information is available at www.call2recycle.org
Do not puncture or expose the battery to excessive heat or flame.
 The symbol, shown here, indicates that this product must not be disposed of in a standard waste container.
Contact Support
Fill out our online support form or call us toll-free at 1-888-837-6437.