Go Direct® Mini GC™ User Manual
Order Code: GDX-GC
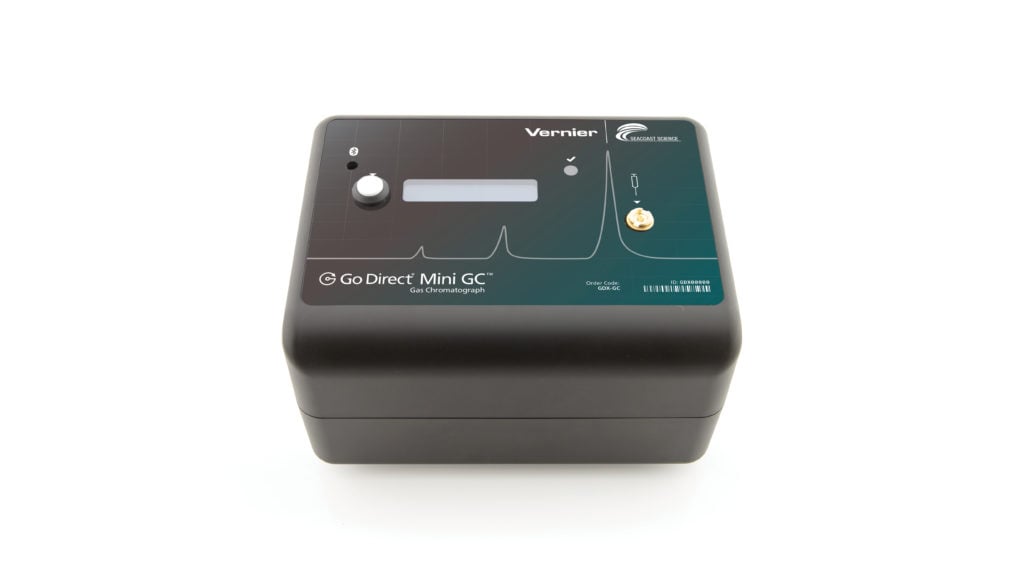
Use Go Direct Mini GC and the free Instrumental Analysis app to teach students chromatography with a portable gas chromatograph that detects polar and nonpolar compounds. Students can separate, analyze, and identify substances contained in a volatile liquid or gaseous sample.
Go Direct Mini GC can connect via Bluetooth wireless technology or wired via USB to your device.
Developed with Seacoast Science, Go Direct Mini GC uses an efficient, software-controlled internal pump system. Go Direct Mini GC uses room air as the carrier gas, so there is no need to purchase an external carrier gas tank and deal with the associated safety measures or to maintain a gas filtration system.
This gas chromatograph can also be used to identify unknown compounds, monitor chemical reactions, and measure products from distillations and chemical reactions.
Note: Vernier products are designed for educational use. Our products are not designed nor are they recommended for any industrial, medical, or commercial process such as life support, patient diagnosis, control of a manufacturing process, or industrial testing of any kind.
What's Included
- Go Direct Mini GC
- USB mini cable
- AC power supply
- Hamilton Syringe (1.0 µL volume)
- Two extra septa (a third septum is already installed)
- Chromatography Experiments with the Go Direct® Mini GC™, an e-book with five investigations, available as a free download from your Vernier account
- Carrying case
Compatible Software
Choose a platform below to see its compatibility requirements.LabQuest
Interface LabQuest App LabQuest 3 Full support LabQuest 2 Full support 1 LabQuest Incompatible Compatibility Notes
Computers
Software Interface Instrumental Analysis No interface required Full support Chromebook
Software Interface Instrumental Analysis No interface required Full support iOS
Software Interface Instrumental Analysis No interface required Full support Android
Software Interface Instrumental Analysis No interface required Full support
Quick Start: Vernier Instrumental Analysis® and Bluetooth®
- Connect the Go Direct Mini GC to AC power.
- Turn on your sensor. The LED will blink red.
- Launch Instrumental Analysis, then click Gas Chromatography.
- Select your sensor from the list. The sensor ID is located on the sensor label near the bar code. The Bluetooth LED will blink green when it is successfully connected.
- Click DONE. You are now ready to collect data.
Using other Vernier data-collection apps or want to connect via USB?
Visit www.vernier.com/start-go-direct
Note: This sensor also works with LabQuest 2 and LabQuest 3; it does not work with the original LabQuest.
Safety
Important: We strongly recommend that you read the entire manual thoroughly before using Go Direct Mini GC for the first time. There are precautions and usage suggestions throughout this manual that are important to know, prior to doing your first data collection. Please wear the appropriate personal safety equipment and use the instrument in accordance with the instructions in this manual to prevent injury.
Caution: Go Direct Mini GC is designed to analyze volatile compounds. These compounds may be toxic or highly flammable; therefore, follow the manufacturer’s instructions when operating this instrument. Serious personal injury may result from improper use of this instrument. Misuse of this instrument may cause injury to the user and should be avoided. All analytes recommended for use with this instrument are flammable and potentially toxic. However, less than a microgram of analyte is released during normal use. Due to the small amounts of analytes, there is no hazard that exhaust from the chromatograph could cause a fire when used according to the instructions. To minimize exposure to vapors, use this instrument in well-ventilated areas. Refer to the Safety Data Sheet for each compound to be injected into the chromatograph. For personal protection, we recommend that open reagent containers be handled in a hood or well-ventilated area. All users or observers should wear appropriate personnel protective equipment when operating this instrument, at a minimum eye protection and protective gloves. Users are cautioned to avoid spills and to clean up spill immediately.
Connecting Go Direct Mini GC
See the following link for up-to-date connection information:
Connecting via Bluetooth
| Ready to connect | Red LED next to Bluetooth icon flashes when sensor is awake and ready to connect. |
| Connected | Green LED next to Bluetooth icon flashes when sensor is connected via Bluetooth. |
Connecting via USB
| Connected | LED next to Bluetooth icon is off when sensor is connected to Instrumental Analysis via USB. |
Using the Product
Installation: The Go Direct Mini GC should be used in a room that is well ventilated to allow for normal heating and cooling. Do not use the Go Direct Mini GC in the presence of flammable vapors.
Unpacking and Setup: Open the lid of the Mini GC carrying case. Remove the power supply, USB cable, and the Mini GC unit from the carton. Remove the ties holding the electrical cords. (You may wish to store the two extra septa separately for use at a later time.)
To avoid damage to the Mini GC, place the instrument on a flat surface away from
- Excessive dust
- Liquids or mists
- Strong vibration
- Strong magnetic fields, electric fields, and/or high frequencies
Powering up the Go Direct Mini GC
Explanation of symbols
|
|
connector to computer via USB |
|
|
Power connector (24 Volt DC, 3 A) |
|
|
Power on |
|
|
Power off |


To operate the Mini GC, plug the low-voltage jack of the power supply into the power socket on the side of the instrument; insert the 120 VAC plug into an outlet. Connect the Mini GC to your platform according to the Getting Started instructions above.
Operation of Go Direct Mini GC is controlled through Instrumental Analysis. With this software, you can
- Connect to the Mini GC via Bluetooth wireless technology or USB.
- Set a temperature profile, either using the default settings, or as described in student lab instructions.
- Set a desired pressure to run the system (maximum of 21 kPa).
- Start and stop a run.
- Name a run.
- Save and export the data.
- Integrate the peaks and determine retention time
Analytes are injected into the instrument through the injection port. Optimal results are obtained using the supplied 1.0 μL syringe for liquid analytes. Instructions for using syringes are provided in the Care and Maintenance section.
Because the Go Direct Mini GC can connect via Bluetooth wireless technology, there is also a button on the instrument itself that initiates data collection once the Mini GC is equilibrated to the set temperature/pressure profile.
Follow these instructions to collect your first chromatogram:
- Put on goggles and gloves.
- Connect the Go Direct Mini GC to your platform according to the Quick Start instructions. Note: The instrument runs a preheat cycle that sets the temperature to 75°C when first connected to Instrumental Analysis. It will remain at this temperature until a temperature/pressure profile is applied.
- Set the temperature/pressure profile. Note: Below is the default temperature/pressure profile. This is appropriate for most samples. However, you may want to adjust these according to the student instructions in the Chromatography Experiments with the Go Direct Mini GC™ e-book. Once you have set the desired parameters, click or tap Apply. This initiates the temperature/pressure profile.
|
Start Temperature (°C) |
45 |
|
Hold Time (min) |
2 |
|
Ramp Rate (°C/min) |
5 |
|
Final Temperature (°C) |
95 |
|
Final Hold Time (min) |
8 |
|
Pressure (kPa) |
11 |
- While the Mini GC is equilibrating, follow the steps below to clean and flush the syringe with acetone or n-hexane. Important: The glass syringe is fragile and can be easily damaged. Be careful not to bend the needle or bend the plunger. If the plunger is accidentally pulled out of the glass barrel, reinserting it is extremely difficult, sometimes impossible. Never pull the plunger back more than 50% of its total volume. Be careful not to bend the plunger as you press it down. Do not remove the plastic spacer on the needle.
- Depress the plunger fully.
- Submerge the tip of the syringe needle into the vial of acetone or n-hexane.
- Pull back the plunger to fill the barrel about 1/3 full of acetone or n-hexane. Examine the barrel of the syringe and estimate the amount of liquid in the barrel.
- Expel the liquid onto a lint-free tissue or a paper towel.
- Repeat Steps a–d at least two times, until you are comfortable pulling up a liquid into the syringe and measuring the volume in the syringe barrel. Use a lint-free tissue or a paper towel to carefully pat around the tip of the syringe needle.
- Follow the process in Step 4 to clean and flush the syringe with a sample, such as pentane, to be injected into the Mini GC.
- Once the Mini GC has reached the correct start temperature and pressure, the indicator LED should turn green and the software will display a message that reads, “Inject, then press collect button on device.” Collect 0.2 µL of your sample, such as pentane, for injection.
To insert the needle of the syringe into the injection port of the Mini GC, hold the syringe with one hand and steady the needle with your other hand. Important: Supporting the needle guard and the lower part of the needle with two fingers, as shown in Figure 1, can prevent the possible bending of the needle. Insert the needle into the injection port until the needle stop is fully seated. If the needle sticks, rotate it slightly while inserting. Do not move the plunger yet.
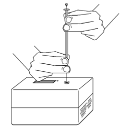
Figure 1
- Depress the syringe plunger; immediately following, press the white Collect button on the Mini GC to begin data collection. Be careful not to bend the plunger as you press it down. Pull the needle out of the injection port immediately. As you withdraw the syringe needle, lift straight up to avoid bending the needle.
- While the data collection proceeds, repeat Step 4 to thoroughly clean the syringe and needle. It may take more than three flushes to feel the syringe plunger move smoothly again, which is your indicator that the syringe and needle are both suitably clean.
- The run will automatically stop after the allotted time or you can choose to end it early if you are satisfied that all analytes have eluted completely.
- Name your sample appropriately.
- Instrumental Analysis: Click or tap the y-axis label. Click or tap the pencil icon next to the data set you wish to rename. Name your sample set and then click or tap Rename.
- LabQuest: From the Table screen, tap the Run 1 label. Name your sample set and tap Done.
- Analyze the chromatogram.
- Instrumental Analysis: Drag across the peak to select it, then click or tap Add Peak Integral,
 .
. - LabQuest: From the Analyze menu, choose Advanced, then Peak Integration. Select the signal you wish to analyze. Once the Peak Integration screen appears, highlight the peak you wish to analyze and tap Add..
- Instrumental Analysis: Drag across the peak to select it, then click or tap Add Peak Integral,
- Click or tap on the File Menu to Save or Export your data. Note: If a peak integration table exists, the data table is saved with the file. Export will not have the information from the data table available.
- When you are done with data collection, make sure to turn the power switch to the Off position and disconnect the Mini GC from AC power. The Mini GC should be turned off with the power switch when not in use. We recommend unplugging and disconnecting the power supply and disconnecting the USB cable while the instrument is not in use. The chromatograph has a built-in timer to turn off heating of the column and pressure from the pump after 2 hours with no communication via Bluetooth wireless technology or USB.
Specifications
|
Column |
Restek MXT-502.2 Column - Siltek-treated stainless steel with proprietary diphenyl/dimethyl polysiloxane phase |
|
Column operating temperature |
30°C to 160°C with a maximum heating ramp of 10°C/min |
|
Detector |
Seacoast Science carbon-nanotube chemiresistive detector |
|
Dimensions and weight |
108 mm height, 191 mm length, 133 mm width; 1.3 kg |
|
Power requirements |
24 VDC, 2.5 A from an external power supply |
|
Utility |
External power supply rated for 100–240 VAC, 1.5 A 50–60 Hz |
|
Carrier gas |
Ambient air |
|
Environmental conditions |
Temperature: 5°C to 40°C Humidity: 95% or less, |
|
Liquid injection volume |
0.01 to 0.6 µL |
|
Operating pressure (above ambient pressure) |
1 to 21 kPa |
Care and Maintenance
To extend the life and ensure the proper functioning of the Go Direct Mini GC, there are some routine cleanings and replacements that should be followed.
- DO NOT inject more than 0.6 μL liquid analyte; injecting excess liquid may damage the sensor. Note: Much larger head-space gas volumes can safely be injected, up to 1 mL.
- DO NOT inject the following liquids/substances into Go Direct Mini GC:
- Water, or compounds with significant amounts of water impurity
- Amines (or any other alkaline substances)
- Liquids containing compounds with large molecular weights, larger than the molecular-weight ranges shown in Appendix A. These types of compounds can become deposited in the column and degrade its performance.
Column maintenance and/or Replacement
The Restek MXT® – 502.2 column is a general-purpose column that performs very well for our recommended families of reagents and laboratory exercises. It is a stainless-steel capillary column, 11 meters in length, and coated with Siltek® to make the stainless steel unreactive. MXT- 502.2 is coated with a proprietary diphenyl/dimethyl polysiloxane phase having selectivity for volatile organic pollutants, light weight hydrocarbons, aromatics, and a wide range of compounds. If separation efficiency deteriorates, conditioning the column with 0.3 μL of acetone or n-hexane, or running the chromatograph for 1–2 hours at 120°C and 20 kPa with air or an inert carrier gas may help to restore proper function.
If you use our recommended procedures and substances with your Go Direct Mini GC, you should get many years of use from the high-quality Restek column. But, if performance deteriorates after time, such that the column must be replaced, contact Vernier for an Return Material Authorization (RMA) number (the column cannot be replaced by the user). You will then send the unit to an RMA address, and be charged a fee for the replacement.
Cleaning the Exterior of the Case
Before cleaning the case, disconnect power. For routine cleaning of the exterior of the case, use mild detergent and a damp cloth. Do not allow water to leak inside of the case as this may result in electrical shock or shorts. Abrasive cleansers should not be used to clean the instrument.
Replacing the Septum
The septum should be replaced after approximately 150 injections. The septum may be replaced by unscrewing (counterclockwise) the septum retainer nut using a coin or a large screwdriver. Note: Two additional septa were shipped with your new Go Direct Mini GC (in a small Ziploc bag). With the retainer nut removed, spear the defective septum with a syringe needle and lift it out. Place a new septum flat in the cavity. Screw the retainer nut to snug tightness. Overtightening the retainer nut will not give a better seal of the septum but will damage the instrument. After you have used your original septum, and the two replacements, you can order additional septa.
Vernier Order Information: Septa Replacement, pkg of 4, order code GC-SEP
Replacing the Chemiresistive Detector
The Seacoast Science carbon nanotube chemiresistive detector is a precision-etched sensor chip coated with a chemoselective polymer. The polymer absorbs analytes exiting the column. Analyte absorption by the polymer coating is measured by the detector.
The carbon nanotube detector should last for more than 2000 hours of operation. If performance deteriorates after time, such that the detector must be replaced, contact Vernier for an RMA number (the sensor cannot be replaced by the user). You will then send the unit to an RMA address, and be charged a fee for the replacement.
Storing the Instrument
Proper storage of the Go Direct Mini GC will protect it from damage and maintain the life of the instrument. The manufacturer recommends flushing the column with 0.3 μL acetone or n-hexane followed by 15 min purge at 120°C and 20 kPa. Store the instrument in the protective case provided with instrument. Store it in a cool, dry environment.
How the Go Direct Mini GC Works
Figure 2 shows a side view of the Go Direct Mini GC. The power input jack, power switch, USB connection to the Chromebook, or computer, and column ventilation grill are shown in this view.
Principles of Operation: Go Direct Mini GC is designed to separate mixtures of gases or volatile liquids and identify components of the mixtures by their specific retention times. The chromatograph uses ambient air supplied from a pump to carry a small sample of vapor through a stainless steel column.
The column is a nonpolar, general purpose capillary column made by Restek (product code: MXT® –502.2). The column is heated using an electric current. Temperature of the column is monitored by a built-in resistance temperature detector (RTD) for accurate temperature measurement. The column assembly also has an independent thermal fuse to protect against overheating.
At the effluent end of the column is a Seacoast Science chemiresistive sensor. The sensor is a precision-etched sensor chip coated with a chemoselective polymer‑carbon nanotube composite. The composite absorbs analytes exiting the column. Analyte absorption by the composite coating is measured by the detector circuitry.
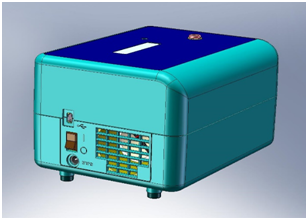
Figure 2
Troubleshooting
|
Error |
Possible Causes |
|---|---|
|
Inconsistent flow, not reaching set pressure |
Check and replace septum |
|
Inconsistent peak areas |
Check injection volume, septum, defective syringe |
|
Inconsistent retention times |
Check septum, pump |
|
No communication |
Check cables. Or, make sure you are using correct software versions. |
|
No power |
Check to make sure power plugs are plugged in properly. |
For additional troubleshooting tips, see www.vernier.com/til/7281
Appendix A
Classes of Compounds That Can Be Used in Go Direct Mini GC
|
Compound Type |
Typical Compounds |
Range of Acceptable Boiling Points (°C) |
|
Alcohols |
C1 –C6 |
50 –175 |
|
Aldehydes |
C1 –C8 |
50 –175 |
|
Alkanes |
C4 –C12 |
30–220 |
|
Amides |
C3 –C4 |
150 –250 |
|
Aromatics |
C6 –C11 |
80 –220 |
|
Carboxylic Acids |
C1 –C4 |
100–150 |
|
Esters |
C2 –C10 |
30 –200 |
|
Ethers |
C2 –C8 |
30– 110 |
|
Heterocycles |
C5–C8 |
100 –150 |
|
Halogenated hydrocarbons |
C1 –C8 |
30–120 |
|
Ketones |
C3–C8 |
50 –175 |
|
Nitriles |
C2–C5 |
50 –120 |
|
Nitroalkanes/aromatics |
C1 –C6 |
100 –210 |
|
Phosphonates |
C3 –C9 |
180 –210 |
|
Sulfides |
C4–C8 |
90– 150 |
Appendix B
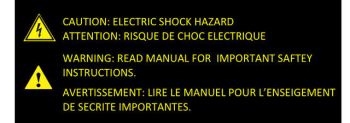
To comply with certification requirements for this instrument, the manufacturer provides the following risk assessment:
Leakage: There is no risk from reagent leaks when using this instrument as intended.
Fire/Flammability: To minimize risk of fire, the exhaust from the chromatograph is vented at the rear panel of the instrument. In the unlikely event that a large injection (1.0 μL) of a very flammable material such as hexane was to ignite by an ignition source placed near the sensor outlet barb, the reaction would produce 3.5 calories of energy. This energy is enough to raise the temperature of a gram of water 3.5°C or to raise the temperature of the chromatograph (1.3 kg mass) by approximately 0.0035°C. This is very small when compared against roughly 252 calories released from ignition of one blue tip match.
Electrical shock: To minimize the hazard of electrical shock, the chromatograph is powered at 24 V. Use only the power supply provided by the manufacturer to power this instrument.
Warning labels:
Appendix C
Syringe Usage Instructions (1.0 μL GC Syringe)
Syringe Handling
- Never pull the plunger back more than 80% of its total volume. Warning: Once the plunger has been pulled out, it is almost impossible to reinsert. You may want to err on the side of caution, and never have students pull the plunger back more than 50% (0.5 μL). This avoids having students accidentally pull the plunger from the syringe body, a costly mistake.
- Exercise caution when depressing the plunger. Stickier chemicals can jam the syringe and depressing the plunger too rapidly can cause the plunger to bend. In the case of our 1.0 μL syringe, the plunger is a fine wire that extends into the needle. A bend in the plunger of this syringe may not be visible, but the plunger will begin to stick which can render the syringe useless.
- If the plunger starts to catch in the syringe during sample collection or injection, follow the procedure for cleaning the syringe. NEVER force the plunger.
- If the syringe becomes clogged, do not pump the plunger or attempt to force liquid or compressed air through it. The excessive pressure could cause the barrel to crack.
- Avoid unnecessary movement of the plunger in a dry syringe.
- The plunger should only be grasped by the button since any abrasions, scratches, or oil from one's fingers can interfere with proper plunger operation.
- Always proceed carefully when inserting the syringe needle into the Go Direct Mini GC. Occasionally, the needle will catch on the column; inserting the needle with too much force will cause it to bend, which will destroy the syringe. Rotating the syringe will alleviate this problem.
- When wiping the needle of the syringe, pinch a lint-free wipe around the needle next to the barrel of the syringe and wipe in a single motion toward the point of the needle. Never wipe the needle toward the barrel.
- Syringes should be regularly inspected for damage, including hairline cracks. Be sure to check the needle tip for barbs, which tear the septum, and can produce particles that clog the needle or the chromatograph’s column. Cracked syringes should be discarded according to your sharps disposal procedure. Needle burrs can be smoothed with a fine emery board or carborundum.
- Before storing a syringe, rinse it with acetone. Wipe dry all external surfaces. Store the syringe in original shipping container or shock-absorbing padding.
- NEVER soak the syringe for an extended period in a solvent. Doing so could cause any adhesives used in the construction of the syringe to dissolve.
Tips
- Greatest analytical accuracy is achieved when the injection volume is at least 20% of the working volume of the syringe. If the optimal syringe size is unavailable, be aware that your results will show greater variability.
- Prior to injection, moving the syringe plunger as slowly as possible during all steps (whether liquid is involved or not) will help maintain the accuracy of the injection volume.
- When collecting your sample, grip the syringe by the flange and plunger button only, as your body heat can affect the volume collected.
- During insertion of the syringe needle into the gas chromatograph, support the needle with one hand and hold the flange of the syringe in the other. This reduces the chance of bending the needle.
- If the needle seems to catch when inserting it into the gas chromatograph, turn the syringe a quarter turn and then try again.
- When injecting into the GC, you want to depress the plunger quickly enough to ensure that the entire sample is delivered at once but carefully enough that you do not bend the plunger if the plunger sticks. The larger injection sizes require greater care during the injection.
Rinsing the Syringe
- Submerge the tip of the syringe needle in the rinse liquid, commonly acetone or ethanol, and draw the plunger back to 50% of its total volume.
- Remove the syringe from the rinse liquid and place the tip of the needle over an appropriate waste receptacle such as a beaker or lint-free tissue.
- Slowly depress the plunger, ejecting all of the solution from the syringe.
- Wipe the needle of the syringe with a fresh lint-free tissue.
- Repeat the above steps 3 times.
- Remove the syringe tip from the solution, replace the cap of the vial of rinse liquid, and wipe the needle of the syringe with a fresh lint-free tissue.
Collecting a Sample
- Remove the cap from the sample container and rinse the syringe with the solution to be injected, following the procedure outlined in the section Rinsing the Syringe.
- Submerge the tip of the needle in the solution to be injected and slowly draw the plunger back by an amount larger than the intended injection volume. This excess volume will typically be somewhere around 0.1 µL. (Example: If you are attempting a 0.2 µL injection, you should withdraw between the 0.25 and 0.3 µL.)
- Remove the syringe tip from the solution and replace the cap on the sample container.
- Holding the syringe vertically at eye level, carefully depress the plunger until the syringe holds only the desired injection volume.
- Carefully wipe the syringe needle with a fresh lint-free tissue, making sure the tissue does not absorb any sample from inside the needle.
- When you are satisfied with the volume of your sample, proceed to injection. If not, carefully eject the syringe contents into the appropriate waste receptacle, wipe the needle with a fresh lint-free tissue, and begin again at Step 2.
Injecting into the Go Direct Mini GC
- Wait for the status indicator light on the Go Direct Mini GC to turn green and the message “Ready for Injection” to appear before collecting your sample into the syringe.
- As soon as your sample is loaded into the syringe, grip the syringe by the flange and pinch the needle about halfway along its length.
- Aim the needle into the center of the brass needle guide at the top of the gas chromatograph and slowly push the needle into the injection port, being careful not to move the plunger. If the needle should catch, immediately stop pushing and turn the syringe a quarter turn, then resume pressure.
- As soon as the syringe is fully inserted against the needle guard, quickly depress the plunger and simultaneously click Collect in the data-collection software.
- Immediately pull the syringe out of the gas chromatograph.
Cleaning the Syringe
- Never force the plunger.
- Clean the syringe following the procedure described in Rinsing the Syringe using an appropriate solvent. Choose a solvent that will dissolve the contaminating substances. Common choices include acetone, methanol, methylene chloride, and acetonitrile, but other solvents may be used. Non‑alkaline, non-phosphate, non-detergent solvents are preferred. Do not soak the syringe in any solvent.
- If the plunger is catching during injection, it may need to be flushed with multiple cleaning solvents.
Troubleshooting
If the syringe plunger will not fully depress
- Follow the procedure for cleaning the syringe.
- Inspect the plunger. If it is bent and cannot be straightened, dispose of the syringe according to your sharps disposal procedure.
Appendix D
Relationship of Pressure and Column Flow Rate
If you are accustomed to setting flow rate rather than column pressure values in a temperature-pressure profile, here is an equation (and a table of typical values) representing the nearly linear relationship between these two variables:
Flow Rate (mL/min) = 0.54×Pressure (kPa)
|
Pressure (kPa) |
Flowrate (mL/min) |
|
2.5 |
1.4 |
|
5.0 |
2.7 |
|
7.5 |
4.1 |
|
10.0 |
5.4 |
|
12.5 |
6.8 |
|
15.0 |
8.1 |
|
17.5 |
9.5 |
|
20.0 |
10.8 |
This relationship was determined by measuring the flow rate of the exiting gas (air) when the column was heated at a constant 45°C temperature at various pressures.
Repair Information
If you have followed the troubleshooting steps and are still having trouble with your Go Direct Mini GC, contact Vernier Technical Support at support@vernier.com or call 888-837-6437.
Accessories/Replacements
|
Item |
Order Code |
|---|---|
|
GC-SYR-MIC |
|
|
GC-SEP |
|
|
GC2-MINI-PS |
|
|
CB-USB-MINI |
|
|
CB-USB-C-MINI |
Warranty
Warranty information for this product can be found on the Support tab at www.vernier.com/gdx-gc/#support
General warranty information can be found at www.vernier.com/warranty
Important: This warranty is void if Go Direct Mini GC is opened by the user.
Contact Support
Fill out our online support form or call us toll-free at 1-888-837-6437.