Go Direct® Motion Detector User Manual
Order Code: GDX-MD
Go Direct Motion accurately tracks objects as close as 15 cm and as far away as 3.5 m. The compact design and wireless capabilities of this motion detector eliminate the concern of a dangling cable getting in the way.
Use the temperature compensation channel of Go Direct Motion to adjust for the difference in the speed of sound in cold and warm locations.
Go Direct Motion can be used in a variety of experiments:
- Study position, velocity, and acceleration of carts on a track.
- Match graphs created in data-collection software.
- Analyze the effects of air resistance on falling coffee filters.
- Investigate simple harmonic motion by monitoring a mass on a spring.
Note: Vernier products are designed for educational use. Our products are not designed nor are they recommended for any industrial, medical, or commercial process such as life support, patient diagnosis, control of a manufacturing process, or industrial testing of any kind.
What's Included
- Go Direct Motion
- Micro USB Cable
Compatible Software
Choose a platform below to see its compatibility requirements.LabQuest
Interface LabQuest App LabQuest 3 Full support LabQuest 2 Full support 1 LabQuest Incompatible Compatibility Notes
Computers
Software Interface Graphical Analysis Graphical Analysis (Web App) No interface required Full support Full support LabQuest 3 Full support 1 Incompatible LabQuest 2 Full support 1 2 Incompatible Compatibility Notes
Chromebook
Software Interface Graphical Analysis (Web App) No interface required Full support iOS
Software Interface Graphical Analysis Graphical Analysis GW No interface required Full support Full support LabQuest 3 Full support 1 2 Full support 1 2 LabQuest 2 Full support 1 2 3 Full support 1 2 3 Compatibility Notes
Android
Software Interface Graphical Analysis Graphical Analysis GW No interface required Full support Incompatible LabQuest 3 Full support 1 2 Full support 1 LabQuest 2 Full support 1 2 3 Full support 1 3 Compatibility Notes
Python
Software Interface Python No interface required Full support Javascript
Software Interface Javascript No interface required Full support 1 Compatibility Notes
LabVIEW
Software Interface NI LabVIEW No interface required Full support
Quick Start: Vernier Graphical Analysis® and Bluetooth®
- Charge your sensor for at least 2 hours before first use.
- Turn on your sensor. The LED will blink red.
- Launch Graphical Analysis, then click Sensor Data Collection.
- Select your sensor from the list. The sensor ID is located on the sensor label near the bar code. Note: If you don’t see a list of available sensors, click WIRELESS. After selecting your sensor, click Pair.
- This is a multi-channel sensor. Click SENSOR CHANNELS and select the channel(s) you want to use.
- Click DONE. You are now ready to collect data.
Using other Vernier data-collection apps or want to connect via USB?
Visit www.vernier.com/start-go-direct
Note: This sensor also works with LabQuest 2 and LabQuest 3; it does not work with the original LabQuest.
Charging the Sensor
Connect Go Direct Motion to the included USB Charging Cable and any USB device for two hours.
You can also charge up to eight Go Direct Motion Detectors using our Go Direct Charge Station, sold separately (order code: GDX-CRG). An LED on each Go Direct Motion indicates charging status.
| Charging |
Orange LED next to the battery icon is solid while the sensor is charging. |
| Fully charged |
Green LED next to the battery icon is solid when the sensor is fully charged. |
Powering the Sensor
| Turning on the sensor |
Press button once. Red LED indicator flashes when unit is on. |
| Putting the sensor in sleep mode |
Press and hold button for more than three seconds to put into sleep mode. Red LED indicator stops flashing when sleeping. |
Connecting the Sensor
See the following link for up-to-date connection information:
Connecting via Bluetooth
| Ready to connect | Red LED next to the Bluetooth icon flashes when sensor is awake and ready to connect. |
| Connected | Green LED next to the Bluetooth icon flashes when sensor is connected via Bluetooth. |
Connecting via USB
| Connected and charging | Orange LED next to the battery icon is solid when the sensor is connected to Graphical Analysis via USB and the unit is charging. LED next to Bluetooth icon is off. |
| Connected, fully charged | Green LED next to the battery icon is solid when the sensor is connected to Graphical Analysis via USB and fully charged. LED next to Bluetooth icon is off. |
| Charging via USB, connected via Bluetooth |
Orange LED next to the battery icon is solid when the sensor is charging. Green LED next to the Bluetooth icon flashes. |
Identifying the Sensor
When two or more sensors are connected, the sensors can be identified by tapping or clicking Identify in Sensor Information.
Using the Product
Connect the sensor following the steps in the Getting Started section of this user manual.
Channels
Go Direct Motion has three measurement channels. The channel names are
- Motion
- Motion (cart)
- Motion with TC
Motion
The default channel that is active when the sensor is connected is motion. The motion channel is set to measure the distance between the sensor and the nearest object based on the speed of sound at 22°C. This channel has a high gain and is best for most uses, such as measuring the motion of a tossed ball, a walking student, or a mass on a spring.
Motion (cart)
This channel has a lower gain setting than the default motion channel. It is useful for measuring a cart on a track as this channel is less likely to pick up objects to either side of the track. Use this channel for small objects close to the motion detector.
Motion with TC
Use the motion with TC channel for automatic temperature compensation, which adjusts the speed of sound used in the distance calculation based on an internal temperature sensor. This is particularly useful if you are using the sensor in an environment that is much warmer or much cooler than room temperature.
Videos
Calibrating the Sensor
In most cases, calibration is unnecessary. If you require better accuracy, select the Motion channel and perform a 1-point calibration based on a measured distance. You can make several adjustments to the readings by zeroing and changing the direction of the coordinate system. You can find details on how to adjust these readings at www.vernier.com/til/2972
Motion and Motion (cart) Channels
The default for this channel uses the speed of sound at 22°C. If you would like to calibrate the sensor to improve accuracy, place a hard, flat surface (such as a wall, book, or box) a known distance away from the front surface of Go Direct Motion and choose calibrate. Note that the calibration will be saved to the sensor, so the next time you use this channel it will use the previously saved value.
Motion with TC Channel
This channel adjusts automatically based on the temperature and cannot be calibrated.
Specifications
|
Range |
Motion and Motion with TC channels: 0.25 m to 3.5 m Motion (cart) channel: 0.15 m to 3.5 m |
|
Accuracy |
≤ ±1.0% FS |
|
Resolution |
1 mm |
|
Temperature compensation |
Motion and Motion (cart) channels: Factory calibrated for room temperature. Calibrate to a known distance for improved distance accuracy. Motion with TC channel: Uses internal temperature sensor to respond to dynamic temperature changes |
|
Accuracy |
2 mm |
|
Ultrasound frequency |
50 kHz |
|
Power consumption |
51 mA |
|
Maximum sampling rate |
30 samples/s |
|
USB specification |
USB 2.0 full speed |
|
Wireless specification |
Bluetooth v4.2 |
|
Maximum wireless range |
30 m (unobstructed) |
|
Battery |
650 mA Li-Poly |
|
Battery life (single full charge) |
~24 hours |
|
Battery life (long term) |
~500 full charge cycles (several years depending on usage) |
Care and Maintenance
Battery Information
Go Direct Motion contains a small lithium-ion battery. The system is designed to consume very little power and not put heavy demands on the battery. Although the battery is warranted for one year, the expected battery life should be several years. Replacement batteries are available from Vernier (order code: GDX-BAT-650).
Storage and Maintenance
To store Go Direct Motion for extended periods of time, put the device in sleep mode by holding the button down for at least three seconds. The red LED will stop flashing to show that the unit is in sleep mode. Over several months, the battery will discharge but will not be damaged. After such storage, charge the device for a few hours, and the unit will be ready to go.
Exposing the battery to temperatures over 35°C (95°F) will reduce its lifespan. If possible, store the device in an area that is not exposed to temperature extremes.
Water Resistance
Go Direct Motion is not water resistant and should never be immersed in water.
If water gets into the device, immediately power the unit down (press and hold the power button for more than three seconds). Disconnect the sensor and charging cable, and remove the battery. Allow the device to dry thoroughly before attempting to use the device again. Do not attempt to dry using an external heat source.
How the Sensor Works
Go Direct Motion emits short bursts of ultrasonic sound waves from the gold foil of the transducer. These waves fill a cone-shaped area about 15 to 20° off the axis of the center line of the beam. Go Direct Motion then “listens” for the echo of these ultrasonic waves returning to it. The equipment measures how long it takes for the ultrasonic waves to make the trip from Go Direct Motion to an object and back. Using this time and the speed of sound in air, the distance to the nearest object is determined.
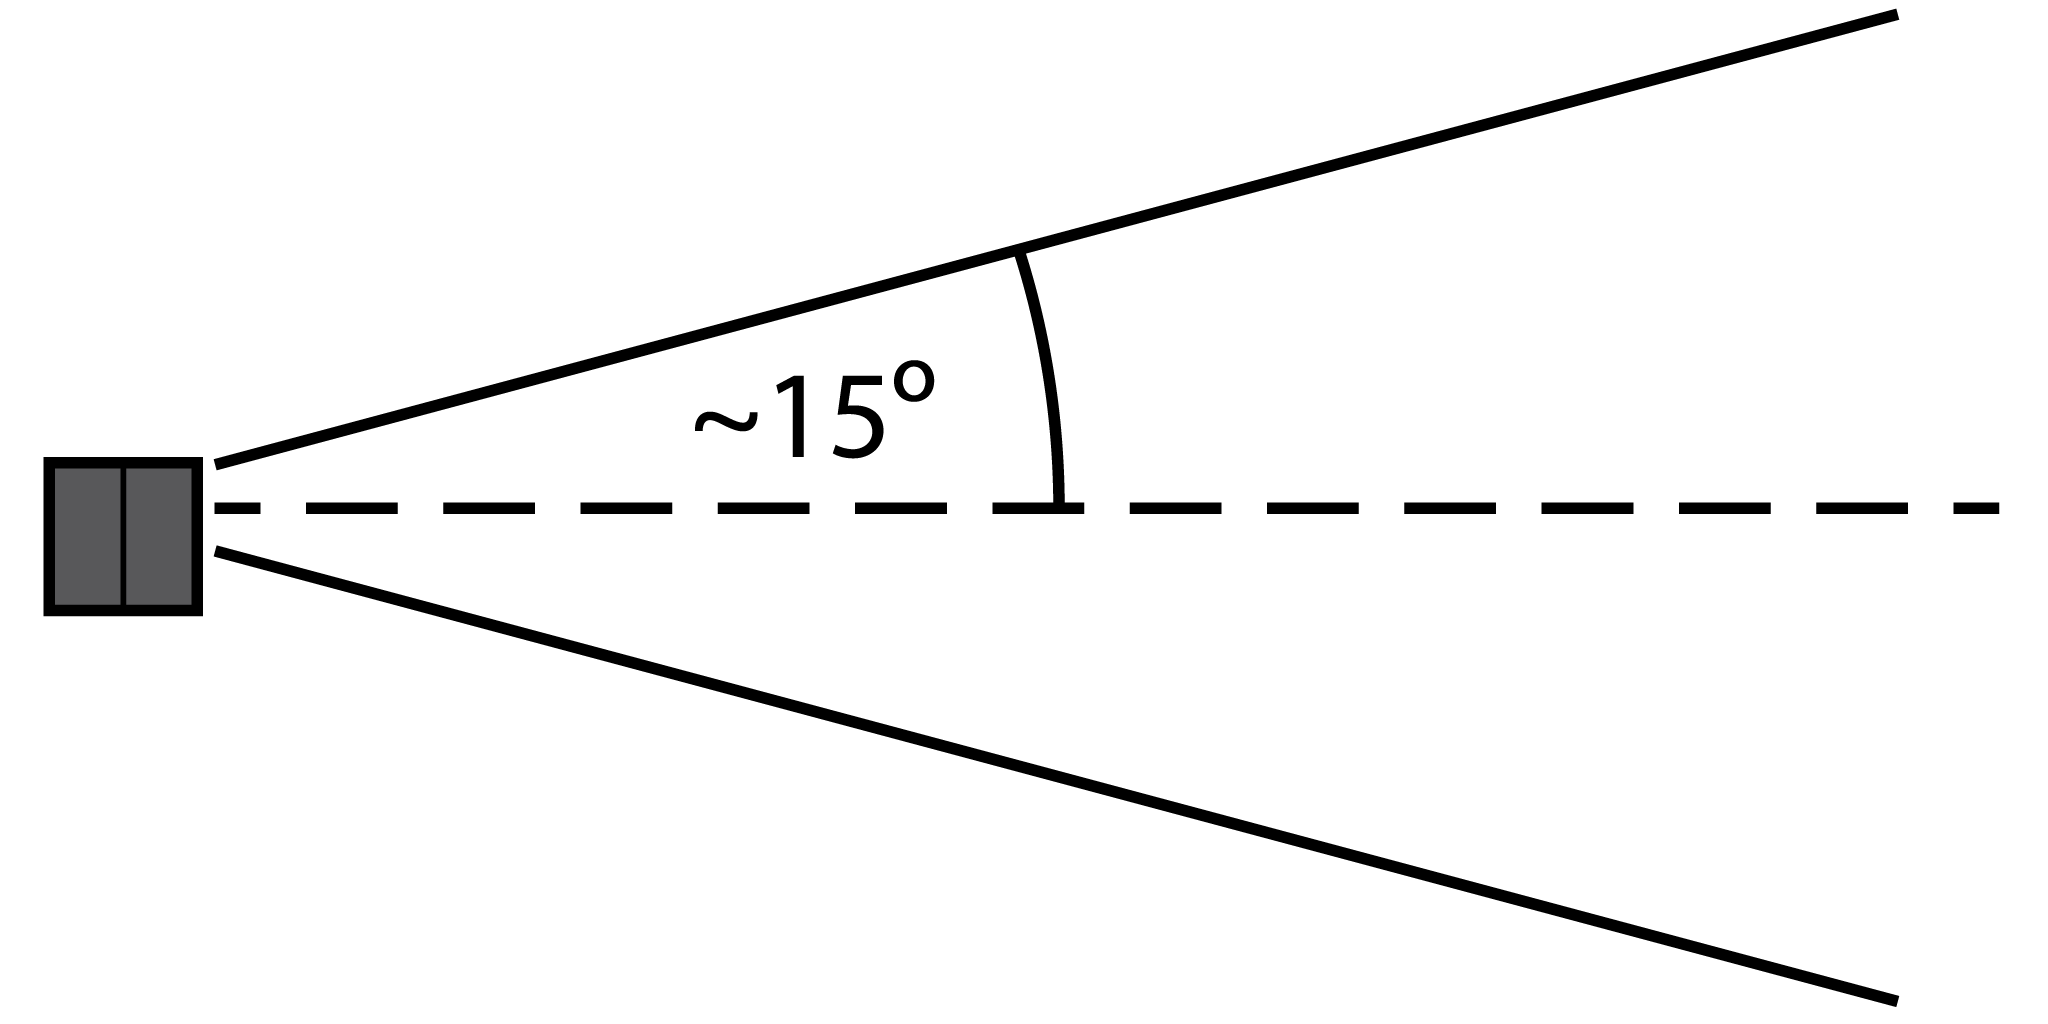
Note that Go Direct Motion will report the distance to the closest object that produces a sufficiently strong echo. Go Direct Motion can pick up objects such as chairs and tables in the cone of ultrasound.
The sensitivity of the echo detection circuitry automatically increases, in steps, every few milliseconds as the ultrasound travels out and back. This change in sensitivity enables the detection of weaker signals.
Troubleshooting
The most frequently reported problems with a motion detector are that the motion does not work beyond a certain distance or that the graph is very noisy. There are a number of ways to troubleshoot these situations, and they are described below.
- If Go Direct Motion does not work beyond a certain distance (e.g., it does not detect anything beyond 1.2 m), here are some things to check if you have this problem:
- Check for movable objects (textbooks, ring stands, etc.) in the cone of the ultrasound. If possible, move these objects out of the measurement cone. It may not take a very large object to cause problems.
- Check for a stationary object (chair, table, etc.) in the cone of the ultrasound. This object may be detected when you are trying to study an object farther away. It may not take a very large object to cause problems. If you have trouble with a stationary object causing unwanted echoes, try setting the equipment up so that the objects are not in the cone or placing a cloth over the object. This minimizes the ultrasound reflection.
- Noisy or erratic data may have a number of causes. Here are some tips.
- Sometimes other sound sources can cause problems. If there is another source of ultrasonic waves in the same frequency range, this will cause erroneous readings. Examples include motors and fans, air track blowers, the sound made by the air exiting the holes on an air track, etc. Try to eliminate these sources of noise. If you are using an air track, try changing the air flow volume.
- Make sure that Go Direct Motion is not placed close to a computer or computer monitor.
- If the room in which Go Direct Motion is being used has a lot of hard, sound‑reflecting surfaces, you can get strange effects caused by the ultrasound bouncing around the room. Standing waves can be set up between Go Direct Motion and a sound reflector. Try placing a cloth horizontally just in front of and below the Motion Detector. This sometimes helps eliminate ultrasound that is “skipping” into the Go Direct Motion.
- Try changing the data-collection rate. Sometimes motion detectors work better at one data rate than another. Rates above 30 Hz do not work well in acoustically live rooms.
- If you are studying people moving, have them hold a large, flat object (e.g., a large book or a pizza box) as a reflector. If you have an irregular reflecting surface, sometimes the waves will be reflected back to the transducer, and sometimes not. The results will seem erratic.
An excellent discussion of motion detector theory and operation can be found in “Physics and Technical Characteristics of Ultrasonic Sonar Systems”, Dan MacIsaac and Ari Hamalainen, The Physics Teacher 40, 39–46 (January 2002).
For additional troubleshooting and FAQs, see www.vernier.com/til/4112
Repair Information
If you have watched the related product video(s), followed the troubleshooting steps, and are still having trouble with your Go Direct Motion, contact Vernier Technical Support at support@vernier.com or call 888-837-6437. Support specialists will work with you to determine if the unit needs to be sent in for repair. At that time, a Return Merchandise Authorization (RMA) number will be issued and instructions will be communicated on how to return the unit for repair.
Accessories/Replacements
| Item | Order Code |
|---|---|
|
CB-USB-MICRO |
|
|
CB-USB-C-MICRO |
|
|
GDX-BAT-650 |
|
|
MD-CLAMP |
|
|
DTS-MDB |
Warranty
Warranty information for this product can be found on the Support tab at www.vernier.com/gdx-md/#support
General warranty information can be found at www.vernier.com/warranty
Contact Support
Fill out our online support form or call us toll-free at 1-888-837-6437.