Go Direct® Optical Dissolved Oxygen Probe User Manual
Order Code: GDX-ODO
Go Direct Optical Dissolved Oxygen is a luminescence-based dissolved oxygen probe that can also measure water temperature and atmospheric pressure. It is actively measuring temperature and pressure, so there is no need for calibration. This probe can be used in experiments to test water samples in the field or in the laboratory.
Note: Vernier products are designed for educational use. Our products are not designed nor are they recommended for any industrial, medical, or commercial process such as life support, patient diagnosis, control of a manufacturing process, or industrial testing of any kind.
What's Included
- Go Direct Optical Dissolved Oxygen
- Electrode Storage Bottle
- Micro USB Cable
Compatible Software
Choose a platform below to see its compatibility requirements.LabQuest
Interface LabQuest App LabQuest 3 Full support LabQuest 2 Full support 1 LabQuest Incompatible Compatibility Notes
Computers
Software Interface Graphical Analysis Graphical Analysis (Web App) No interface required Full support Full support LabQuest 3 Full support 1 Incompatible LabQuest 2 Full support 1 2 Incompatible Compatibility Notes
Chromebook
Software Interface Graphical Analysis (Web App) No interface required Full support iOS
Software Interface Graphical Analysis Graphical Analysis GW No interface required Full support Partial support 1 LabQuest 3 Full support 2 3 Full support 2 3 LabQuest 2 Full support 2 3 4 Full support 2 3 4 Compatibility Notes
Android
Software Interface Graphical Analysis Graphical Analysis GW No interface required Full support Incompatible LabQuest 3 Full support 1 2 Full support 1 LabQuest 2 Full support 1 2 3 Full support 1 3 Compatibility Notes
Python
Software Interface Python No interface required Full support Javascript
Software Interface Javascript No interface required Full support 1 Compatibility Notes
LabVIEW
Software Interface NI LabVIEW No interface required Full support
Quick Start: Vernier Graphical Analysis® and Bluetooth®
- Charge your sensor for at least 2 hours before first use.
- Turn on your sensor. The LED will blink red.
- Launch Graphical Analysis, then click Sensor Data Collection.
- Select your sensor from the list. The sensor ID is located on the sensor label near the bar code. Note: If you don’t see a list of available sensors, click WIRELESS. After selecting your sensor, click Pair.
- This is a multi-channel sensor. Click SENSOR CHANNELS and select the channel(s) you want to use.
- Click DONE. You are now ready to collect data.
Using other Vernier data-collection apps or want to connect via USB?
Visit www.vernier.com/start-go-direct
Note: This sensor also works with LabQuest 2 and LabQuest 3; it does not work with the original LabQuest.
Charging the Sensor
Connect Go Direct Optical Dissolved Oxygen to the included Micro USB Cable and any USB device for two hours.
You can also charge up to eight Go Direct Optical Dissolved Oxygen probes using our Go Direct Charge Station, sold separately (order code: GDX-CRG). An LED on each Go Direct Optical Dissolved Oxygen indicates charging status.
| Charging |
Blue LED on steady while sensor is connected to the Micro USB Cable or Charging Station. |
| Fully charged |
Blue LED is off when charging is complete. |
Powering the Sensor
| Turning on the sensor |
Press button once. Red LED indicator flashes when unit is on. |
| Putting the sensor in sleep mode |
Press and hold button for more than three seconds to put into sleep mode. Red LED indicator stops flashing when sleeping. |
Connecting the Sensor
See the following link for up-to-date connection information:
| Connected and charging | Blue and Green LED solid when sensor is connected to Graphical Analysis via USB and unit is charging. (Green LED is obscured by the blue one.) |
| Connected | Green LED solid when sensor is connected to Graphical Analysis via USB and the unit is fully charged. Green LED flashing when sensor is connected to Graphical Analysis via Bluetooth wireless technology. |
| Charging via USB, connected via Bluetooth wireless technology |
Blue LED is solid and green LED is flashing, but the green flashing LED looks white because it is overwhelmed by the blue. |
Identifying the Sensor
When two or more sensors are connected, the sensors can be identified by tapping or clicking Identify in Sensor Information.
Using the Product
- Connect the probe following the steps in the Quick Start section of this user manual.
- Remove the storage bottle from the probe by unscrewing the lid and removing the bottle and lid.
- Place the tip of the probe into the water sample. The sample needs to be deep enough that the metal ring on the tip is submerged. Note: If your water sample is not at room temperature, wait a few minutes for the reading to equilibrate before taking a reading.
- When you are finished making measurements, rinse the probe with distilled water.
- Slide the lid onto the body of the probe, and then screw the lid onto the storage bottle.
Channels
Go Direct Optical Dissolved Oxygen has five measurement channels:
- DO Concentration
- DO Saturation
- Temperature
- Pressure
- DO Salinity
DO Concentration
This channel measures the dissolved oxygen concentration in a water sample. This is an absolute measurement of dissolved oxygen concentration expressed as milligrams of oxygen gas dissolved per liter of water. Units can be changed from milligrams per liter (mg/L) to parts per million (ppm). Water temperature and atmospheric pressure are being measured and used in the DO calculations regardless of whether the temperature and/or pressure channels are activated. This is the default channel that is active when the probe is connected.
DO Saturation
This channel measures the percent saturation of dissolved oxygen in a water sample. Percent saturation is a relative measurement in which the dissolved oxygen concentration is expressed as a percentage of the maximum amount of oxygen that water can hold at a given temperature and pressure. This channel is not active by default when the probe is connected.
Temperature
This channel measures water temperature of the sample. Units can be changed from °C to °F, or K. This channel is not active by default when the probe is connected, however it is always in use internally, along with pressure, to calculate the dissolved oxygen readings.
Pressure
This channel measures the atmospheric pressure. Units can be changed from kPa to mmHg, inHg, mbar, psi, atm, or torr. This channel is not active by default when the probe is connected, however it is always in use internally, along with temperature, to calculate the dissolved oxygen readings.
DO Salinity
This channel should be used when measuring dissolved oxygen in highly saline environments (> 1 ppt). In these cases, a correction must be made to account for the effect of salinity on dissolved oxygen concentration. Salinity is not actually measured by the probe, but it can be manually entered once this channel has been selected. If no value is entered, a default salinity concentration of 35 ppt, the typical salinity of ocean water, is used to make the correction. Units can be changed from milligrams per liter (mg/L) to parts per million (ppm). This channel is not active by default when the probe is connected.
Calibrating the Sensor
DO Concentration
This channel is factory calibrated and does not require calibration by the user. If the probe is not reading accurately, a reset can be done using a one-point calibration. To do a reset
- Fill the storage bottle to the top of the sponge with distilled water.
- Insert the probe into the storage bottle and make sure it is positioned vertically so that the tip is not in contact with the sponge or water.
- Start the software and identify your probe, if necessary.
- Keep the probe in a vertical position for a minimum of 60 seconds.
- Click or tap the meter, choose calibrate, and follow the instructions on the screen.
DO Saturation
This channel is factory calibrated and does not require calibration by the user. If the probe is not reading accurately a reset can be done using a one-point calibration. To do a reset
- Fill the storage bottle, to the top of the sponge, with distilled water.
- Insert the probe into the storage bottle and make sure it is positioned vertically so that the tip is not in contact with the sponge or water.
- Start the software and identify your probe, if necessary.
- Keep the probe in a vertical position for a minimum of 60 seconds.
- Click or tap the meter, choose calibrate, and follow the instructions on the screen.
Temperature
This channel is factory calibrated and can not be calibrated by the user.
Pressure
This channel is factory calibrated and can not be calibrated by the user.
DO Salinity
This channel is factory calibrated and does not require calibration by the user. The salinity correction is automatically set for 35 ppt. To change the correction, click or tap the meter, choose calibrate, and enter the actual salinity concentration, in ppt. Click or tap Keep, then done.
Specifications
|
Range (mg/L) |
0 to 20 mg/L |
|
Range (%) |
0 to 300% |
|
Accuracy (mg/L) |
|
|
Accuracy (%) |
|
|
Accuracy with calibration reset (mg/L) |
|
|
Accuracy with calibration reset (%) |
|
|
Type |
Luminescent |
|
Response time |
90% of final reading in 40 seconds |
|
Temperature range |
0 to 50°C |
|
Pressure range |
228 mmHg to 1519 mmHg |
|
Minimum sample flow |
none required |
|
Wireless specification |
Bluetooth 4.2 |
|
Maximum wireless range |
30 m |
|
Battery |
650 mA Li-Poly |
|
Battery life (single full charge) |
~24 hours |
|
Battery life (long term) |
~500 full charge cycles (several years depending on usage) |
Care and Maintenance
Battery Information
Go Direct Optical Dissolved Oxygen contains a small lithium-ion battery. The system is designed to consume very little power and not put heavy demands on the battery. Although the battery is warranted for one year, the expected battery life should be several years. Replacement batteries are available from Vernier (order code: GDX-BAT-650).
Storage and Maintenance
When you have finished using Go Direct Optical Dissolved Oxygen, rinse it off with distilled water and blot it dry using a paper towel or lab wipe. Insert the probe back into the storage bottle containing the sponge, dampened with distilled water.
The tip of the probe is a replaceable screw-on cap called the Go Direct Optical Dissolved Oxygen Replacement Cap. This cap is warranted to be free from defects of a period of two years from the date of purchase; it is possible that you can get longer use than the warranty period. If you notice a reduced response, it is probably time to replace the cap (order code GDX-ODO-CAP). To extend the lifetime of the cap, do not expose it to direct sunlight for an extended period of time.
To store Go Direct Optical Dissolved Oxygen for extended periods of time, put the device in sleep mode by holding the button down for at least three seconds. The red LED will stop flashing to show that the unit is in sleep mode. Over several months, the battery will discharge but will not be damaged. After such storage, charge the device for a few hours, and the unit will be ready to go.
Exposing the battery to temperatures over 35°C (95°F) will reduce its lifespan. If possible, store the device in an area that is not exposed to temperature extremes.
This probe should be used in aqueous solutions only. Do not place the probe in viscous, organic liquids, such as heavy oils, glycerin (glycerol), ethylene glycol, or alcohols. Do not place the probe in acetone or non-polar solvents, such as pentane or hexane.
Water Resistance
Go Direct Optical Dissolved Oxygen is designed so that the tip of the probe can be submerged in an aquatic environment for extended periods of time. For best results keep the pressure-sensing element out of water so as not to interfere with the active pressure readings. This probe is not designed for long-term immersion applications.
The included micro USB cable is not waterproof.
How the Sensor Works
Go Direct Optical Dissolved Oxygen operates on the principle of reversible luminescence quenching of a luminophore by oxygen as it passes through the cap. The cap is coated with a luminescent compound encased in a matrix for protection. Blue light from an LED is transmitted to the cap and excites the luminophore.
A collision of an oxygen molecule with the luminophore in its electronic excited state results in energy transfer from the luminophore to oxygen. As the luminophore relaxes it emits red light. The time from when the blue light is transmitted and the red light is emitted is measured by a photodiode. The more oxygen that is present, the shorter the time it takes for the red light to be emitted.
This time is measured and correlated to the oxygen concentration. Between the flashes of blue light, a red LED is flashed onto the probe and used as an internal reference to help validate each measurement. This process is described by the Stern-Volmer equation
τ0 / τ = 1 + Ksv[DO]
where τ0 and τ are the luminescence lifetimes in the absence and presence of oxygen, respectively, [DO] is the dissolved oxygen concentration, and Ksv is the Stern-Volmer quenching constant.
The Stern-Volmer constant (Ksv) depends directly upon the rate constant for the diffusion of oxygen, the solubility of oxygen, and the natural lifetime of the electronic excited state of the luminophore. Lifetime measurements have an advantage over intensity measurements since they are not usually affected by processes which result in loss of the complex, such as bleaching or photodegradation.
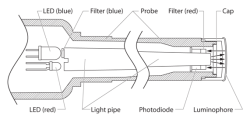
Interior schematic of the Optical Dissolved Oxygen Probe
Troubleshooting
If the probe seems to be giving incorrect values:
- Give the probe a few minutes to equilibrate in the sample, especially if the water is not at room temperature.
- Reset the calibration using the instructions above in the Calibrating the Sensor section.
For troubleshooting and FAQs, see www.vernier.com/til/4227
Repair Information
If you have followed the troubleshooting steps and are still having trouble with your Go Direct Optical Dissolved Oxygen, contact Vernier Technical Support at support@vernier.com or call 888-837-6437. Support specialists will work with you to determine if the unit needs to be sent in for repair. At that time, a Return Merchandise Authorization (RMA) number will be issued and instructions will be communicated on how to return the unit for repair.
Accessories/Replacements
| Item | Order Code |
|---|---|
|
CB-USB-MICRO |
|
|
CB-USB-C-MICRO |
|
| Go Direct 650 mAh Replacement Battery |
GDX-BAT-650 |
|
GDX-ODO-CAP |
|
|
ODO-GRD |
|
|
BTL-ES |
Warranty
Warranty information for this product can be found on the Support tab at www.vernier.com/gdx-odo/#support
General warranty information can be found at www.vernier.com/warranty
Disposal
When disposing of this electronic product, do not treat it as household waste. Its disposal is subject to regulations that vary by country and region. This item should be given to an applicable collection point for the recycling of electrical and electronic equipment. By ensuring that this product is disposed of correctly, you help prevent potential negative consequences on human health or on the environment. The recycling of materials will help to conserve natural resources. For more detailed information about recycling this product, contact your local city office or your disposal service.
Battery recycling information is available at www.call2recycle.org
Do not puncture or expose the battery to excessive heat or flame.
 The symbol, shown here, indicates that this product must not be disposed of in a standard waste container.
Contact Support
Fill out our online support form or call us toll-free at 1-888-837-6437.