Go Direct® Polarimeter User Manual
Order Code: GDX-POL
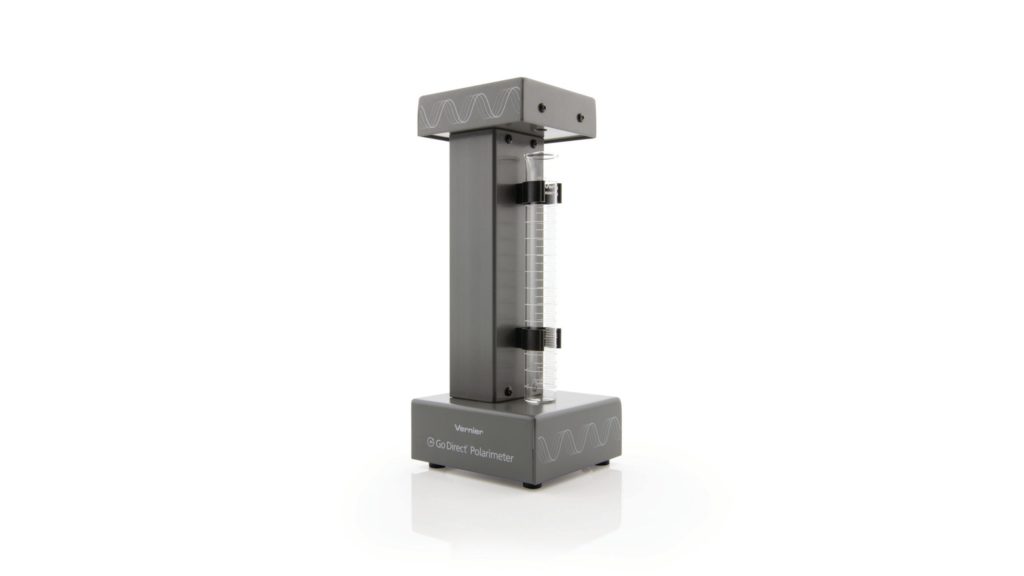
Go Direct Polarimeter provides a visual representation of chirality by measuring the optical rotation of optical isomers, such as sugars, amino acids, and proteins.
Note: Vernier products are designed for educational use. Our products are not designed nor are they recommended for any industrial, medical, or commercial process such as life support, patient diagnosis, control of a manufacturing process, or industrial testing of any kind.
What's Included
- Go Direct Polarimeter
- Sample cell
- Micro USB Cable
Compatible Software
Choose a platform below to see its compatibility requirements.LabQuest
Interface LabQuest App LabQuest 3 Full support LabQuest 2 Full support 1 LabQuest Incompatible Compatibility Notes
Computers
Software Interface Instrumental Analysis No interface required Full support Chromebook
Software Interface Instrumental Analysis No interface required Full support iOS
Software Interface Instrumental Analysis No interface required Full support Android
Software Interface Instrumental Analysis No interface required Full support
Quick Start: Vernier Instrumental Analysis® and Bluetooth®
- Charge your sensor for at least 2 hours before first use.
- Turn on your sensor. The LED will blink red.
- Launch Instrumental Analysis, then click Polarimetry.
- Select your sensor from the list. The sensor ID is located on the sensor label near the bar code.
- Click DONE. You are now ready to collect data.
Using other Vernier data-collection apps or want to connect via USB?
Visit www.vernier.com/start-go-direct
Note: This sensor also works with LabQuest 2 and LabQuest 3; it does not work with the original LabQuest.
Charging the Sensor
Connect Go Direct Polarimeter to the included Micro USB Cable and any USB device for two hours.
You can also charge up to eight Go Direct Polarimeters using our Go Direct Charge Station, sold separately (order code: GDX-CRG). An LED on each Go Direct Polarimeter indicates charging status.
| Charging |
Red LED next to battery icon is solid while sensor is charging. |
| Fully charged |
Green LED next to battery icon solid when sensor is fully charged. |
Connecting the Sensor
See the following link for up-to-date connection information:
Connecting via Bluetooth Wireless Technology
| Ready to connect | Red LED flashes when sensor is powered and ready to connect. |
| Connected | Green LED flashes when sensor is connected via Bluetooth wireless technology. |
Connecting via USB
|
Connected via USB, data collection software is not running |
Red LED flashes when sensor is powered and ready to connect. |
|
Connected via USB, data collection software is running |
Green LED is solid when connected to the software via USB. |
Identifying the Sensor
Use the Identify feature to flash the LED on the sensor that is connected via Bluetooth wireless technology. In Instrumental Analysis, Identify is accessed from Sensor Information. In LabQuest App, Identify is accessed by tapping the sensor meter, then tapping Go Direct.
Using the Product
Follow these steps when using the Go Direct Polarimeter when performing optical rotation experiments.
- Connect the Go Direct Polarimeter according to the Quick Start instructions.
- Calibrate Go Direct Polarimeter.
- Pour distilled water or the appropriate solvent in the Go Direct Polarimeter cell to a height of 10 cm. It is important to read the height to the nearest 0.1 cm. Read to the bottom of the meniscus.
- Place the cell in the Go Direct Polarimeter, then follow the appropriate steps:
- Instrumental Analysis: Click or tap Finish Calibration. When the polarimeter is ready, click or tap Done.
- LabQuest: Select Calibrate from the Sensors menu. Tap Calibrate Now and follow the instructions on the screen. When the polarimeter is ready, tap OK.
- You are now ready to add your optically active sample into the polarimeter cell.
- Rinse the polarimeter cell with a few milliliters of your optically active sample. Pour your sample into the polarimeter cell to a height of 10.0 cm (1.00 dm). It is important to read the height to the nearest 0.1 cm. Read to the bottom of the meniscus.
- Place the sample cell in the polarimeter.
- Start data collection. Data collection will stop automatically. Data are stored automatically in Instrumental Analysis. In LabQuest App, you can store a run by tapping the file cabinet icon on the graph screen.
- Record the first angle closest to 0° where the illumination is at a maximum. This is the observed angle of rotation for the optically active sample (α). There are several ways to locate this angle.
- Statistics: To simply get the angle with the highest illumination, highlight the peak of interest in Instrumental Analysis or LabQuest App. In Instrumental Analysis, click or tap Graph Tools and select Statistics. In LabQuest App, choose Statistics from the Analyze menu. Record the angle value where the illumination is at a maximum, as presented in the box. This method is the fastest and will result in reproducibility of the angle of rotation measurement of ±2.0°.
- Cosine Squared: To incorporate all your data into the fit, you can fit the data to their true waveform, a cosine squared, in either Instrumental Analysis or LabQuest App. In Instrumental Analysis, click or tap Graph Tools and select Curve Fit. Then select cosine squared from the drop-down list. In LabQuest App, choose Curve Fit from the Analyze menu. From the list of available General Equations, select Cosine Squared. The fit will run automatically. In this fit, the x-value corresponding to the maximum y‑value is obtained from the negative of the phase shift parameter, –C. This is a nonlinear fit that undergoes numerous iterations and may not converge, which may result in an unreasonable answer. Make sure the resulting value is reasonable based on the data. This method is the most time consuming; however, it will result in reproducibility of the angle of rotation measurement of ±0.1°.
- A compound will consistently have the same specific rotation under identical experimental conditions. To determine the specific rotation of the sample, use Biot’s law:
α = [α] ℓ c
where α is the observed optical rotation in units of degrees, [α] is the specific rotation in units of degrees (the formal unit for specific rotation is degrees dm‑1 mL g-1, but scientific literature uses just degrees), ℓ is the length of the cell in units of dm, and c is the sample concentration in units of grams per milliliter.
- To calculate a percent optical purity (or enantiomeric excess):

The value for the pure enantiomer can be obtained from literature or it can be measured using a neat sample, considering the purity of that sample as described by the manufacturer.
Calibrating the Sensor
You should perform a new calibration each time you power on the Go Direct Polarimeter. Refer to the Using the Sensor section of this user manual for additional instructions.
Specifications
|
Accuracy (optical rotation measurements) |
±1° |
|
Light source |
LED |
|
Wavelength |
589 nm |
Care and Maintenance
Battery Information
Go Direct Polarimeter contains a small lithium-ion battery. The system is designed to consume very little power and not put heavy demands on the battery. Although the battery is warranted for one year, the expected battery life should be several years. Replacement batteries are available from Vernier (order code: GDX-BAT-650).
Storage and Maintenance
To store Go Direct Polarimeter for extended periods of time, put the device in sleep mode by holding the button down for at least three seconds. The red LED will stop flashing to show that the unit is in sleep mode. Over several months, the battery will discharge but will not be damaged. After such storage, charge the device for a few hours, and the unit will be ready for use.
Exposing the sensor to temperatures below –15°C or over 45°C will damage the sensor. Additionally, temperatures over 35°C (95°F) will reduce the battery's lifespan. If possible, store the device in an area that is not exposed to temperature extremes.
Water Resistance
Important: Go Direct Polarimeter is neither waterproof, nor is it water resistant and should never be immersed in water.
If any liquid gets into the device, immediately power the unit down (press and hold the power button for more than three seconds). Disconnect the sensor and charging cable, and remove the battery. Allow the device to dry thoroughly before attempting to use the device again. Do not attempt to dry using an external heat source.
Note: Damage due to liquids is not covered under warranty.
How the Sensor Works
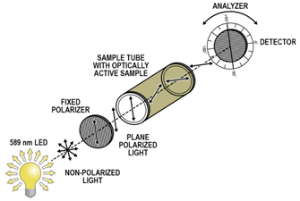
Go Direct Polarimeter is a vertical polarimeter that uses an LED source, a fixed polarizer, and a rotating polarizer (also called an analyzer) to detect changes in rotation of plane-polarized light in the presence of an optically active compound. Go Direct Polarimeter uses a light sensor and a bidirectional optical encoder to detect the quantity of light passing through the sample at each angle as the analyzer is rotated by a motor. A graph is produced that shows a clear change in the light’s polarization with respect to angle. This allows the user to determine various characteristics, including the identity, of the specific chemical compound being investigated.
Incident non-polarized light is transmitted through a fixed polarizer that only allows a certain orientation of light into the sample. The sample then rotates the light at a unique angle. As the analyzer is turned, the rotated light is maximally transmitted at that unique angle, allowing the user to determine properties of the sample. A (+) enantiomer rotates the plane of linearly polarized light clockwise, dextro, as seen by the detector. A (–) enantiomer rotates the plane counter‑clockwise, levo.
Troubleshooting
- There are four free experiments available for this instrument on our website: www.vernier.com/product/gdx-pol We highly recommend starting with one of these experiments to master the technique.
- Due to the nature of light transmission, it is important that the sample be transparent and homogeneous. The sample can have a moderate amount of color (up to OD of 2) but make sure it is not too dark to ensure that light will still pass through it onto the detector.
- The illumination value should not be used as a quantitative value for this device. If you choose to use it for this purpose, note that this value is very sensitive to change. These slight variations can be brought on by several different variables in the sample including inhomogeneity (such as particulates and bubbles), height of the sample in the cell, concentration of the sample, and aberrations in the glass cell or pathlength.
- The standard in polarimetry is to use a 10 cm pathlength. However, since it is not always feasible to have this large of a sample volume, you can accurately take readings with sample heights lower than 10 cm. To remain within the ±1° accuracy of the device, keep sample heights between 2 cm (~5 mL) and 10 cm (~ 25 mL). Outside of this region, there can be deviations in the light path that decrease the accuracy of the detector.
- A package of four additional sample cells is available. Order code: CELLS-POL.
For troubleshooting and FAQs, see www.vernier.com/til/10458
Repair Information
If you have followed the troubleshooting steps and are still having trouble with your Go Direct Polarimeter, contact Vernier Technical Support at support@vernier.com or call 888-837-6437. Support specialists will work with you to determine if the unit needs to be sent in for repair. At that time, a Return Merchandise Authorization (RMA) number will be issued and instructions will be communicated on how to return the unit for repair.
Accessories/Replacements
| Item | Order Code |
|---|---|
|
CELLS-POL |
|
|
GDX-BAT-650 |
|
|
CB-USB-MICRO |
Warranty
Warranty information for this product can be found on the Support tab at www.vernier.com/gdx-pol/#support
General warranty information can be found at www.vernier.com/warranty
Disposal
When disposing of this electronic product, do not treat it as household waste. Its disposal is subject to regulations that vary by country and region. This item should be given to an applicable collection point for the recycling of electrical and electronic equipment. By ensuring that this product is disposed of correctly, you help prevent potential negative consequences on human health or on the environment. The recycling of materials will help to conserve natural resources. For more detailed information about recycling this product, contact your local city office or your disposal service.
Battery recycling information is available at www.call2recycle.org
Do not puncture or expose the battery to excessive heat or flame.
 The symbol, shown here, indicates that this product must not be disposed of in a standard waste container.
Contact Support
Fill out our online support form or call us toll-free at 1-888-837-6437.