Go Direct® Pyranometer User Manual
Order Code: GDX-PYR

The Go Direct Pyranometer measures the power of electromagnetic radiation in watts per square meter. It is sensitive to the near infrared, visible, and UV ranges, where nearly all of the solar energy is concentrated. It is great for experiments with solar cells and calculating their efficiency. The sensor is weatherproof and has a dome-shape top to allow it to work with a wide range of sun angles. The Pyranometer has a 5 m cable.
An ideal pyranometer measures the entire solar spectrum, 280 to 2800 nm. However, about ninety percent of sunlight energy is in the wavelengths between 300 and 1100 nm. The Go Direct Pyranometer detects all of this energy.
The Go Direct Pyranometer is cosine corrected and is designed to maintain its accuracy when radiation comes from different angles. The cosine response when the sun is at 75° to the zenith is ± 5 percent. Zenith angles greater than 75° contribute less than 3 percent of daily radiation.
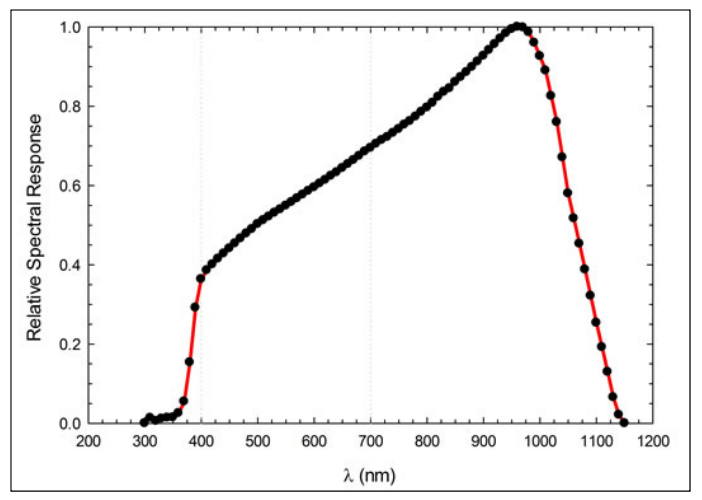
Spectral response of the Go Direct Pyranometer
Note: Vernier products are designed for educational use. Our products are not designed nor are they recommended for any industrial, medical, or commercial process such as life support, patient diagnosis, control of a manufacturing process, or industrial testing of any kind.
What's Included
- Go Direct Pyranometer
- Go Direct Pyranometer lens cover
- Micro USB Cable
Compatible Software
Choose a platform below to see its compatibility requirements.LabQuest
Interface LabQuest App LabQuest 3 Full support LabQuest 2 Full support 1 LabQuest Incompatible Compatibility Notes
Computers
Software Interface Graphical Analysis Graphical Analysis (Web App) No interface required Full support Full support LabQuest 3 Full support 1 Incompatible LabQuest 2 Full support 1 2 Incompatible Compatibility Notes
Chromebook
Software Interface Graphical Analysis (Web App) No interface required Full support iOS
Software Interface Graphical Analysis Graphical Analysis GW No interface required Full support Incompatible LabQuest 3 Full support 1 2 Full support 1 2 LabQuest 2 Full support 1 2 3 Full support 1 2 3 Compatibility Notes
Android
Software Interface Graphical Analysis Graphical Analysis GW No interface required Full support Incompatible LabQuest 3 Full support 1 2 Full support 1 LabQuest 2 Full support 1 2 3 Full support 1 3 Compatibility Notes
Python
Software Interface Python No interface required Full support Javascript
Software Interface Javascript No interface required Full support 1 Compatibility Notes
LabVIEW
Software Interface NI LabVIEW No interface required Full support
Quick Start: Vernier Graphical Analysis® and Bluetooth®
- Charge your sensor for at least 2 hours before first use.
- Turn on your sensor. The LED will blink red.
- Launch Graphical Analysis, then click Sensor Data Collection.
- Select your sensor from the list. The sensor ID is located on the sensor label near the bar code. Note: If you don’t see a list of available sensors, click WIRELESS. After selecting your sensor, click Pair.
- Click DONE. You are now ready to collect data.
Using other Vernier data-collection apps or connecting via USB?
Visit www.vernier.com/start-go-direct
Note: This sensor also works with LabQuest 2 and LabQuest 3; it does not work with the original LabQuest.
Remote Data Logging
|
If this symbol is on the sensor label, the sensor can store data directly to its memory, making it ideal for investigations that extend beyond typical connection ranges (e.g., long-term environmental monitoring). Use Graphical Analysis to set up remote logging and retrieve the data. Learn more at www.vernier.com/remote-logging |
Charging the Sensor
Connect Go Direct Pyranometer to the included Micro USB Cable and any USB device for two hours.
You can also charge up to eight Go Direct Pyranometers using our Go Direct Charge Station, sold separately (order code: GDX-CRG). An LED on each
Go Direct Pyranometer indicates charging status.
| Charging |
Orange LED next to the battery icon is solid while the sensor is charging. |
| Fully charged |
Green LED next to the battery icon is solid when the sensor is fully charged. |
Providing Power
| Turning on the sensor |
Press button once. Red LED indicator flashes when unit is on. |
| Putting the sensor in sleep mode |
Press and hold button for more than three seconds to put into sleep mode. Red LED indicator stops flashing when sleeping. |
Connecting the Sensor
See the following link for up-to-date connection information:
Connecting via Bluetooth
| Ready to connect | Red LED flashes when sensor is awake and ready to connect via Bluetooth. |
| Connected | Green LED flashes when sensor is connected via Bluetooth. |
Connecting via USB
| Connected and charging | Orange LED next to the battery icon is solid when the sensor is connected to Graphical Analysis via USB and the unit is charging. LED next to Bluetooth icon is off. |
| Connected, fully charged | Green LED next to the battery icon is solid when the sensor is connected to Graphical Analysis via USB and fully charged. LED next to Bluetooth icon is off. |
| Charging via USB, connected via Bluetooth |
Orange LED next to the battery icon is solid when the sensor is charging. Green LED next to the Bluetooth icon flashes. |
Identifying the Sensor
When two or more sensors are connected, the sensors can be identified by tapping or clicking Identify in Sensor Information.
Using the Product
Mounting the Go Direct Pyranometer
The Go Direct Pyranometer is designed to be permanently mounted outside. It is weatherproof and has a lens to work with a wide range of sun angles. The sensor is designed for continuous outdoor use. The electronics box should be kept dry.
The Go Direct Pyranometer should be mounted with the white lens pointing straight up and with the cord pointing toward the north (if you are in the Northern Hemisphere) or toward the south (if in the Southern Hemisphere).
The nylon 10–32″ × 3/8″ mounting screw can be used for attaching the Go Direct Pyranometer to a solid object.
Calibrating the Sensor
Go Direct Pyranometer cannot be calibrated by the user. It is custom calibrated before it ships. It was calibrated over a multiple day period by comparison to a heated and ventilated Kipp & Zonen model CM21 precision reference radiometer.
Optional Calibration Check:
The Go Direct Pyranometer should never need calibration, but if you want to verify that the calibration is correct, you can check it using a Clear Sky Calibration. The concept involved here is that if you know your latitude, longitude, altitude, time of day, air temperature, and humidity, you should know the irradiance on a day with a totally clear sky (no clouds or pollution). If you have a clear sky day and you can get all the information, visit www.clearskycalculator.com
This site will offer you a web application that will calculate the irradiance in Watts per square meter, assuming a completely clear sky. Complete the required fields and you will get a reading, which you can compare with the Pyranometer reading. Repeat several times near solar noon and over several days, if possible. If the reading from the Pyranometer is consistently lower than the Clear Sky Calculator value, the Pyranometer may need to be cleaned or re-leveled. If that does not correct the problem, contact Vernier Science Education.
Specifications
|
Irradiance range |
0 to 1100 W/m2 (in full sun) |
|
Absolute accuracy |
±5% |
|
Repeatability |
±1% |
|
Long-term drift |
Less than 3% per year |
|
Cosine response 45° zenith angle 75° zenith angle |
1% ±5% |
|
Wavelength range |
360 to 1120 nm |
|
Typical Resolution |
0.3 Watts/m2 |
|
Sensor dimensions |
|
|
Materials |
Anodized aluminum with cast acrylic lens |
|
Current draw |
300 μA |
|
Operating environment |
Sensor Head and Cable
Sensor Box
|
Suggested Experiments
Monitor the Energy from the Sun over Several Days
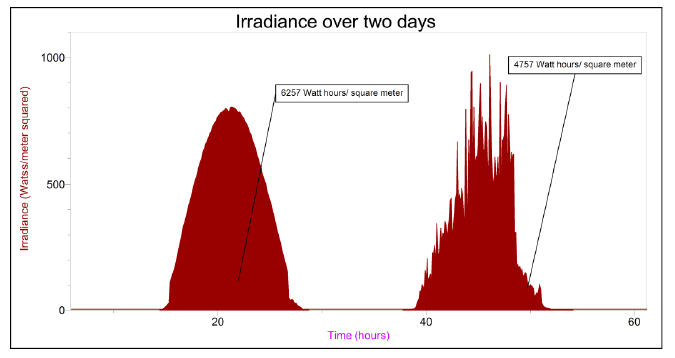
Here is a sample graph of pyranometer data taken over two consecutive days. The first day had nearly clear skies and the second day was partly cloudy. Note: The integral of the irradiance over time is a measure of the energy available per square meter.
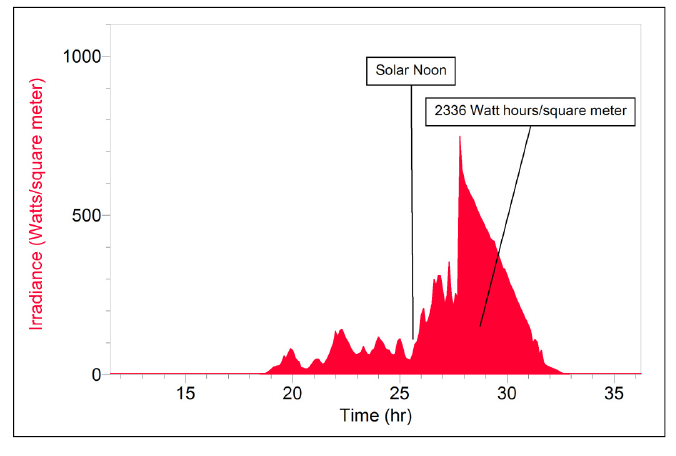
Here is a pyranometer graph for a day with the fairly common weather pattern near the coast of thick clouds in the morning burning off in the afternoon. Note: The total solar energy available on this day is considerably less.
Determining the Efficiency of a Solar Panel
Since the Go Direct Pyranometer reads out in watts per square meter, it allows you to easily determine the efficiency of a photovoltaic system. You need to measure the surface area of the solar panels and then monitor the current and voltage delivered to the circuit. The graphs below were made using a automotive lighting system powered by a fairly large (about a half square meter) solar panel. The solar panel was fixed at the recommended angle for solar panels at that location. The experiment took place on a very hot day (high temperature 39ºC or 102ºF). We monitored the current through the circuit with a Vernier High Current Sensor (HCS-BTA) and the voltage with a Vernier 30-Volt Voltage Probe (30V-BTA). We calculated the power as the product of current and voltage. Note that the efficiency of the system varied between 13 and 20 percent.

Use the Go Direct Pyranometer as a Control in Solar Panel Studies
There are a lot of experiments that can be done using photovoltaic cells. Students may be interested in investigating any of the following or other topics:
- What is the optimum tilt of the panel?
- How much does tracking the sun vertically (changing tilt angle during the day) improve the efficiency of the panels?
- How much does tracking the sun horizontally (rotating the panels east to west) have on the efficiency of the panels?
- How does efficiency vary with the temperature of the panel?
- How much impact does minor dust and dirt have on the efficiency of the panel?
If you use the Go Direct Pyranometer at the same time as you do these experiments, you can make sure that the amount of solar energy available was constant during the experiment and you can calculate efficiency for the panels under different conditions.
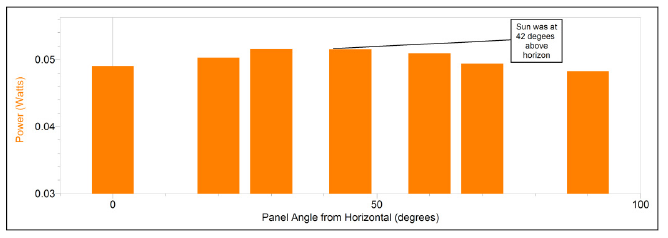
Here are some sample results from an experiment with a small photovoltaic cell testing the tilt angle with the pyranometer used to verify that the irradiance remained constant during data collection.
Care and Maintenance
Cleaning the Pyranometer
Debris on the Pyranometer lens is a common cause of low readings. Salt deposits can accumulate on the sensor from evaporation of sprinkler irrigation water, and dust can accumulate during periods of low rainfall. Salt deposits should be dissolved and removed with vinegar and a soft cloth or cotton swab. Dust and other organic deposits are best removed with water, rubbing alcohol, or window cleaner. Never use an abrasive cleaner on the lens.
Do not wrap the cable tightly around the sensor for storage. Repeatedly doing so can irreparably damage the wires and is not covered under warranty.
Battery Information
The Go Direct PYR Sensor contains a small lithium-ion battery in the electronics box. The system is designed to consume very little power and not put heavy demands on the battery. Although the battery is warranted for one year, the expected battery life should be several years. Replacement batteries are available from Vernier (order code: GDX-BAT-300).
Storage and Maintenance
To store the Go Direct PYR Sensor for extended periods of time, put the device in sleep mode by holding the button down for at least three seconds. The red LED will stop flashing to show that the unit is in sleep mode. Over several months, the battery will discharge but will not be damaged. After such storage, charge the device for a few hours, and the unit will be ready to go.
Exposing the battery to temperatures over 35°C (95°F) will reduce its lifespan. If possible, store the device in an area that is not exposed to temperature extremes.
Troubleshooting
For troubleshooting and FAQs, see www.vernier.com/til/17340
Repair Information
If you have watched the related product video(s), followed the troubleshooting steps, and are still having trouble with your Go Direct Pyranometer, contact Vernier Technical Support at support@vernier.com or call 888-837-6437. Support specialists will work with you to determine if the unit needs to be sent in for repair. At that time, a Return Merchandise Authorization (RMA) number will be issued and instructions will be communicated on how to return the unit for repair.
Warranty
Warranty information for this product can be found on the Support tab at www.vernier.com/gdx-pyr/#support
General warranty information can be found at www.vernier.com/warranty
Disposal
When disposing of this electronic product, do not treat it as household waste. Its disposal is subject to regulations that vary by country and region. This item should be given to an applicable collection point for the recycling of electrical and electronic equipment. By ensuring that this product is disposed of correctly, you help prevent potential negative consequences on human health or on the environment. The recycling of materials will help to conserve natural resources. For more detailed information about recycling this product, contact your local city office or your disposal service.
Battery recycling information is available at www.call2recycle.org
Do not puncture or expose the battery to excessive heat or flame.
 The symbol, shown here, indicates that this product must not be disposed of in a standard waste container.
Contact Support
Fill out our online support form or call us toll-free at 1-888-837-6437.