Go Direct® pH Sensor User Manual
Order Code: GDX-PH
Go Direct pH can be used for any lab or demonstration that can be done with a traditional pH meter, including acid-base titrations, monitoring pH in an aquarium, and investigating the water quality of streams and lakes.
Note: Vernier products are designed for educational use. Our products are not designed nor are they recommended for any industrial, medical, or commercial process such as life support, patient diagnosis, control of a manufacturing process, or industrial testing of any kind.
What's Included
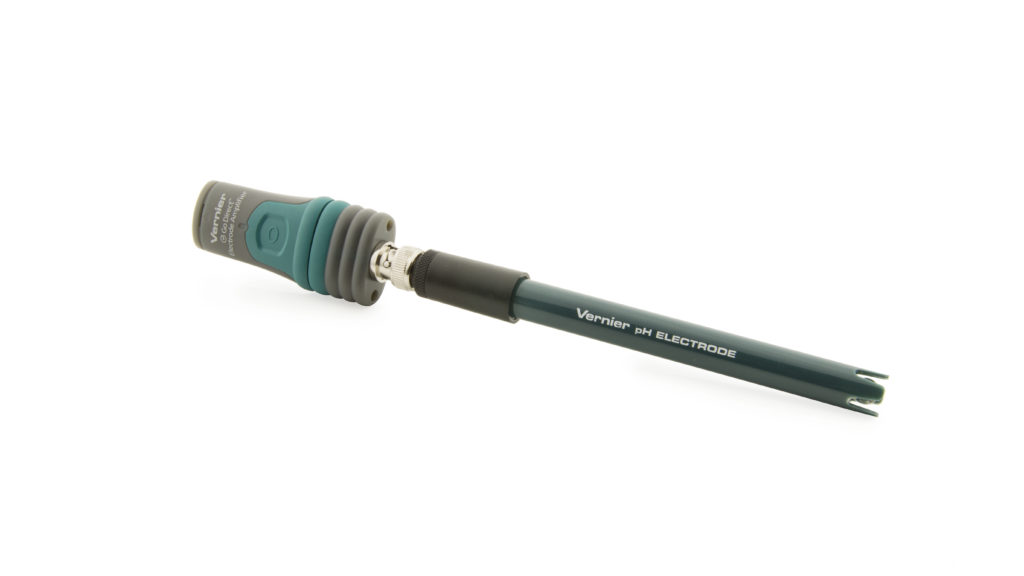
- Go Direct pH (Go Direct Electrode Amplifier connected to a Go Direct pH BNC Electrode)
- Electrode storage bottle, containing pH 4/KCl solution
- Micro USB Cable
Compatible Software
Choose a platform below to see its compatibility requirements.LabQuest
Interface LabQuest App LabQuest 3 Full support LabQuest 2 Full support 1 LabQuest Incompatible Compatibility Notes
Computers
Software Interface Graphical Analysis Graphical Analysis (Web App) No interface required Full support Full support LabQuest 3 Full support 1 Incompatible LabQuest 2 Full support 1 2 Incompatible Compatibility Notes
Chromebook
Software Interface Graphical Analysis (Web App) No interface required Full support iOS
Software Interface Graphical Analysis Graphical Analysis GW No interface required Full support Full support LabQuest 3 Full support 1 2 Full support 1 2 LabQuest 2 Full support 1 2 3 Full support 1 2 3 Compatibility Notes
Android
Software Interface Graphical Analysis Graphical Analysis GW No interface required Full support Incompatible LabQuest 3 Full support 1 2 Full support 1 LabQuest 2 Full support 1 2 3 Full support 1 3 Compatibility Notes
Python
Software Interface Python No interface required Full support Javascript
Software Interface Javascript No interface required Full support 1 Compatibility Notes
LabVIEW
Software Interface NI LabVIEW No interface required Full support
Quick Start: Vernier Graphical Analysis® and Bluetooth®
- Charge your sensor for at least 2 hours before first use.
- Turn on your sensor. The LED will blink red.
- Launch Graphical Analysis, then click Sensor Data Collection.
- Select your sensor from the list. The sensor ID is located on the sensor label near the bar code. Note: If you don’t see a list of available sensors, click WIRELESS. After selecting your sensor, click Pair.
- Click DONE. You are now ready to collect data.
Using other Vernier data-collection apps or want to connect via USB?
Visit www.vernier.com/start-go-direct
Note: This sensor also works with LabQuest 2 and LabQuest 3; it does not work with the original LabQuest.
Charging the Sensor
Connect Go Direct pH to the included Micro USB Cable and any USB device for two hours. Connecting the Go Direct pH BNC Electrode to the electrode amplifier during charging is optional.
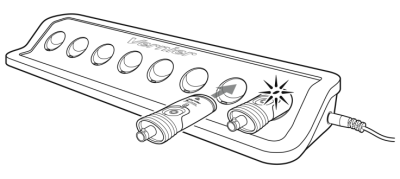
You can also charge up to eight Go Direct pH Sensors using our Go Direct Charge Station, sold separately (order code: GDX-CRG). An LED on each Go Direct pH Sensor indicates charging status.
| Charging |
Blue LED on steady while sensor is connected to the Micro USB Cable or Charging Station. |
| Fully charged |
Blue LED is off when charging is complete. |
Powering the Sensor
| Turning on the sensor |
Press button once. Red LED indicator flashes when unit is on. |
| Putting the sensor in sleep mode |
Press and hold button for more than three seconds to put into sleep mode. Red LED indicator stops flashing when sleeping. |
Connecting the Sensor
See the following link for up-to-date connection information:
| Connected and charging | Blue and Green LED solid when sensor is connected to Graphical Analysis via USB and unit is charging. (Green LED is obscured by the blue one.) |
| Connected, fully charged | Green LED solid when sensor is connected to Graphical Analysis via USB and the unit is fully charged. |
| Charging via USB, connected via Bluetooth |
Blue LED is solid and green LED is flashing, but the green flashing LED looks white because it is overwhelmed by the blue. |
Identifying the Sensor
When two or more sensors are connected, the sensors can be identified by tapping or clicking Identify in Sensor Information.
Using the Product
- Remove the storage bottle from the electrode by unscrewing the lid and removing the bottle and lid.
- Thoroughly rinse the lower section of the probe, especially around the bulb shaped tip, using distilled or deionized water.
- Connect the sensor following the steps in the Quick Start section of this user manual.
- When you are finished making measurements, rinse the electrode with distilled water.
- Slide the cap onto the electrode body, and then screw the cap onto the storage bottle so the tip of the electrode is immersed in the storage solution.
Important: Do not fully submerge the sensor. The BNC connection is not waterproof.
Do not leave the electrode in acids or bases with concentrations greater than 1.0 M for periods longer than 5 minutes. See www.vernier.com/ph-sensors for other types of pH electrodes.
By default, the units displayed will be in pH. See www.vernier.com/til/3984 to change the displayed units.
Videos
Calibrating the Sensor
For many experiments, calibrating the Go Direct pH Sensor is not required. A calibration equation is stored on each pH Sensor before it is shipped, which is used as a default by Vernier software.
For the most accurate measurements with this sensor, we recommend calibration. It is a simple process that takes only a few minutes.
To calibrate the sensor in Graphical Analysis, complete the following steps.
- Click or tap the sensor meter to view sensor options.
- Select Calibrate and follow the applicable prompts on the Calibrate Sensor screen.
In order to calibrate a pH Sensor, or to confirm that a saved pH calibration is accurate, you should have a supply of pH buffer solutions that cover the range of the pH values you will be measuring. For more information about pH buffer solutions, including recipes for preparation, see www.vernier.com/til/3625
Once you have calibrated your Go Direct pH Sensor, the calibration is automatically stored to the sensor and will be used each time you connect to your device. You can always choose to restore factory defaults if you feel the custom calibration is invalid.
To restore factory defaults in Graphical Analysis, complete the following steps.
- Click or tap the live readouts meter and choose Calibrate.
- Click or tap Reset Calibration.
- A window will appear warning you that you are about to reset the calibration. Choose Reset Calibration.
Specifications
|
Range |
pH 0–14 |
|
Temperature range |
5 to 80°C (readings not compensated) |
|
Accuracy with new electrode (pH) |
±0.2 pH units |
|
Isopotential pH |
pH 7 (point at which temperature has no effect) |
|
Shaft diameter |
12 mm OD |
|
Resolution |
0.01 pH |
|
USB specification |
2.0 |
|
Wireless specification |
Bluetooth 4.2 |
|
Maximum wireless range |
30 m |
|
Storage solution |
pH-4/KCl solution (10 g KCl in 100 mL buffer pH-4 solution) |
|
Type |
Sealed, gel-filled, polycarbonate body, Ag/AgCl reference, single junction |
|
Dimensions |
|
|
Battery |
300 mA Li-Poly |
|
Battery life (single full charge) |
~24 hours |
|
Battery life (long term) |
~500 full charge cycles (several years depending on usage) |
Care and Maintenance
Short-term storage (up to 24 hours): Place the electrode in pH 4 or pH 7 buffer solution. It should never be stored in distilled water.
Long-term storage (more than 24 hours): Store the electrode in a pH 4 buffer/KCl storage solution in the storage bottle. The pH electrode is shipped in this solution. Vernier sells 500 mL bottles of pH Storage Solution (order code PH‑SS), or you can prepare additional storage solution by adding 10 g of solid potassium chloride (KCl) to 100 mL of pH 4 buffer solution. Vernier sells a pH Buffer Capsule kit (PH‑BUFCAP) that includes a buffer solution preservative. Storing the electrode in this solution contributes to electrode longevity and retains electrode response time when the unit is placed back into service.
If the electrode is inadvertently stored dry for a short period of time, immerse the tip in the pH 4 buffer/KCl storage solution for a minimum of 8 hours prior to use. If the readings are still not accurate after calibration or if the response is slow, try shocking the sensor as described in the Troubleshooting section.
Battery Information
The Go Direct pH Sensor contains a small lithium-ion battery in the handle. The system is designed to consume very little power and not put heavy demands on the battery. Although the battery is warranted for one year, the expected battery life should be several years. Replacement batteries are available from Vernier (order code: GDX-BAT-300).
Storage and Maintenance
To store the Go Direct pH Sensor for extended periods of time, put the device in sleep mode by holding the button down for at least three seconds. The red LED will stop flashing to show that the unit is in sleep mode. Over several months, the battery will discharge but will not be damaged. After such storage, charge the device for a few hours, and the unit will be ready to go.
Exposing the battery to temperatures over 35°C (95°F) will reduce its lifespan. If possible, store the device in an area that is not exposed to temperature extremes.
Water Resistance
The Go Direct pH Sensor is not water resistant and should never be immersed in water.
If water gets into the device, immediately power the unit down (press and hold the power button for more than three seconds). Disconnect the sensor and charging cable, and remove the battery. Allow the device to dry thoroughly before attempting to use the device again. Do not attempt to dry using an external heat source.
How the Sensor Works
pH is measured potentiometrically when using an electrode. In other words, your measurement is based on an electrical signal. A potential develops across the glass membrane of a pH electrode when it comes in contact with a solution. This potential varies as the pH varies, but requires a constant second potential to compare the changes against. This is the function of the reference electrode, to provide a constant potential, regardless of pH.
In acidic or alkaline solutions, the voltage on the outer membrane surface changes proportionally to changes in hydrogen ion activity by the Nernst equation:
E = Eo + (2.3RT/nF) log [H+]
Where:
E = total potential difference (measured in mV)
Eo = standard potential
R = gas constant
T = temperature in Kelvin
N = number of electrons
F = Faraday's constant
[H+] = hydrogen ion activity
Troubleshooting
The Vernier gel-filled Go Direct pH Sensor is designed to make measurements in the pH range of 0 to 14. The gel-filled reference half cell is sealed; it cannot be refilled.
The pH Sensor is designed to be used in aqueous solutions. The polycarbonate body of the sensor can be damaged by many organic solvents. In addition, do not use the sensor in solutions containing: perchlorates, silver ions, sulfide ions, biological samples with high concentrations of proteins, or Tris buffered solutions. Do not use the sensor with hydrofluoric acid or in acid or base solutions with a concentration greater than 1.0 molar. See www.vernier.com/bnc-electrodes for other types of pH electrodes.
When testing a Go Direct pH Sensor, it is best to measure a buffer solution because it is easier to determine if the sensor is reading correctly. Do not test your sensor by measuring distilled water. Distilled water can have a pH reading in the range of 5.5–7.0, due to varying amounts of dissolved carbon dioxide. Furthermore, due to a lack of ions, the pH values reported with the sensor in distilled water will be erratic.
If your pH Sensor is reading differently from the pH of a buffer solution (e.g., reads 6.7 in a buffer 7), you may simply need to calibrate the sensor. See the Calibrating the Sensor section for more information.
Examine the glass bulb. If it is broken, pH readings will be incorrect.
If your readings are off by several pH values, the pH readings do not change when moved from one buffer solution to a buffer solution of different pH, the sensor was stored dry for an extended period of time, or the sensor’s response seems slow, the problem may be more serious. A method called “shocking” can be used to revive pH electrodes. To shock your pH Sensor, perform the following:
- Soak the pH Electrode for 4–8 hours in an HCl solution of 0.1 M–0.5 M.
- Rinse off the electrode and soak the tip in freshly prepared long term storage solution (recipe above) for 30–60 minutes.
- Rinse the electrode and test it with buffer solutions of known pH.
Occasionally, mold will grow in the pH 4 buffer/storage solution. Mold will not harm the electrode and can easily be removed using a mild detergent solution. Mold growth in the storage solution can be inhibited by adding a buffer preservative.
For additional troubleshooting and FAQs, see www.vernier.com/til/3965
Repair Information
If you have watched the related product video(s), followed the troubleshooting steps, and are still having trouble with your Go Direct pH Sensor, contact Vernier Technical Support at support@vernier.com or call 888-837-6437. Support specialists will work with you to determine if the unit needs to be sent in for repair. At that time, a Return Merchandise Authorization (RMA) number will be issued and instructions will be communicated on how to return the unit for repair.
Accessories/Replacements
| Item | Order Code |
|---|---|
|
PH-SS |
|
|
PH-BUFCAP |
|
|
BTL |
|
|
GDX-PH-BNC |
|
|
GDX-EA |
|
|
CB-USB-MICRO |
|
|
CB-USB-C-MICRO |
|
| Go Direct 300 mAh Replacement Battery |
GDX-BAT-300 |
Warranty
Warranty information for this product can be found on the Support tab at www.vernier.com/gdx-ph/#support
General warranty information can be found at www.vernier.com/warranty
Contact Support
Fill out our online support form or call us toll-free at 1-888-837-6437.