Dissolved Oxygen Probe User Manual
Order Code: DO-BTA
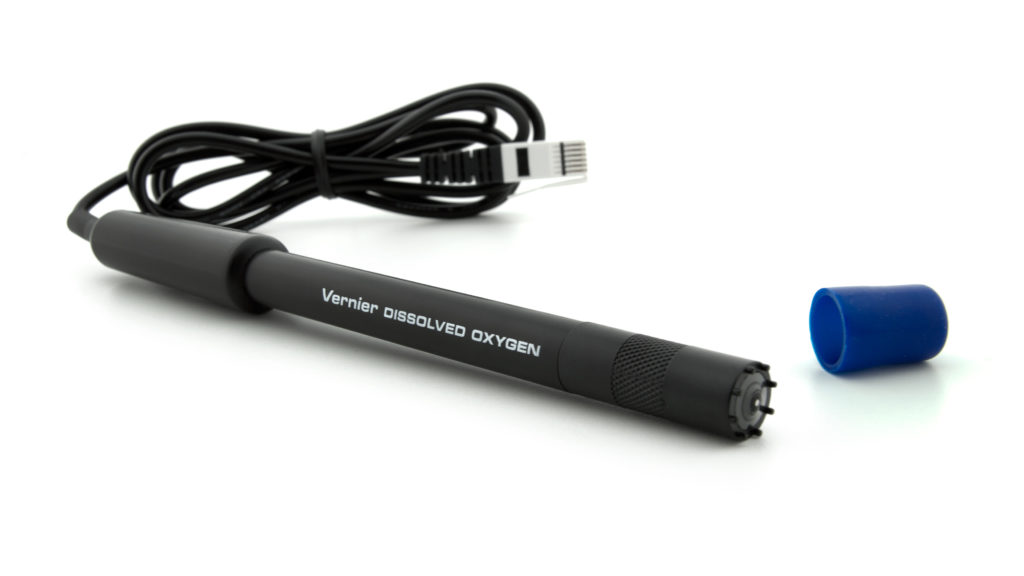
The Vernier Dissolved Oxygen Probe uses a Clark-type polarographic electrode to measure the concentration of dissolved oxygen in water. You can use this sensor to perform a wide variety of tests or experiments to determine changes in dissolved oxygen levels, one of the primary indicators of the quality of an aquatic environment.
Note: Vernier products are designed for educational use. Our products are not designed nor are they recommended for any industrial, medical, or commercial process such as life support, patient diagnosis, control of a manufacturing process, or industrial testing of any kind.
What's Included
- Dissolved Oxygen Probe (one membrane cap attached)
- Replacement membrane cap
- Sodium Sulfite Calibration Standard (2.0 M Na2SO3) with Safety Data Sheet (SDS)
- DO Electrode Filling Solution, SDS, and filling pipet
- Calibration bottle (empty, lid with hole)
- DO Polishing Strips (1 pkg)
Compatible Software and Interfaces
Choose a platform below to see its compatibility requirements.LabQuest
Interface LabQuest App LabQuest 3 Full support LabQuest 2 (discontinued) Full support LabQuest (discontinued) Full support Computers
Software Interface Graphical Analysis Logger Pro Logger Lite LabQuest Mini Full support Full support Full support LabQuest 3 Full support Full support Incompatible LabQuest 2 (discontinued) Full support Full support Full support LabQuest Stream (discontinued) Full support 1 Full support Full support 1 Go!Link Full support Full support Full support LabQuest (discontinued) Full support Full support Full support LabPro (discontinued) Incompatible Full support Full support Compatibility Notes
Chromebook
Software Interface Graphical Analysis LabQuest Mini Full support LabQuest 3 Full support LabQuest 2 (discontinued) Full support LabQuest Stream (discontinued) Full support 1 Go!Link Full support LabQuest (discontinued) Full support Compatibility Notes
iOS
Software Interface Graphical Analysis Graphical Analysis GW LabQuest Stream (discontinued) Full support Full support LabQuest 3 Full support 1 Full support 1 LabQuest 2 (discontinued) Full support 1 Full support 1 Compatibility Notes
Android
Software Interface Graphical Analysis Graphical Analysis GW LabQuest Stream (discontinued) Full support Partial support 1 LabQuest 3 Full support 2 Full support 2 LabQuest 2 (discontinued) Full support 2 Full support 2 Compatibility Notes
Arduino
Software Interface Arduino Vernier Arduino® Interface Shield Full support 1 Compatibility Notes
LabVIEW
Software Interface NI LabVIEW SensorDAQ (discontinued) Full support 1 Vernier myDAQ Adapter Full support 1 2 Go!Link Full support 1 LabQuest Mini Full support LabQuest Stream (discontinued) Full support LabQuest 3 Full support LabQuest 2 (discontinued) Full support LabQuest (discontinued) Full support Compatibility Notes
Texas Instruments
Software Interface EasyData DataMate TI-84 SmartView DataQuest TI-Nspire Software EasyLink Full support 1 Incompatible Full support 2 Full support Full support 2 CBL 2 (discontinued) Full support 3 Full support 3 4 Incompatible Incompatible Incompatible LabPro (discontinued) Full support 3 Full support 3 4 Incompatible Incompatible Incompatible TI-Nspire Lab Cradle (discontinued) Incompatible Incompatible Incompatible Full support Full support Compatibility Notes
Assembly
- Remove the blue protective cap from the tip of the probe.
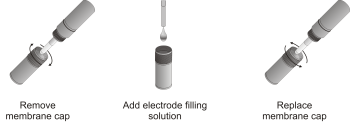
- Unscrew the membrane cap from the tip of the probe. Do not touch the membrane. Oil from your skin could cause damage.

- Use a pipet to fill the membrane cap with 1 mL of DO Electrode Filling Solution.
- Carefully thread the membrane cap back onto the electrode. Some filling solution should overflow during this process.
- Rinse the probe and place it in distilled water. Note: Do not completely submerge; the handle is not waterproof.
Getting Started
- Once assembly is complete, connect the sensor to the interface (LabQuest Mini, LabQuest 2, etc.).
- Start the appropriate data-collection software (Logger Pro, Logger Lite, LabQuest App) if not already running, and choose New from File menu. The software will identify the sensor and load a default data-collection setup.
- While keeping the probe soaking in distilled water, allow it to warm up for at least 10 minutes prior to use.
You are now ready to continue your experiment.
If you are collecting data using a Chromebook™, mobile device such as iPad® or Android™ tablet, or a Vernier wireless sensor or interface, please see the following link for up-to-date connection information:
Using the Product
- Assemble and warm up the probe following the steps in the previous sections of this user manual.
- Place the tip of the probe into the sample deep enough that the silver dot on the shaft (thermistor for temperature compensation) is submerged, but not the handle. The handle is not waterproof.
- Gently stir the probe in the water. Monitor the dissolved oxygen concentration in the live readouts.
- It is important to keep moving the probe in the water sample. There must always be water flowing past the probe tip while taking measurements due to the consumption of oxygen at the membrane. If the probe is left still in calm water, reported DO readings will drop erroneously.
- If the water is not at room temperature, it is important to leave the probe in the water long enough for the integrated thermistor, responsible for the automatic temperature compensation, to have time to equilibrate; at least two minutes.
Videos
Calibration
It is not always necessary to perform a new calibration when using the Dissolved Oxygen Probe. If your experiment or application is measuring the change in dissolved oxygen concentration, the stored calibration should suffice. When accuracy matters, consider performing a new calibration.
- After warming up the probe, enter the calibration routine in the software and begin a new calibration.
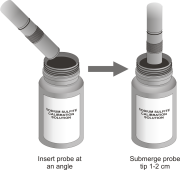
- First Calibration Point Remove the probe from the water, blot dry, and place the tip of the probe into the Sodium Sulfite Calibration Solution. The displayed voltage should begin to drop.
- When the displayed voltage reading stabilizes, enter 0 (the known dissolved oxygen value in mg/L) in the edit field.

- Second Calibration Point Rinse the probe well with distilled water and gently blot dry. The displayed voltage should begin to rise.

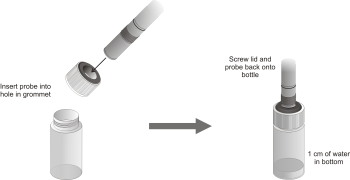
- Remove the lid from the empty calibration bottle provided with the probe. Slide the lid 1–2 cm onto the probe body.
- Add water to the bottle to a depth of about 1 cm and screw the bottle into the cap, as shown. Important: Do not touch the membrane or get it wet during this step.
- When the displayed voltage reading stabilizes, enter the saturated dissolved oxygen value (in mg/L) from Table 1 using the current air pressure and temperature values.
- If you do not know the current air pressure, use Table 2 to estimate the air pressure at your altitude. If these tables do not extend to your elevation, see www.vernier.com/til/2108 for more information.
- If your sample water has a salinity greater than 1000 mg/L, the saturated dissolved oxygen value will need to be calculated. See www.vernier.com/til/3715 for instructions.
You can also store your custom calibration on the sensor using the following steps:
- Go to the Storage tab and click the Set Sensor Calibration button (Logger Pro) or Save Calibration to Sensor (LabQuest). Once saved, this new calibration will be used automatically, regardless of the interface to which the sensor is connected.
- Click Done to complete the calibration process.
• For instructions on calibration using Logger Pro computer software, see www.vernier.com/til/2341
• For instructions on calibration using LabQuest App, see www.vernier.com/til/3394
• For instructions on calibration using Graphical Analysis with a Chromebook, see www.vernier.com/til/3631
• For instructions on calibration using Graphical Analysis with an iOS or Android device, see www.vernier.com/til/3630
Table 1 Dissolved oxygen (mg/L) in air-saturated distilled water
at various temperatures and pressures (mm Hg)
| 770 | 760 | 750 | 740 | 730 | 720 | 710 | 700 | |
| 0°C | 14.76 | 14.57 | 14.38 | 14.19 | 13.99 | 13.80 | 13.61 | 13.42 |
| 1°C | 14.38 | 14.19 | 14.00 | 13.82 | 13.63 | 13.44 | 13.26 | 13.07 |
| 2°C | 14.01 | 13.82 | 13.64 | 13.46 | 13.28 | 13.10 | 12.92 | 12.73 |
| 3°C | 13.65 | 13.47 | 13.29 | 13.12 | 12.94 | 12.76 | 12.59 | 12.41 |
| 4°C | 13.31 | 13.13 | 12.96 | 12.79 | 12.61 | 12.44 | 12.27 | 12.10 |
| 5°C | 12.97 | 12.81 | 12.64 | 12.47 | 12.30 | 12.13 | 11.96 | 11.80 |
| 6°C | 12.66 | 12.49 | 12.33 | 12.16 | 12.00 | 11.83 | 11.67 | 11.51 |
| 7°C | 12.35 | 12.19 | 12.03 | 11.87 | 11.71 | 11.55 | 11.39 | 11.23 |
| 8°C | 12.05 | 11.90 | 11.74 | 11.58 | 11.43 | 11.27 | 11.11 | 10.96 |
| 9°C | 11.77 | 11.62 | 11.46 | 11.31 | 11.16 | 11.01 | 10.85 | 10.70 |
| 10°C | 11.50 | 11.35 | 11.20 | 11.05 | 10.90 | 10.75 | 10.60 | 10.45 |
| 11°C | 11.24 | 11.09 | 10.94 | 10.80 | 10.65 | 10.51 | 10.36 | 10.21 |
| 12°C | 10.98 | 10.84 | 10.70 | 10.56 | 10.41 | 10.27 | 10.13 | 9.99 |
| 13°C | 10.74 | 10.60 | 10.46 | 10.32 | 10.18 | 10.04 | 9.90 | 9.77 |
| 14°C | 10.51 | 10.37 | 10.24 | 10.10 | 9.96 | 9.83 | 9.69 | 9.55 |
| 15°C | 10.29 | 10.15 | 10.02 | 9.88 | 9.75 | 9.62 | 9.48 | 9.35 |
| 16°C | 10.07 | 9.94 | 9.81 | 9.68 | 9.55 | 9.42 | 9.29 | 9.15 |
| 17°C | 9.86 | 9.74 | 9.61 | 9.48 | 9.35 | 9.22 | 9.10 | 8.97 |
| 18°C | 9.67 | 9.54 | 9.41 | 9.29 | 9.16 | 9.04 | 8.91 | 8.79 |
| 19°C | 9.47 | 9.35 | 9.23 | 9.11 | 8.98 | 8.86 | 8.74 | 8.61 |
| 20°C | 9.29 | 9.17 | 9.05 | 8.93 | 8.81 | 8.69 | 8.57 | 8.45 |
| 21°C | 9.11 | 9.00 | 8.88 | 8.76 | 8.64 | 8.52 | 8.40 | 8.28 |
| 22°C | 8.94 | 8.83 | 8.71 | 8.59 | 8.48 | 8.36 | 8.25 | 8.13 |
| 23°C | 8.78 | 8.66 | 8.55 | 8.44 | 8.32 | 8.21 | 8.09 | 7.98 |
| 24°C | 8.62 | 8.51 | 8.40 | 8.28 | 8.17 | 8.06 | 7.95 | 7.84 |
| 25°C | 8.47 | 8.36 | 8.25 | 8.14 | 8.03 | 7.92 | 7.81 | 7.70 |
| 26°C | 8.32 | 8.21 | 8.10 | 7.99 | 7.89 | 7.78 | 7.67 | 7.56 |
| 27°C | 8.17 | 8.07 | 7.96 | 7.86 | 7.75 | 7.64 | 7.54 | 7.43 |
| 28°C | 8.04 | 7.93 | 7.83 | 7.72 | 7.62 | 7.51 | 7.41 | 7.30 |
| 29°C | 7.90 | 7.80 | 7.69 | 7.59 | 7.49 | 7.39 | 7.28 | 7.18 |
| 30°C | 7.77 | 7.67 | 7.57 | 7.47 | 7.36 | 7.26 | 7.16 | 7.06 |
| 31°C | 7.64 | 7.54 | 7.44 | 7.34 | 7.24 | 7.14 | 7.04 | 6.94 |
| 32°C | 7.51 | 7.42 | 7.32 | 7.22 | 7.12 | 7.03 | 6.93 | 6.83 |
| 33°C | 7.39 | 7.29 | 7.20 | 7.10 | 7.01 | 6.91 | 6.81 | 6.72 |
| 34°C | 7.27 | 7.17 | 7.08 | 6.98 | 6.89 | 6.80 | 6.70 | 6.61 |
| 35°C | 7.15 | 7.05 | 6.96 | 6.87 | 6.78 | 6.68 | 6.59 | 6.50 |
Table 1, cont. Dissolved oxygen (mg/L) in air-saturated distilled water
at various temperatures and pressures (mm Hg)
| 690 | 680 | 670 | 660 | 650 | |
| 0°C | 13.23 | 13.04 | 12.84 | 12.65 | 12.46 |
| 1°C | 12.88 | 12.70 | 12.51 | 12.32 | 12.14 |
| 2°C | 12.55 | 12.37 | 12.19 | 12.01 | 11.82 |
| 3°C | 12.23 | 12.05 | 11.88 | 11.70 | 11.52 |
| 4°C | 11.92 | 11.75 | 11.58 | 11.40 | 11.23 |
| 5°C | 11.63 | 11.46 | 11.29 | 11.12 | 10.95 |
| 6°C | 11.34 | 11.18 | 11.01 | 10.85 | 10.68 |
| 7°C | 11.07 | 10.91 | 10.75 | 10.59 | 10.42 |
| 8°C | 10.80 | 10.65 | 10.49 | 10.33 | 10.18 |
| 9°C | 10.55 | 10.39 | 10.24 | 10.09 | 9.94 |
| 10°C | 10.30 | 10.15 | 10.00 | 9.86 | 9.71 |
| 11°C | 10.07 | 9.92 | 9.78 | 9.63 | 9.48 |
| 12°C | 9.84 | 9.70 | 9.56 | 9.41 | 9.27 |
| 13°C | 9.63 | 9.49 | 9.35 | 9.21 | 9.07 |
| 14°C | 9.42 | 9.28 | 9.14 | 9.01 | 8.87 |
| 15°C | 9.22 | 9.08 | 8.95 | 8.82 | 8.68 |
| 16°C | 9.02 | 8.89 | 8.76 | 8.63 | 8.50 |
| 17°C | 8.84 | 8.71 | 8.58 | 8.45 | 8.33 |
| 18°C | 8.66 | 8.54 | 8.41 | 8.28 | 8.16 |
| 19°C | 8.49 | 8.37 | 8.24 | 8.12 | 8.00 |
| 20°C | 8.33 | 8.20 | 8.08 | 7.96 | 7.84 |
| 21°C | 8.17 | 8.05 | 7.93 | 7.81 | 7.69 |
| 22°C | 8.01 | 7.90 | 7.78 | 7.67 | 7.55 |
| 23°C | 7.87 | 7.75 | 7.64 | 7.52 | 7.41 |
| 24°C | 7.72 | 7.61 | 7.50 | 7.39 | 7.28 |
| 25°C | 7.59 | 7.48 | 7.37 | 7.26 | 7.15 |
| 26°C | 7.45 | 7.35 | 7.24 | 7.13 | 7.02 |
| 27°C | 7.33 | 7.22 | 7.11 | 7.01 | 6.90 |
| 28°C | 7.20 | 7.10 | 6.99 | 6.89 | 6.78 |
| 29°C | 7.08 | 6.98 | 6.87 | 6.77 | 6.67 |
| 30°C | 6.96 | 6.86 | 6.76 | 6.66 | 6.56 |
| 31°C | 6.85 | 6.75 | 6.65 | 6.55 | 6.45 |
| 32°C | 6.73 | 6.63 | 6.54 | 6.44 | 6.34 |
| 33°C | 6.62 | 6.53 | 6.43 | 6.33 | 6.24 |
| 34°C | 6.51 | 6.42 | 6.32 | 6.23 | 6.13 |
| 35°C | 6.40 | 6.31 | 6.22 | 6.13 | 6.03 |
Table 2 Approximate barometric pressure at various elevations
| Elevation (feet) |
Pressure (mm Hg) |
Elevation (feet) |
Pressure (mm Hg) |
Elevation (feet) |
Pressure (mm Hg) |
| 0 | 760 | 2000 | 708 | 4000 | 659 |
| 250 | 753 | 2250 | 702 | 4250 | 653 |
| 500 | 746 | 2500 | 695 | 4500 | 647 |
| 750 | 739 | 2750 | 689 | 4750 | 641 |
| 1000 | 733 | 3000 | 683 | 5000 | 635 |
| 1250 | 727 | 3250 | 677 | 5250 | 629 |
| 1500 | 720 | 3500 | 671 | 5500 | 624 |
| 1750 | 714 | 3750 | 665 | 5750 | 618 |
Specifications
|
Type |
Clark-type polarographic electrode |
|
Range |
0 to 15 mg/L (or ppm) |
|
Accuracy |
±0.2 mg/L with calibration |
|
Response time |
95% of final reading in 30 s, 98% in 45 s |
|
Temperature compensation |
Automatic from 5 to 35°C |
|
Pressure compensation |
Manual, accounted for during calibration |
|
Salinity compensation |
Manual, accounted for during calibration |
|
Shaft diameter |
12 mm OD |
|
Minimum sample flow |
20 cm/second |
|
Factory calibration values |
|
Care and Maintenance
- Long-term storage (more than 24 hours) Remove the membrane cap and rinse the inside and outside of the cap with distilled water. Shake the membrane cap dry. Also rinse and dry the exposed anode and cathode inner elements (blot dry with a lab wipe). Reinstall the membrane cap loosely onto the electrode body for storage. Do not screw it on tightly.
- Short-term storage (less than 24 hours) Leave the probe assembled with the filling solution inside and place in distilled water. Note: Do not completely submerge; the handle is not waterproof.
- Replacing the membrane cap The membrane cap will require replacement from time to time; once per year if used infrequently, or after about 6 months of continuous use. Replacement of the membrane cap is recommended when your Dissolved Oxygen Probe will no longer respond rapidly during calibration or when taking readings.
- Polishing the metal electrodes If the cathode (the small platinum contact at the tip of the inner stem) and anode (the silver metal surrounding the inner stem) become discolored or appear corroded, polish them with the polishing strips provided. Perform this operation only as needed to restore electrode performance—it should be necessary only once every year or so. Remove the membrane cap and thoroughly rinse the inner elements of the probe with distilled water to remove all filling solution. Cut a one-inch piece from the DO Electrode Polishing Strip provided. Wet the dull (abrasive) side of the polishing strip with distilled water. Using a circular motion, polish the cathode. Use gentle finger pressure during this polishing operation. Polish only enough to restore a bright, clean surface. Next, polish the anode. Polish only enough to restore a silver appearance. Note: Aggressive polishing will damage the probe inner elements. Be sure to use only gentle pressure when performing the polishing of the anode and cathode. When you have completed the polishing, rinse the cathode and anode elements thoroughly and dry with a lab wipe.
- Sodium Sulfite Calibration Solution The 2.0 M sodium sulfite (Na2SO3) calibration solution can be purchased (order code DO-CAL). But it can also be prepared from solid sodium sulfite crystals: Add 25.0 g of solid anhydrous sodium sulfite crystals (Na2SO3) to enough distilled water to yield a final volume of 100 mL of solution. The sodium sulfite crystals do not need to be reagent grade; laboratory grade will work fine. Prepare the solution 24 hours in advance of doing the calibration to ensure that all oxygen has been depleted. If solid sodium sulfite is not available, you may substitute either 2.0 M sodium hydrogen sulfite solution, (sodium bisulfite, 20.8 g of NaHSO3 per 100 mL of solution) or 2.0 M potassium nitrite (17.0 g of KNO2 per 100 mL of solution).
- DO Electrode Filling Solution The DO Electrode Filling Solution is primarily a potassium chloride solution. However, it also contains some proprietary ingredients, and must therefore be purchased from Vernier (order code FS).
How the Sensor Works
The Vernier Dissolved Oxygen Probe is a Clark-type polarographic electrode that senses the oxygen concentration in water and aqueous solutions. A platinum cathode and a silver/silver chloride reference anode in KCl electrolyte are separated from the sample by a gas-permeable plastic membrane.

A fixed voltage is applied to the platinum electrode. As oxygen diffuses through the membrane to the cathode, it is reduced
1/2 O2 + H2O + 2e– → 2 OH–
The oxidation taking place at the reference electrode (anode) is
Ag + Cl– → AgCl + e–
Accordingly, a current will flow that is proportional to the rate of diffusion of oxygen, and in turn to the concentration of dissolved oxygen in the sample. This current is converted to a proportional voltage, which is amplified and converted to concentration by the software.
Troubleshooting
Here's a few items to consider if the probe is reading incorrect values:
- Has the blue protective cap been removed?
- Is there filling solution in the probe (with no air bubbles)?
- Was the probe warmed up properly?
- Does the probe need to be calibrated?
- Are any other electrodes being used at the same time? See www.vernier.com/til/638 for interference information.
Calibration voltages are good troubleshooting tools. If you do not see the voltages given below, try a new membrane cap and/or polish the anode and cathode.
- Sodium sulfite solution (zero oxygen) voltage should be between 0.2 and 0.5 volts.
- Calibration bottle (humid environment) voltage should be between 2 and 3 volts.
If the values are slowly dropping, make sure you are moving the probe around in the solution.
For more troubleshooting tips, see www.vernier.com/til/1413
Repair Information
If you have watched the related product video(s), followed the troubleshooting steps, and are still having trouble with your Vernier Dissolved Oxygen Probe, contact Vernier Technical Support at support@vernier.com or call 888-837-6437. Support specialists will work with you to determine if the unit needs to be sent in for repair. At that time, a Return Merchandise Authorization (RMA) number will be issued and instructions will be communicated on how to return the unit for repair.
Accessories/Replacements
| Item | Order Code |
|
MEM |
|
|
DO-CAL |
|
|
FS |
|
|
PS |
Warranty
Vernier warrants this product to be free from defects in materials and workmanship for a period of five years from the date of shipment to the customer. The membrane caps, polishing strips, solutions, pipet, and bottle are all exempt from the warranty as consumables. This warranty does not cover damage to the product caused by abuse or improper use. This warranty covers educational institutions only.
Disposal
Consult product Safety Data Sheets (SDS) and your local regulations for disposal information.
Contact Support
Fill out our online support form or call us toll-free at 1-888-837-6437.

