Qubit EKG/EMG Sensor User Manual
Order Code: Q-S207
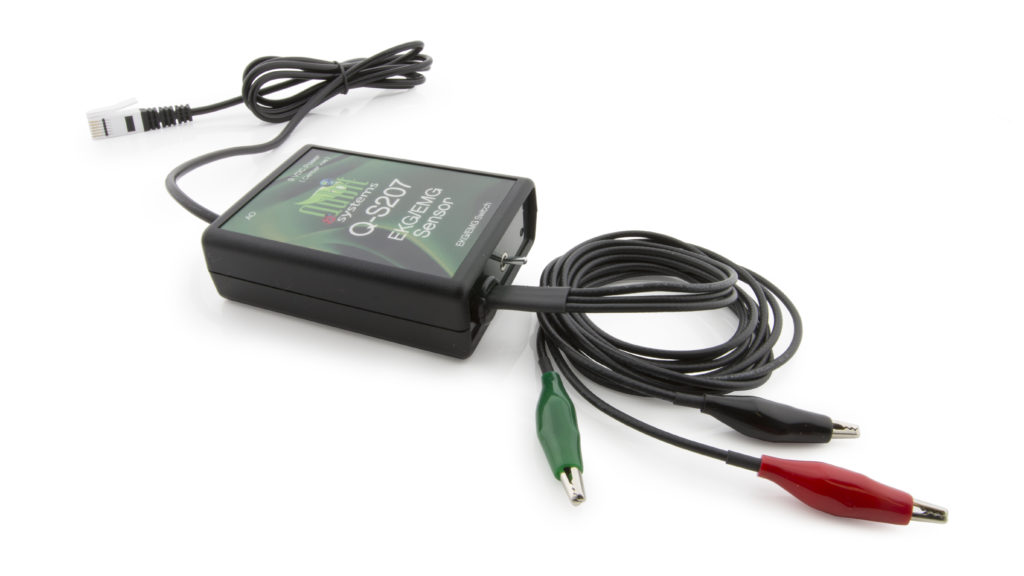
The Q-S207 Qubit EKG/EMG Sensor is designed to measure voltage waveforms produced during muscle contraction (EMGs). In addition, it has a switch setting that can be used for recording EKGs.
Note: This product is designed for educational use and research in an academic setting only. This product is not designed nor recommended for medical use in a clinical setting. It should not be used for clinical monitoring, life support, patient diagnosis, or clinical testing of any kind.
What's Included
- Qubit EKG/EMG Sensor
- Power supply
- One package of 100 disposable electrodes
Note: The full user manual can be found on the included thumb drive and at www.vernier.com/files/manuals/q-s207.qubit-manual.pdf
Compatible Software and Interfaces
Choose a platform below to see its compatibility requirements.LabQuest
Interface LabQuest App LabQuest 3 Full support 1 LabQuest 2 Full support 1 LabQuest Incompatible Compatibility Notes
Computers
Software Interface Logger Pro (discontinued) LabQuest Mini Full support 1 LabQuest 3 Full support 1 LabQuest 2 Full support 1 LabQuest Stream Partial support 1 2 Go!Link Full support 1 LabQuest Full support 1 LabPro Full support 1 Compatibility Notes
Arduino
Software Interface Arduino Vernier Arduino® Interface Shield Full support 1 2 Compatibility Notes
LabVIEW
Software Interface NI LabVIEW SensorDAQ Full support 1 Vernier myDAQ Adapter Full support 1 2 Go!Link Full support 1 2 LabQuest Mini Full support 1 3 LabQuest Stream Full support 3 Compatibility Notes
Using the Product
Note: This sensor will not be automatically identified by Logger Pro or LabQuest App. Use the following instructions for best results.
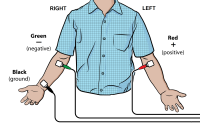
Electrode Placement for EKGs
- Attach three electrode tabs to the subject as shown in Figure 1. Place a single patch on the inside of the right wrist, on the inside of the right upper forearm (distal to the elbow), and on the inside of the left upper forearm (distal to elbow).
- Connect the sensor clips to the electrode tabs as shown in Figure 1. Have the subject sit in a relaxed position in a chair with their forearms resting on their legs or on the arms of the chair.
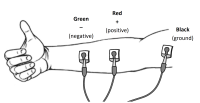
Electrode Placement for EMGs
- To conduct EMGs, the red and green leads need to be placed on electrodes that are attached to the muscle of interest. The two leads are interchangeable for EMGs. Place these leads along the length of the muscle. The black lead serves as a ground. It should not be placed on the muscle of interest. For example, to record from the muscles of the ventral forearm, attach three electrode tabs to the subject as shown in Figure 2. Two electrode tabs should be placed on the ventral forearm, 5 and 10 cm from the medial epicondyle with the ground electrode on the upper arm. Alternatively, the ground electrode can be placed on the wrist of the adjacent arm to minimize movement artifacts.
-
Attach the green and red leads to the electrode tabs on the muscle of interest. Attach the black lead to the ground electrode.
Collecting Data with a Computer
- Connect the power supply to the sensor.
- Connect the sensor to the Vernier data-collection interface.
- Select the appropriate switch setting for the experiment (EKG or EMG).
- Place the electrodes on the subject (EKG) or muscle of interest (EMG) as described above.
- Attach the sensor leads to the electrodes as described above.
- Set up the data-collection program.
- Connect the interface to the computer and start Logger Pro.
- Open the file, "Q‑S207 EKG Setup" (if doing an EKG) or "Q-S207 EMG Setup" (if doing an EMG) from the Qubit folder within the Probes & Sensors folder. Note: If you cannot locate these files in Logger Pro, they can be downloaded at www.vernier.com/q-s207
You are now ready to begin data collection.
Collecting Data with LabQuest App
Note: This sensor works with LabQuest 2 and LabQuest 3; it does not work with the original LabQuest.
- Connect the power supply to the sensor.
- Select the appropriate switch setting for your experiment (EKG or EMG).
- Connect the sensor to LabQuest 2 or newer.
- Choose New from the File menu.
- Place the electrodes on the subject (EKG) or muscle of interest (EMG) and attach the sensor leads as described above.
- Set up LabQuest for data collection.
- On the Meter screen, tap Sensors and then select Sensor Setup.
- Tap the appropriate channel, scroll down the list of sensors, and tap Qubit.
- Select q-S207 EKG/EMG and tap OK.
- Tap OK again to return to the Meter screen.
You are now ready to begin data collection.
Repair Information
If you are having trouble with your Qubit EKG/EMG Sensor, contact Vernier Technical Support at support@vernier.com or call 888-837-6437. Support specialists will work with you to determine if the unit needs to be sent in for repair. At that time, a Return Merchandise Authorization (RMA) number will be issued and instructions will be communicated on how to return the unit for repair.
Accessories/Replacements
| Item | Order Code |
|---|---|
|
ELEC |
Warranty
Warranty information for this product can be found on the Support tab at www.vernier.com/q-s207/#support
General warranty information can be found at www.vernier.com/warranty
Contact Support
Fill out our online support form or call us toll-free at 1-888-837-6437.