Sharing ideas and inspiration for engagement, inclusion, and excellence in STEM
On April 8, 2024, a total solar eclipse will be visible over the United States, starting in Texas. This upcoming eclipse event is an exciting opportunity to incorporate phenomenon-based learning into your instruction and engage your students through inquiry.
Here are some tips for making the most out of this rare occasion as you study it with your students.
1. Never look directly at the sun, except if you are in the path of totality during the few minutes of totality
Look at the sun only through special filters or glasses designed specifically for that purpose. Do not use welding glasses or any other dark glasses, unless they are specifically made for looking at the sun.
View a Total Eclipse with Glasses
Wear the glasses to look at the sun in the time leading up to the total eclipse, take them off just briefly during totality, then put the glasses back on. Totality will last up to four minutes, but the duration will vary by location. The brightness of the sky will dim to a point where planets may start to become visible. As totality ends, you will see what is called the Diamond Ring (the first rays of light from the sun sneaking by the side of the moon). This signals that it is time to put the eclipse glasses back on.
View a Partial Solar Eclipse with Glasses
Much of the US will have partial eclipses during this event. If you are in a region with a partial eclipse, be sure to never look at the sun without eclipse glasses.
Watch an Eclipse with a Solar Projector
Another way to safely watch the eclipse is to make a solar projector or pinhole camera. These systems project the image of the sun on a white screen, and you can safely look at it as much as you like. There are lots of great plans for how to set this up on the internet. Learn how to make a pinhole camera here.
Learn more about eye safety from NASA here.
2. Be prepared
If you are in the region of totality, eclipse day will be a day you will never forget. Plan ahead to make sure you leave lots of time to get to the location you have selected. There will be lots of people traveling to the zone of totality, and there may be major traffic jams.
If you want to sound knowledgeable about the eclipse, familiarize yourself with these terms:
- First Contact
- Second Contact
- Third Contact
- Fourth Contact
- Sunspots
- Corona
- Prominences
- Bailey’s Beads
- Shadow Bands
- Diamond Ring
It takes at least an hour from First Contact, when the moon first starts obscuring the sun, until totality (or the peak of the partial eclipse, if you are not in the zone of totality). You then have the same amount of time after the eclipse until the sun is completely unblocked.
There are many opportunities to investigate this phenomenon: temperature changes as the eclipse proceeds, wind speed variations as totality approaches, sky color changes as totality approaches, animal behavior changes, and more. You and your students will be very excited during totality and the time just before. It is easy to make mistakes in that situation, so practice taking data in a “trial run” before eclipse day.
3. Study the light level
As the moon gradually blocks more and more of the sun, you would certainly expect to see an associated change in the light level. Is there a direct relationship between the reading and the fraction of the sun that is visible?
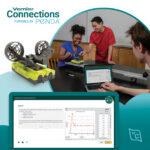
- Visible light level measured with Go Direct® Light and Color Sensor or Light Sensor
- UVA measured with Go Direct Light and Color Sensor or UVA Sensor
- Total solar radiation with Go Direct Pyranometer or Pyranometer
- Light color with Go Direct Light and Color Sensor
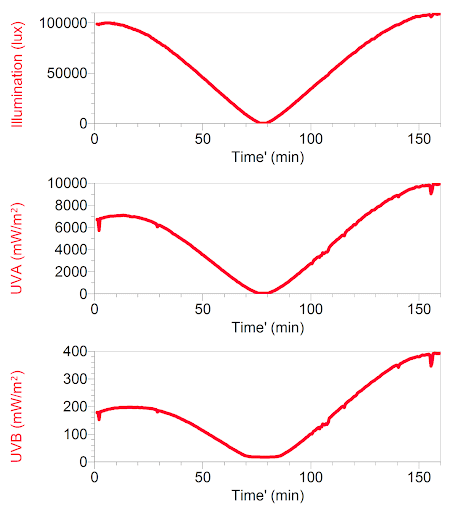
The data above were collected in Oregon during the 2017 total eclipse. The eclipse was at totality at 10:18 am (PDT), and the sun continued to rise throughout the duration of the eclipse. The sun angle was 41 degrees at totality and greater after totality. Levels were higher after the eclipse, especially the UV levels because there is less atmosphere to dissipate the sun’s UV rays as the sun’s angle increases.
4. Investigate emission spectra
You often hear that the sky gets bluer as totality approaches during an eclipse. Is it really true? Use the Go Direct SpectroVis® Plus Spectrometer with the Vernier Spectrophotometer Optical Fiber to collect an emission spectrum every few minutes as the eclipse proceeds and compare.
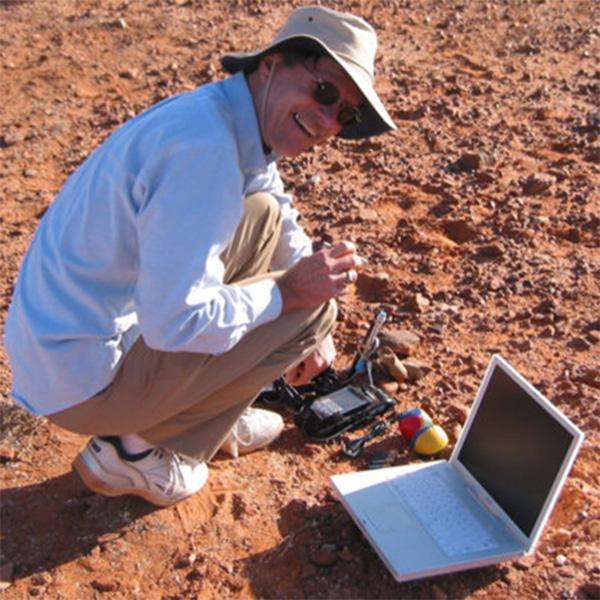
On a (rare) sunny day in March in Oregon, we captured an emission spectrum to demonstrate how to collect emissions spectra during an eclipse. Data were collected by pointing the optical fiber down at a piece of white paper on the ground. By varying the distance from the paper to the optical fiber, you can vary the intensity of the spectrum.
When collecting data with the Go Direct SpectroVis Plus Spectrophotometer, the sample time was changed to 15 ms from the default 50 ms to avoid maxing out the reading at some wavelengths. To do this, choose Set Up Sensors from the Experiment menu. Choose the spectrophotometer, and then change the sample time.
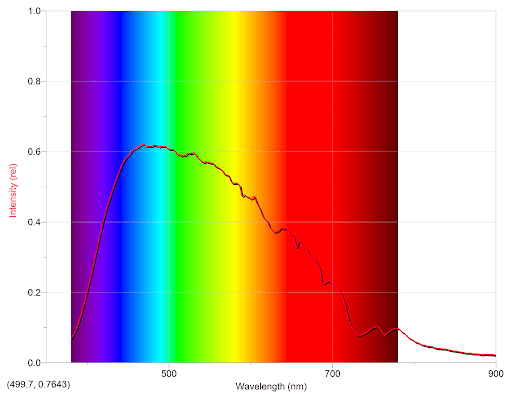
The emission spectrum you see plotted is not a calibrated emission spectrum. That is, because the intensity at wavelength A is double the intensity at wavelength B, we cannot say that the energy delivered at wavelength A is double that delivered at wavelength B. The intensity is really a combination of how much light there is at that wavelength and how sensitive the detector is to that wavelength. If you always use the same instrument, you can compare the relative intensities at different wavelengths. For example, the widely reported phenomenon of the sky turning bluer as the eclipse approaches totality should show up in these spectra. The relative height of the blue intensities should increase as compared to the red wavelength intensities.
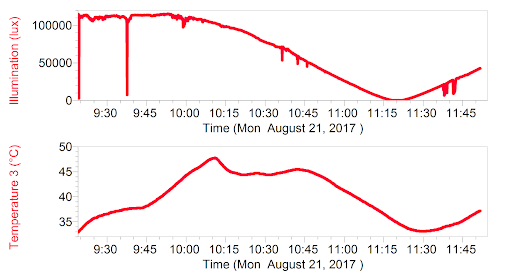
5. Examine temperature changes
Since we are interested in air temperature in this case, a sensor that responds quickly to changes in air temperature would be best. The Go Direct Surface Temperature Sensor or Surface Temperature Sensor will work best for this application.
6. Compare the wind speed
During a total eclipse, you often get changes in temperature and there can be wind speed changes, as well. Use the Go Direct Weather System to measure the wind speed in one direction only. Mount the sensor on a tripod (not included) and orient it so that it points into the wind.
7. Take pictures
First, make sure that you never look through a camera directly at the sun. Don’t even point your camera toward the sun without a solar filter on it. You could damage your eyes.
- Be sure to bring a tripod to steady and mount your camera.
- Except during the brief period of totality, only photograph the sun through a filter designed specifically for that purpose.
- During totality, do not use a filter.
- Use a long focal length lens.
- Consider taking photos or even a video of the excited people around you during the eclipse.
The tremendous variation in light levels before and during the eclipse can make photography challenging, so don’t forget to enjoy the experience. There will be plenty of great photos available after the event from professional photographers. You might want to concentrate on capturing photos or videos of the excited people around you during the eclipse.
Share your data and pictures with us!
We encourage you to collect data and send it to us. It will be interesting to compare data taken by different student/teacher groups in different regions of the country. You can also post data and results on social media with the hashtag #VernierEclipse
Are you ready for the 2024 total solar eclipse? Explore Vernier eclipse resources.
Share this Article
Related Articles


Sign up for our newsletter
Stay in the loop! Beyond Measure delivers monthly updates on the latest news, ideas, and STEM resources from Vernier.