Goniometer User Manual
Order Code: GNM-BTA
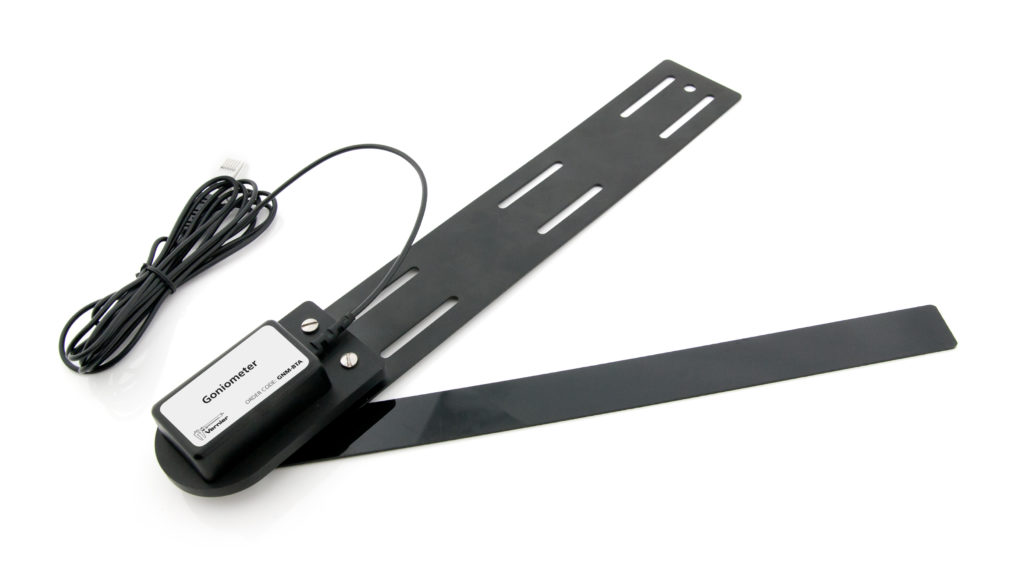
The Goniometer measures the angle of a joint, such as the knee or elbow. Use it to measure the range of motion of a limb during different types of physical activity. A set of elastic straps can be used to secure the sensor to the subject for dynamic measurements of joint angle during different types of physical activity. You can also use it with a Vernier EKG Sensor to measure muscle activity during different phases of limb motion. In addition, the sensor head can be detached from both arms of the sensor for use in STEM and engineering activities.
Note: Vernier products are designed for educational use. Our products are not designed nor are they recommended for any industrial, medical, or commercial process such as life support, patient diagnosis, control of a manufacturing process, or industrial testing of any kind.
What's Included
- Goniometer: joint angle sensor attached to metal stationary arm
- 12-inch flexible joint arm (comes attached to sensor)
- 10-inch flexible joint arm
- 8-inch flexible joint arm
- 24-inch elastic hook and loop straps (2)
- 14-inch elastic hook and loop straps (2)
Compatible Software
Choose a platform below to see its compatibility requirements.LabQuest
Interface LabQuest App LabQuest 3 Full support LabQuest 2 Full support LabQuest Full support Computers
Software Interface Graphical Analysis Graphical Analysis (Web App) Logger Pro (discontinued) Logger Lite (discontinued) LabQuest Mini Full support Full support Full support Full support LabQuest 3 Full support Full support Full support Incompatible LabQuest 2 Full support Full support Full support Full support LabQuest Stream Full support 1 Full support 1 Partial support 2 Full support 1 Go! Link Full support Full support Full support Full support LabQuest Full support Full support Full support Full support LabPro Incompatible Incompatible Full support Full support Compatibility Notes
Chromebook
Software Interface Graphical Analysis (Web App) LabQuest Mini Full support LabQuest 3 Full support LabQuest 2 Full support LabQuest Stream Full support 1 Go! Link Full support LabQuest Full support Compatibility Notes
iOS
Software Interface Graphical Analysis Graphical Analysis GW LabQuest Stream Full support Full support LabQuest 3 Full support 1 Full support 1 LabQuest 2 Full support 1 Full support 1 Compatibility Notes
Android
Software Interface Graphical Analysis Graphical Analysis GW LabQuest Stream Full support Partial support 1 LabQuest 3 Full support 2 Full support 2 LabQuest 2 Full support 2 Full support 2 Compatibility Notes
Arduino
Software Interface Arduino Vernier Arduino® Interface Shield Full support LabVIEW
Software Interface NI LabVIEW SensorDAQ Full support Vernier myDAQ Adapter Full support 1 Go! Link Full support LabQuest Mini Full support LabQuest Stream Full support LabQuest 3 Full support LabQuest 2 Full support LabQuest Full support Compatibility Notes
Texas Instruments
Software Interface EasyData DataMate TI-84 SmartView DataQuest TI-Nspire Software EasyLink Full support 1 Incompatible Full support 2 Full support Full support 2 CBL 2 Full support 3 Full support 3 4 Incompatible Incompatible Incompatible LabPro Full support 3 Full support 3 4 Incompatible Incompatible Incompatible TI-Nspire Lab Cradle Incompatible Incompatible Incompatible Full support Full support Compatibility Notes
Quick Start
- Plug the sensor into the interface (LabQuest 3, LabQuest Mini, etc.).
- Connect the interface to your device.
- If using USB, connect to the USB port on your computer.
- If using Bluetooth® wireless technology, click your interface type and then select your device.
- Prepare for data collection:
- Vernier Graphical Analysis®: Launch the app, if necessary, and click Sensor Data Collection.
- LabQuest® App: Choose New from the File menu.
- The software will identify the sensor and load a default data-collection setup.
- Zero the sensor to report positive and negative joint angles from the subject's starting position. To zero sensors,
- LabQuest Users: Choose Zero from the Sensors menu on the Meter screen.
- Graphical Analysis Users: Click or tap the Angle Meter and choose zero.
You are now ready to collect data.
Need Additional Information?
Visit the following link:
Using the Product
Attaching the Goniometer to a Person
- Select one member of the group to be the test subject. Thread two 24-inch elastic straps through the slots that can be found on the stationary arm of the Goniometer.
- Secure the stationary arm of the Goniometer to the upper leg or arm of the subject using the elastic straps, as shown in Figure 1.
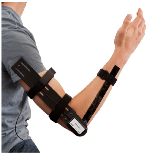
- Make sure the dial on the sensor is centered on the joint being studied. Reposition and secure the Goniometer, if necessary.
- Using a single 14-inch elastic strap, secure the flexible arm of the Goniometer to the foreleg or forearm.
- Verify that the subject can move freely with the Goniometer attached to the limb being studied.
Changing the Flexible Arm of the Goniometer
The Goniometer comes with a set of flexible arms that vary in size. For subjects with smaller limbs, you may want to use one of the smaller joint arms on this sensor. To change the flexible arm, simply loosen and remove the screw that secures the arm to the dial. Select the appropriate joint arm and fasten it to the sensor with the screw provided. Verify that the terminal edge of the joint arm is aligned with the set screw on the side of dial. Reposition the flexible arm of the Goniometer, if necessary.
Helpful Hints
You can easily reverse the reporting direction of the Goniometer using the data-collection software. This is very useful for comparing joint activity from left and right limbs. The instructions for reversing direction are dependent on the data-collection software you are using.
- LabQuest: Tap the angle reading on the Meter screen. Choose Reverse Direction. Select the box for the Goniometer.
- Graphical Analysis: Click or tap the Angle meter and turn on Reverse.
You can easily increase the length of the 14-inch strap if it is too short to comfortably wrap around the foreleg or forearm. Thread the second 14-inch strap through the eyelet of the first strap. Fold the second strap over itself so that the hook and loops lock. This will increase the length of the strap by 8 inches.
Calibrating the Sensor
Optional Calibration Procedure
Calibrating the Goniometer may not be necessary for some activities. If you are evaluating the range of motion of a joint, such as the knee or elbow, then the stored calibration should work well. For dynamic analysis of a joint you may want to calibrate the sensor before attaching it to a subject. The instructions for calibration are dependent on the data-collection software you are using.
Calibrating the Goniometer with LabQuest App
- Choose Calibrate from the Sensors menu. Select the box marked One point calibration. Tap the Calibrate Now button.
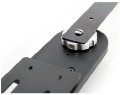
- Rotate the flexible arm of the goniometer until it is positioned 180º from the stationary arm, as shown in Figure 2. Verify that the set screw on the side of the dial is aligned with the silver dot on the baseplate of the sensor.
- Enter 180º for Value 1. Tap Keep, and then tap OK.
Calibrating the Goniometer with Graphical Analysis
- Click the Angle meter and choose Calibrate. Choose One-point calibration from the Calibrate menu.
- Rotate the flexible arm of the Goniometer until it is positioned 180º from the stationary arm, as shown in Figure 2. Verify that the set screw on the side of the dial is aligned with the silver dot on the baseplate of the sensor.
- Enter 180° for the first known value. Click or tap Apply to complete the calibration process.
Specifications
|
Range |
0–340º (or ±170º) |
|
Accuracy |
±3° ±1° (with calibration) |
|
Resolution |
0.12° |
|
Stored Calibration Values |
slope: 90°/V intercept: –45° |
Suggested Experiments
Measure the range of motion of various anatomical joints
Students measure the range of motion of different anatomical joints in this exercise. The knee, elbow, hip, wrist, ankle, and hand can all be measured using the Goniometer. Standard bony landmarks are used to mark the axis of rotation for each joint. As a result, the Goniometer does not need to be attached to the subject for this exercise.
Measure the range of motion of the elbow or knee during physical activity
In this type of activity, the Goniometer is attached to the subject’s arm or leg. The range of motion of the joint is then recorded during physical activity. Standard weight lifting exercises can be used for the leg and arm, such as squats, leg extensions, bicep curls, dips, and triceps extensions. As shown in Figure 3, dynamic range of motion can be studied during running. Dynamic range of motion can also be studied while cycling
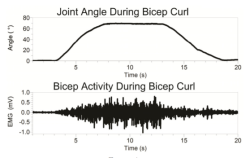
Measure the activity of different muscle groups during limb movement
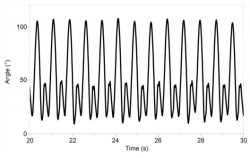
In this type of activity, the Goniometer is used with one or more EKG Sensors to measure the electrical activity of different muscle groups during physical activity. Standard weight lifting exercises can be used for the leg and arm. The bicep curl is an excellent exercise for this lab. As shown in Figure 4, bicep activity increases during flexion and will decrease during extension.
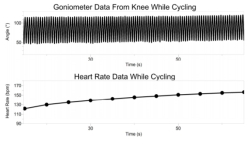
Measure heart rate and dynamic motion of the knee during physical activity
In this type of activity, an Exercise Heart Rate Monitor and the Goniometer are used to measure heart rate and dynamic range of the knee during physical activity. As shown in Figure 5, a standard exercise bike work well for this exercise. Treadmills and rowing machines can also be used in this type of activity.
Care and Maintenance
Do not wrap the cable tightly around the sensor for storage. Repeatedly doing so can irreparably damage the wires and is not covered under warranty.
How the Sensor Works
The flexible arm of the Goniometer is attached to a metal dialon the sensor head that can rotate 360º. A magnet inside the sensor rotates with this dial. A magnetic encoder is used to report the position of the magnet. As the magnet rotates, the encoder produces a voltage that is converted into the position (angle) of the dial by the data-collection software.
Troubleshooting
For troubleshooting and FAQs, see www.vernier.com/til/2886
Repair Information
If you have watched the related product video(s), followed the troubleshooting steps, and are still having trouble with your Goniometer, contact Vernier Technical Support at support@vernier.com or call 888-837-6437. Support specialists will work with you to determine if the unit needs to be sent in for repair. At that time, a Return Merchandise Authorization (RMA) number will be issued and instructions will be communicated on how to return the unit for repair.
Accessories/Replacements
| Item | Order Code |
|---|---|
|
GNM-STRAPS |
|
|
GNM-ARMS |
Warranty
Warranty information for this product can be found on the Support tab at www.vernier.com/gnm-bta/#support
General warranty information can be found at www.vernier.com/warranty
Disposal
When disposing of this electronic product, do not treat it as household waste. Its disposal is subject to regulations that vary by country and region. This item should be given to an applicable collection point for the recycling of electrical and electronic equipment. By ensuring that this product is disposed of correctly, you help prevent potential negative consequences on human health or on the environment. The recycling of materials will help to conserve natural resources. For more detailed information about recycling this product, contact your local city office or your disposal service.
Contact Support
Fill out our online support form or call us toll-free at 1-888-837-6437.