Force Plate User Manual
Order Code: FP-BTA
Designed for much higher forces than the Dual-Range Force Sensor, the Force Plate can measure the forces developed during stepping, jumping, and other human-scale actions. For example, you can perform the following kinds of experiments:
- Observe the change in normal force during an elevator ride.
- Measure the impulse delivered by the floor during a jump.
- Measure the reaction force as a student leans against a wall.
Note: Vernier products are designed for educational use. Our products are not designed nor are they recommended for any industrial, medical, or commercial process such as life support, patient diagnosis, control of a manufacturing process, or industrial testing of any kind.
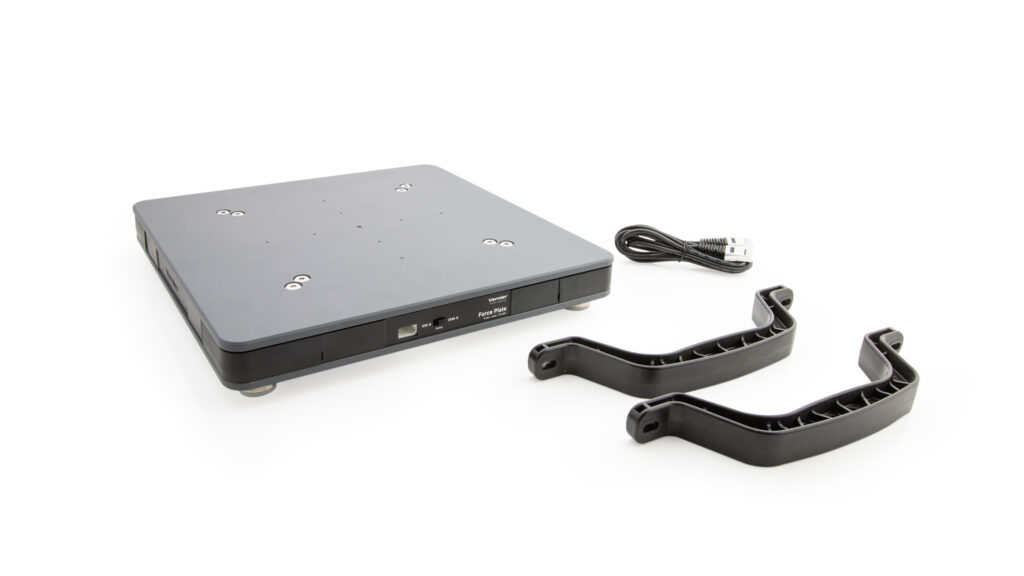
What's Included
- Force Plate
- Long BTA to BTA Cable
- (4) Feet
- One pair of handles
- (4) Thumbscrews for securing handles
Note: Handles can be attached the back side of the force plate. Do not step on the force plate when the handles are attached.
Compatible Software
Choose a platform below to see its compatibility requirements.LabQuest
Interface LabQuest App LabQuest 3 Full support LabQuest 2 Full support LabQuest Full support Computers
Software Interface Graphical Analysis Graphical Analysis (Web App) Logger Pro (discontinued) Logger Lite (discontinued) LabQuest Mini Full support Full support Full support Full support LabQuest 3 Full support Full support Full support Incompatible LabQuest 2 Full support Full support Full support Full support LabQuest Stream Full support 1 Full support 1 Partial support 2 Full support 1 Go! Link Partial support 3 Partial support 3 Partial support 3 Partial support 3 LabQuest Full support Full support Full support Full support LabPro Incompatible Incompatible Full support Full support Compatibility Notes
Chromebook
Software Interface Graphical Analysis (Web App) LabQuest Mini Full support LabQuest 3 Full support LabQuest 2 Full support LabQuest Stream Full support 1 Go! Link Partial support 2 LabQuest Full support Compatibility Notes
iOS
Software Interface Graphical Analysis Graphical Analysis GW LabQuest Stream Full support Full support LabQuest 3 Full support 1 Full support 1 LabQuest 2 Full support 1 Full support 1 Compatibility Notes
Android
Software Interface Graphical Analysis Graphical Analysis GW LabQuest Stream Full support Full support LabQuest 3 Full support 1 Full support 1 LabQuest 2 Full support 1 Full support 1 Compatibility Notes
Arduino
Software Interface Arduino Vernier Arduino® Interface Shield Full support LabVIEW
Software Interface NI LabVIEW SensorDAQ Full support Vernier myDAQ Adapter Full support 1 Go! Link Partial support 2 LabQuest Mini Full support LabQuest Stream Full support LabQuest 3 Full support LabQuest 2 Full support LabQuest Full support Compatibility Notes
Texas Instruments
Software Interface EasyData DataMate TI-84 SmartView DataQuest TI-Nspire Software EasyLink Partial support 1 2 Incompatible Partial support 2 3 Partial support 2 Partial support 2 3 CBL 2 Full support 4 Full support 4 5 Incompatible Incompatible Incompatible LabPro Full support 4 Full support 4 5 Incompatible Incompatible Incompatible TI-Nspire Lab Cradle Incompatible Incompatible Incompatible Full support Full support Compatibility Notes
Quick Start
- Plug the sensor into the interface (LabQuest 3, LabQuest Mini, etc.).
- Connect the interface to your device.
- If using USB, connect to the USB port on your computer.
- If using Bluetooth® wireless technology, click your interface type and then select your device.
- Prepare for data collection:
- Vernier Graphical Analysis®: Launch the app, if necessary, and click Sensor Data Collection.
- LabQuest® App: Choose New from the File menu.
The software will identify the sensor and load a default data-collection setup. You are now ready to collect data.
Need Additional Information?
Visit the following link:
Using the Product
Zeroing the Sensor
In some situations you may want to zero the Force Plate, because changing the physical orientation of the sensor will change the reading when no force is applied. After you have set up your experiment, use your data-collection software to zero the sensor. Also, in the case of experiments involving large impact forces, you may need to zero the reading after one impact has taken place.
The Two Switch Settings – Resolution and Range
The Force Plate has a range switch located on the side of the plate, next to the cable port. As with any instrument, there is a trade-off between resolution (the smallest force that can be measured) and the range of forces that can be measured. In general, you should use the 850 N range if you can. If the forces exceed 850 N, you will need to use the 3500 N range. In normal use, the resolution with the different switch settings when used with a LabQuest will be 1.0 N for the –350/+3500 N range and 0.3 N for the –85/+850 N range.
The Handles
The Force Plate includes two handles and four screws. You can attach the handles to the back side of the plate using the threaded holes. Do not step on the Force Plate when the handles are attached.
With handles in place, you can support the unit by hand for pushing on a wall or other large object.
The force plate can also be hung on the wall using the cutout on the back and a sturdy wall attachment. This can be a useful configuration for measuring horizontal reaction forces of a student standing on a ladder, for example.
Videos
Calibrating the Sensor
Optional Calibration Procedure
For most experiments, you do not have to calibrate the Force Plate. A stored calibration is used when the software is started. Select the desired range of the sensor, and then start the data-collection program.
If you want to improve the calibration, it is easy to recalibrate following the same procedure used in calibrating most Vernier probes—a two-point calibration. One point is your zero, with no force applied to the sensor. Set the Force Plate on a level surface. Select the calibration option of the program you are using and remove all force from the Force Plate. Enter 0 (zero) as the first known intensity. Now apply a known force to the plate. The easiest way to do this is to put an object of known weight centered on the plate. For the best results, take care to accurately center the weight on the Force Plate. The weight should be at least 25% of the range used for the plate (212.5 or 875 N); for example, exercise weights could be used. Enter the weight of the mass (Note: 1 kg weighs 9.8 N). Do not exceed the selected range setting during the calibration.
Calibrations are usually retained only for the current session. Restarting the software, opening a new file, or choosing New from the File menu will reset the calibration to the default calibration. To retain calibrations across sessions, consult the instructions or help files appropriate to your software. See also www.vernier.com/til/4011/
Specifications
|
Force range |
–350 to +3500 N |
|
Maximum non-damaging force |
4500 N (1000 lb) compression |
|
Resolution |
1.0 N or 0.3 N |
|
Dimensions |
31.5 cm x 31.5 cm x 3.5 cm |
|
Calibration function |
|
Care and Maintenance
Do not wrap the cable tightly around the Force Plate for storage. Repeatedly doing so can irreparably damage the wires and is not covered under warranty.
Suggested Experiments
- Analyze a crouched jump. Start with knees bent, hands on hips. Do NOT lower your body further; jump up only. Do not move your arms. This very artificial jump is easier to analyze than a natural jump.
- Use the impulse of the force to find the change in momentum; find the jumper’s velocity at take-off to estimate the jump height.
- Use the flight time and kinematics to find the jump height.
- From the force vs. time graph, determine an acceleration vs. time graph. Integrate to find velocity and position vs. time graphs. Construct a plot of force vs. position, and use that to determine the work done on the jumper’s center of mass by the floor. Since that work shows up as kinetic energy, use the energy to find the velocity at take-off.
- Repeat the above analysis for a natural jump, beginning with standing straight, crouching down, and then jumping. You will be able to jump higher this way, but the analysis will be more complex.
- Investigate the forces involved during the technique known as “unweighting” during ski or snowboard turns. Can you reduce your apparent weight?
- Take the Force Plate on an elevator ride. Stand on the Force Plate, and record the force of the elevator floor on your feet as a function of time. Explain. Can you determine the speed of the elevator from the data?
References
- R. Cross, “Standing, Walking, Running, and Jumping on a Force Plate,” Am. J. Phys, 67(4), 304-309 (1999).
- N.P. Linthorne, “Analysis of Standing Vertical Jumps Using a Force Platform,” Am. J. Phys. 69(11), 1198-1204 (2001).
- Haugland, “Physics Measurements for Sports,” Phys. Teach. 39. 350–353 (Sept. 2001).
Troubleshooting
For troubleshooting and FAQs, see www.vernier.com/til/1416
Repair Information
If you have watched the related product video(s), followed the troubleshooting steps, and are still having trouble with your Vernier Force Plate, contact Vernier Technical Support at support@vernier.com or call 888-837-6437. Support specialists will work with you to determine if the unit needs to be sent in for repair. At that time, a Return Merchandise Authorization (RMA) number will be issued and instructions will be communicated on how to return the unit for repair.
Accessories/Replacements
| Item | Order Code |
|---|---|
|
FP-HAN |
Warranty
Warranty information for this product can be found on the Support tab at www.vernier.com/FP-BTA/#support
General warranty information can be found at www.vernier.com/warranty
Contact Support
Fill out our online support form or call us toll-free at 1-888-837-6437.