Turbidity Sensor User Manual
Order Code: TRB-BTA
Turbidity is a measure of water’s lack of clarity and is an important indicator of water quality. Water with high turbidity is cloudy, while water with low turbidity is clear. The cloudiness is produced by light reflecting off particles in the water; therefore, the more particles in the water, the higher the turbidity.
Note: Vernier products are designed for educational use. Our products are not designed nor are they recommended for any industrial, medical, or commercial process such as life support, patient diagnosis, control of a manufacturing process, or industrial testing of any kind.
What's Included
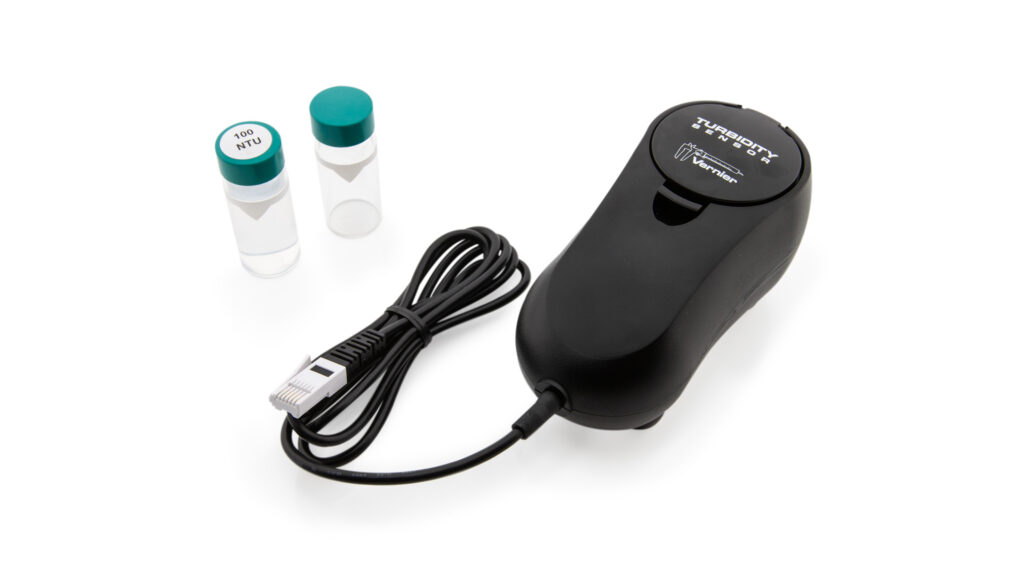
- Turbidity Sensor
- Turbidity Accessories Kit (includes one empty cuvette and one cuvette containing 100 NTU standard)
Compatible Software
Choose a platform below to see its compatibility requirements.LabQuest
Interface LabQuest App LabQuest 3 Full support LabQuest 2 Full support LabQuest Full support Computers
Software Interface Graphical Analysis Graphical Analysis (Web App) Logger Pro (discontinued) Logger Lite (discontinued) LabQuest Mini Full support Full support Full support Full support LabQuest 3 Full support Full support Full support Incompatible LabQuest 2 Full support Full support Full support Full support LabQuest Stream Full support 1 Full support 1 Partial support 2 Full support 1 Go!Link Full support Full support Full support Full support LabQuest Full support Full support Full support Full support LabPro Incompatible Incompatible Full support Full support Compatibility Notes
Chromebook
Software Interface Graphical Analysis (Web App) LabQuest Mini Full support LabQuest 3 Full support LabQuest 2 Full support LabQuest Stream Full support 1 Go!Link Full support LabQuest Full support Compatibility Notes
iOS
Software Interface Graphical Analysis Graphical Analysis GW LabQuest Stream Full support Full support LabQuest 3 Full support 1 Full support 1 LabQuest 2 Full support 1 Full support 1 Compatibility Notes
Android
Software Interface Graphical Analysis Graphical Analysis GW LabQuest Stream Full support Partial support 1 LabQuest 3 Full support 2 Full support 2 LabQuest 2 Full support 2 Full support 2 Compatibility Notes
Arduino
Software Interface Arduino Vernier Arduino® Interface Shield Full support LabVIEW
Software Interface NI LabVIEW SensorDAQ Full support Vernier myDAQ Adapter Full support 1 Go!Link Full support LabQuest Mini Full support LabQuest Stream Full support LabQuest 3 Full support LabQuest 2 Full support LabQuest Full support Compatibility Notes
Texas Instruments
Software Interface EasyData DataMate TI-84 SmartView DataQuest TI-Nspire Software EasyLink Full support 1 Incompatible Full support 2 Full support Full support 2 CBL 2 Full support 3 Full support 3 4 Incompatible Incompatible Incompatible LabPro Full support 3 Full support 3 4 Incompatible Incompatible Incompatible TI-Nspire Lab Cradle Incompatible Incompatible Incompatible Full support Full support Compatibility Notes
Quick Start
- Plug the sensor into the interface (LabQuest 3, LabQuest Mini, etc.).
- Connect the interface to your device.
- If using USB, connect to the USB port on your computer.
- If using Bluetooth® wireless technology, click your interface type and then select your device.
- Prepare for data collection:
- Vernier Graphical Analysis®: Launch the app, if necessary, and click Sensor Data Collection.
- LabQuest® App: Choose New from the File menu.
The software will identify the sensor and load a default data-collection setup. You are now ready to collect data.
Need Additional Information?
Visit the following link:
Using the Product
Collecting Data
- Warm up the sensor by connecting it to the software for at least five minutes prior to use.
- Gently invert the sample water to mix in any particles that may have settled to the bottom. Important: Do not shake the sample. Shaking will introduce tiny air bubbles that will affect turbidity.
- Empty the distilled water from the cuvette and rinse it with sample water. Fill the cuvette to the top of the line with sample water.
- Screw the lid on the cuvette. Wipe the outside with a soft, lint-free cloth or tissue.
- Hold the cuvette by the lid and place it into the Turbidity Sensor. Make sure the marks are aligned. Close the lid.
- Monitor the turbidity value. Note: Particles in the water will settle over time and show a slow downward drift in turbidity readings; therefore, take your readings soon after placing the cuvette in the sensor.
Videos
Calibrating the Sensor
For many experiments, calibrating the Turbidity Sensor is not required. However, periodic calibration will provide the most accurate results. To calibrate:
- Warm up the sensor by connecting it to the software for at least five minutes prior to use.
- Enter the calibration routine for your data-collection program.
- First Calibration Point: Obtain the cuvette containing the Turbidity Standard (100 NTU) and gently invert it four times to mix in any particles that may have settled to the bottom. Important: Do not shake the standard. Shaking will introduce tiny air bubbles that will affect turbidity readings.
- Wipe the outside of the cuvette with a soft, lint-free cloth or tissue.
- Holding the standard by the lid, place it in the Turbidity Sensor. Align the mark on the cuvette with the mark on the Turbidity Sensor. Important: These marks must be aligned whenever a reading is taken.
- Close the lid.
- Enter 100 as the value in NTU.
- Remove the standard.
- Second Calibration point: Prepare a blank by rinsing the empty cuvette with distilled water, then filling it to the top of the line with distilled water. Important: The bottom of the meniscus should be at the top of the line for every measurement throughout this test. This volume level is critical to obtain correct turbidity values.
- Screw the lid on the cuvette. Wipe the outside with a soft, lint-free cloth or tissue.
- Holding the cuvette by the lid, place it into the slot of the Turbidity Sensor. Makec sure that the marks are aligned. Close the lid.
- Enter 0 as the value in NTU. You are now ready to collect turbidity data.
- Store the calibration by following the directions under the Storage tab (LabQuest only).
- You are now ready to collect turbidity data.
Specific instructions for each software platform can be found here:.
- For instructions on calibration using LabQuest App, see www.vernier.com/til/3394
- For instructions on calibration using Graphical Analysis with a Chromebook, see www.vernier.com/til/3631
- For instructions on calibration using Graphical Analysis with an iOS or Android device, see www.vernier.com/til/3630
Specifications
|
Range: |
0 to 200 NTU |
|
Resolution: |
0.25 NTU |
|
Accuracy: |
±2 NTU for readings under 25 NTU ±5 of readings above 25 NTU |
|
LED wavelength: |
890 nm |
Care and Maintenance
When you have finished using the Turbidity Sensor, simply rinse the sample cuvette with distilled water. It is important to take good care of your cuvette and the Turbidity Standard. Their integrity is essential for accurate turbidity measurements.
Do not wrap the cable tightly around the sensor for storage. Repeatedly doing so can irreparably damage the wires and is not covered under warranty.
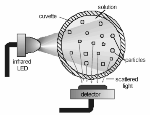
How the Sensor Works
Infrared light is directed at a cuvette containing the sample water. This light is scattered in all directions off the particles in the water. A detector, consisting of a photodiode, is placed at a 90° angle to the light source. The amount of light being scattered directly into the detector is measured in volts and translated into turbidity units. This style of turbidity sensor is called a nephelometer. A standard is used to calibrate the Turbidity Sensor in units of NTU, Nephelometric Turbidity Units.
Troubleshooting
For troubleshooting and FAQs, see www.vernier.com/til/1388
Repair Information
If you have watched the related product video(s), followed the troubleshooting steps, and are still having trouble with your Turbidity Sensor, contact Vernier Technical Support at support@vernier.com or call 888-837-6437. Support specialists will work with you to determine if the unit needs to be sent in for repair. At that time, a Return Merchandise Authorization (RMA) number will be issued and instructions will be communicated on how to return the unit for repair.
Accessories/Replacements
| Item | Order Code |
|---|---|
|
TRB-BOT |
|
| Turbidity Accessories Replacement Kit |
TRB-ACC |
Warranty
Warranty information for this product can be found on the Support tab at www.vernier.com/trb-bta/#support
General warranty information can be found at www.vernier.com/warranty
Disposal
When disposing of this electronic product, do not treat it as household waste. Its disposal is subject to regulations that vary by country and region. This item should be given to an applicable collection point for the recycling of electrical and electronic equipment. By ensuring that this product is disposed of correctly, you help prevent potential negative consequences on human health or on the environment. The recycling of materials will help to conserve natural resources. For more detailed information about recycling this product, contact your local city office or your disposal service.
 The symbol, shown here, indicates that this product must not be disposed of in a standard waste container.
Contact Support
Fill out our online support form or call us toll-free at 1-888-837-6437.